Managing Tasks
Introduction
Tasks are the building blocks of projects in Trackr. They represent individual work items that need to be completed to achieve project goals. This guide covers everything you need to know about creating, managing, and tracking tasks.
Understanding Task Board
Accessing Task Board
Navigation:
- Open any project from the Projects page
- Look for the Task Board button in the top action bar
- Click to open the Kanban-style task board
Alternative Access:
- From project detail page, click the Task Board icon
- Available in the top right toolbar
- Blue icon with board layout symbol
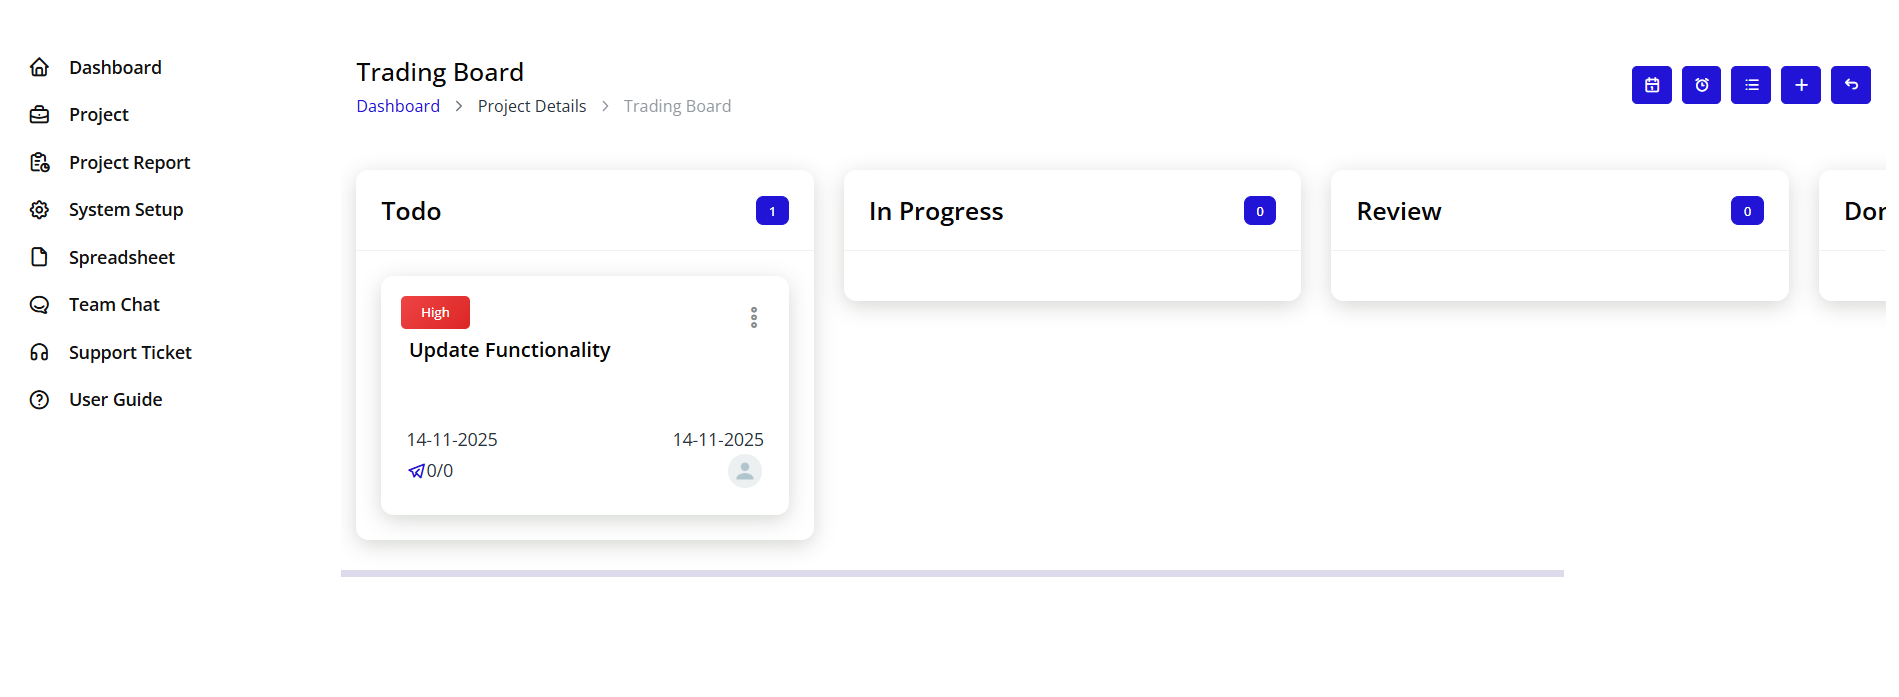
Task Board Interface
Board Layout
The Task Board uses a Kanban methodology with columns representing different task stages:
Default Columns:
-
Todo (Blue header)
- Tasks waiting to be started
- Newly created tasks default here
- Backlog items
-
In Progress (Gray/Dark header)
- Tasks actively being worked on
- Current sprint items
- Work in progress
-
Review (Blue header)
- Tasks completed and awaiting review
- Quality check stage
- Pending approval
-
Done (Green header)
- Completed tasks
- Approved deliverables
- Archived completed work
Note: Task stages can be customized in System Setup
Board Features
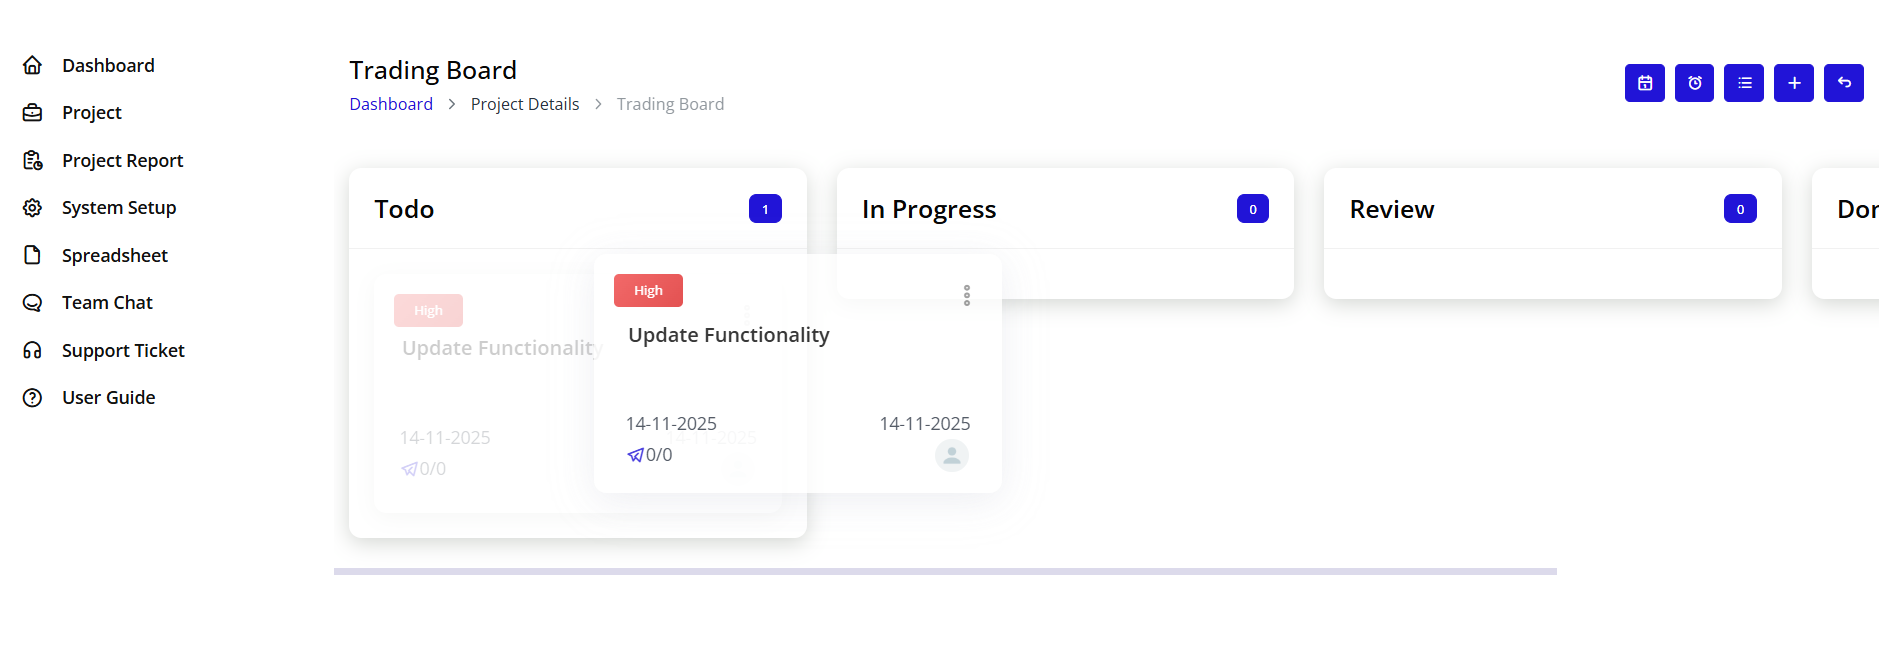
Drag and Drop:
- Click and hold any task card
- Drag to different column
- Drop to change task status
- Status updates automatically
Visual Organization:
- Color-coded columns
- Clear stage separation
- Easy progress tracking
- Quick status identification
Creating Tasks
Step 1: Access Task Creation

From Task Board:
- Click on the Task Board view
- Look for the + Add Task button within any column
- Or use the main Create Task button in the top right
From Project Details:
- Navigate to project detail page
- Scroll to tasks section
- Click + Create Task button
Step 2: Fill Task Details Form
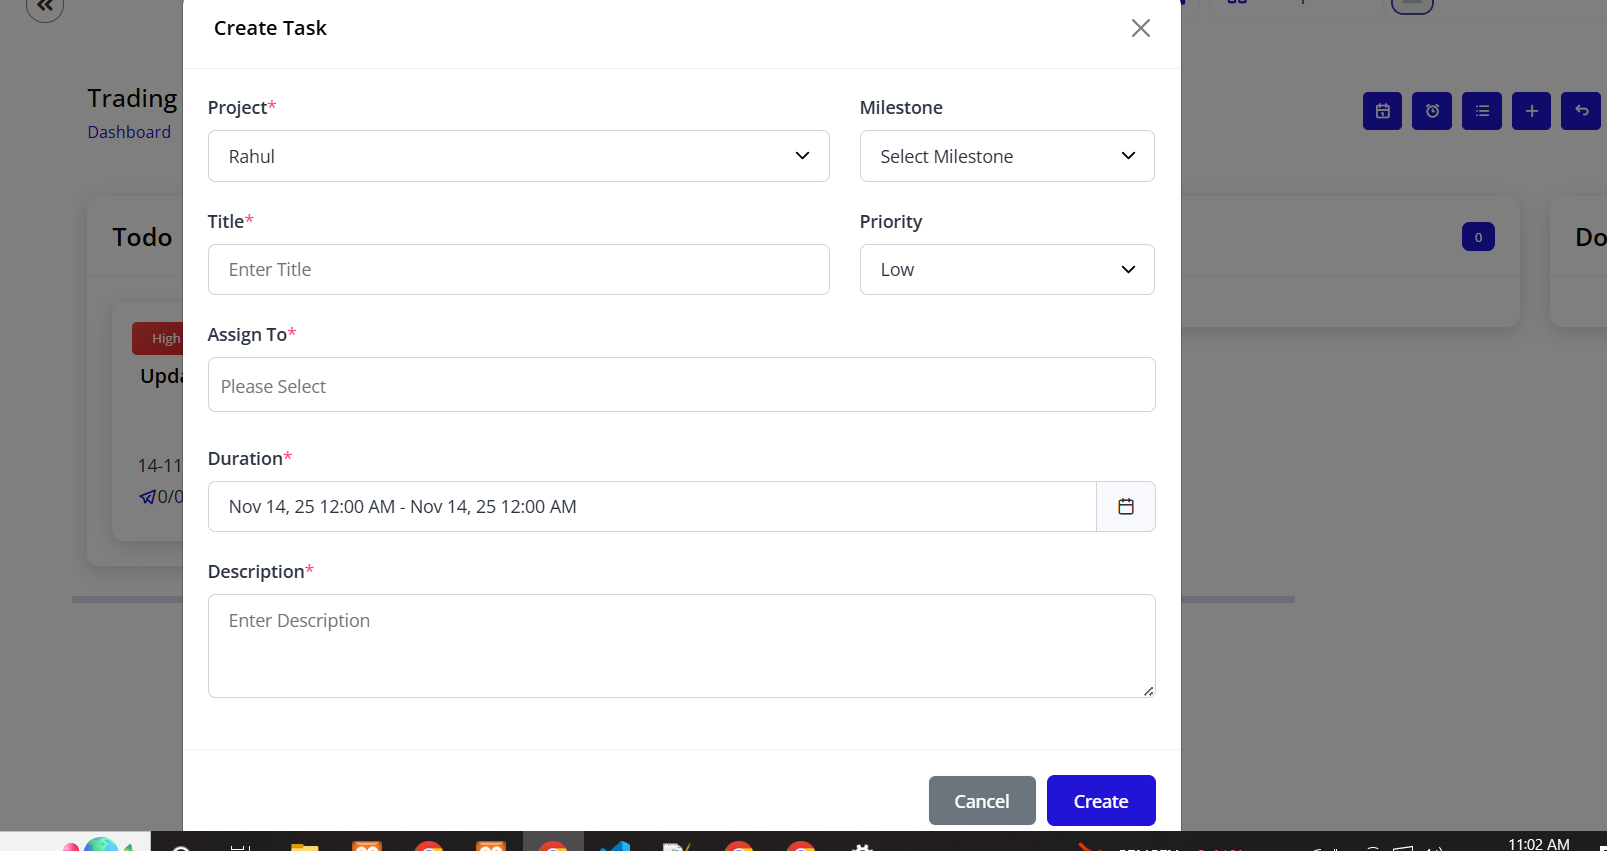
The "Create Task" modal appears with the following fields:
Required Fields (marked with *)
1. Project*
- Type: Dropdown selection
- Example: "Rahul"
- Purpose: Select which project this task belongs to
- Pre-filled: If creating from project page
- Function: Associates task with specific project
2. Title*
- Label: "Title*"
- Placeholder: "Enter Title"
- Type: Single-line text input
- Purpose: Brief task description
- Best Practice: Use action verbs (e.g., "Review shipping documents", "Approve trade agreement")
- Character Limit: Typically 100-150 characters
3. Assign To*
- Label: "Assign To*"
- Type: Dropdown/multi-select
- Placeholder: "Please Select"
- Purpose: Assign task to team member(s)
- Options: Shows all project team members
- Multiple Selection: Can assign to multiple users if needed
4. Duration*
- Label: "Duration*"
- Type: Date-time range picker
- Format: "Nov 13, 25 12:00 AM - Nov 13, 25 12:00 AM"
- Purpose: Set task start and end date/time
- Features:
- Calendar picker for dates
- Time selector for specific hours
- Duration automatically calculated
- Timezone aware
5. Description*
- Label: "Description*"
- Type: Multi-line text area
- Placeholder: "Enter Description"
- Purpose: Detailed task information
- Best Practice Include:
- What needs to be done
- Expected deliverables
- Acceptance criteria
- Special instructions
- Links to resources
Optional Fields
6. Milestone
- Label: "Milestone"
- Type: Dropdown selection
- Placeholder: "Select Milestone"
- Purpose: Link task to project milestone
- Function: Groups related tasks under major project phases
- Note: Milestones must be created first in project settings
7. Priority
- Label: "Priority"
- Type: Dropdown selection
- Default: "Low"
- Options:
- Low (default)
- Medium
- High
- Critical/Urgent
- Purpose: Indicates task importance and urgency
- Visual Indicator: Different colors on task cards
Step 3: Submit Task
Action Buttons:
Cancel Button:
- Color: Gray
- Position: Bottom left
- Function: Close form without saving
- Behavior: All entered data is discarded
- Confirmation: May ask "Discard changes?" if data entered
Create Button:
- Color: Blue
- Position: Bottom right
- Function: Create and save the task
- Validation: Checks all required fields are filled
- Success: Task appears on board in appropriate column
- Notification: Team members notified if configured
Task Creation Flow:
- Fill all required fields (marked with *)
- Add optional information as needed
- Click "Create" button
- System validates form
- Task is created
- Task appears in "Todo" column (default)
- Assigned users receive notification
- Task ID generated automatically
Task Card Details
Understanding Task Cards
Each task card on the board displays essential information:
Card Header
Priority Indicator:
- Location: Small colored strip at top
- Colors:
- Red: High priority
- Orange: Medium priority
- Blue: Low priority
- Green: Normal/default
Task Title:
- Display: Bold text at top of card
- Format: Truncated if too long
- Click Action: Opens task detail view
Card Body
Assignee Information:
- Avatar: Circle with initials or photo
- Name: Full name of assigned user
- Multiple Assignees: Shows multiple avatars if task assigned to multiple people
Due Date:
- Icon: Calendar icon
- Format: "Due: DD-MM-YYYY"
- Color Coding:
- Red: Overdue
- Orange: Due soon (within 2 days)
- Black: Normal
Task Metadata:
- Comments Count: Speech bubble icon with number
- Attachments Count: Paperclip icon with number
- Checklist Progress: Shows X/Y completed items
Card Footer
Quick Actions:
- Edit Icon: Quick edit task
- Delete Icon: Remove task
- More Options: Additional actions menu
Managing Task Status
Changing Task Status
Method 1: Drag and Drop (Recommended)
- Click and hold task card
- Drag to desired column
- Drop in new column
- Status updates automatically
- Team receives notification
Method 2: Edit Task
- Click on task card to open details
- Find status dropdown
- Select new status
- Save changes
Method 3: Quick Status Menu
- Right-click on task card
- Select "Change Status"
- Choose from available statuses
- Confirm change
Task Status Workflow
Typical Workflow:
Todo → In Progress → Review → Done
Alternative Workflows:
Todo → In Progress → OnHold → In Progress → Done
Todo → In Progress → Done (skip review)
Status Descriptions:
Todo:
- Task created but not started
- Waiting in backlog
- Not yet assigned or planning phase
- No work completed
In Progress:
- Active work happening
- Assignee working on task
- Resources allocated
- Progress being made
Review:
- Work completed
- Awaiting quality check
- Pending approval
- Under evaluation
Done:
- Task completed
- Approved and accepted
- Deliverables submitted
- Closed
Task Details View
Accessing Task Details
Opening Task Details:
- Click anywhere on task card
- Or click task title from list view
- Task detail page or modal opens
Task Detail Page Components
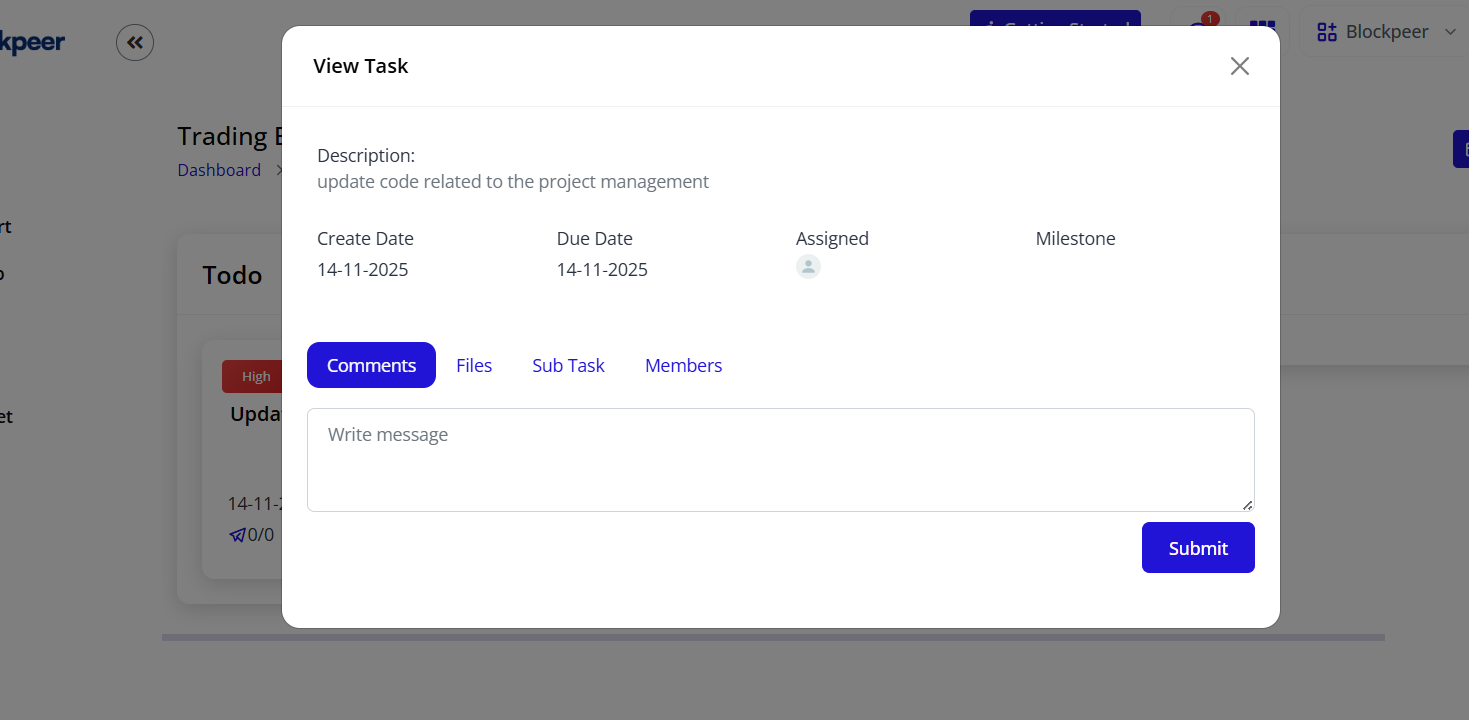
Overview Section
Task Information Display:
- Task Title: Large, editable heading
- Status Badge: Current status with color coding
- Priority Level: Visual indicator
- Created Date: When task was created
- Last Updated: Recent modification timestamp
Quick Edit:
- Click pencil icon next to title
- Inline editing for quick updates
- Save changes immediately
Description Panel
Full Description:
- Complete task details
- Formatted text support
- Links and attachments
- Edit mode available
Description Features:
- Rich Text: Bold, italic, lists
- Mentions: @mention team members
- Links: Hyperlinks to resources
- Formatting: Proper spacing and structure
Assignment Panel
Assigned Users:
- List of all assigned team members
- Avatar and full name
- Email address
- Assignment date
- Remove/add assignees
Adding Assignees:
- Click "+ Add Assignee" button
- Search for team member
- Select from dropdown
- Confirm addition
- User receives notification
Removing Assignees:
- Click X next to assignee name
- Confirm removal
- User notified of removal
Timeline Panel
Date Information:
- Start Date: When task begins
- Due Date: Deadline
- Duration: Total time allocated
- Time Remaining: Days/hours until due
- Overdue By: If past deadline
Updating Timeline:
- Click on date fields
- Select new dates from calendar
- Save changes
- Team notified of changes
Milestone Association
Linked Milestone:
- Shows associated milestone name
- Click to view milestone details
- Progress contribution indicator
Changing Milestone:
- Click dropdown
- Select different milestone
- Or remove milestone association
- Save changes
Priority Management
Priority Indicator:
- Visual badge showing priority level
- Color-coded for quick identification
Changing Priority:
- Click priority dropdown
- Select: Low, Medium, High, Critical
- Save changes
- Card updates on board
Task Comments and Collaboration
Comments Section

Comment Features:
- Real-time discussion thread
- @mention team members
- File attachments
- Edit/delete own comments
- Timestamp on each comment
Adding Comments
To Add a Comment:
- Scroll to comments section
- Click in comment text box
- Type your message
- Use @ to mention users
- Attach files if needed (paperclip icon)
- Click "Post" or "Comment" button
Comment Best Practices:
- Be clear and specific
- Mention relevant team members
- Include updates on progress
- Ask questions when blocked
- Document decisions made
- Provide constructive feedback
Comment Notifications
Users Receive Notifications When:
- Mentioned in comment (@username)
- Someone comments on their task
- Reply to their comment
- Status changes related to comment
Notification Methods:
- In-app notifications
- Email notifications (if enabled)
- Mobile push (if app installed)
Task Attachments and Files
Managing Task Files
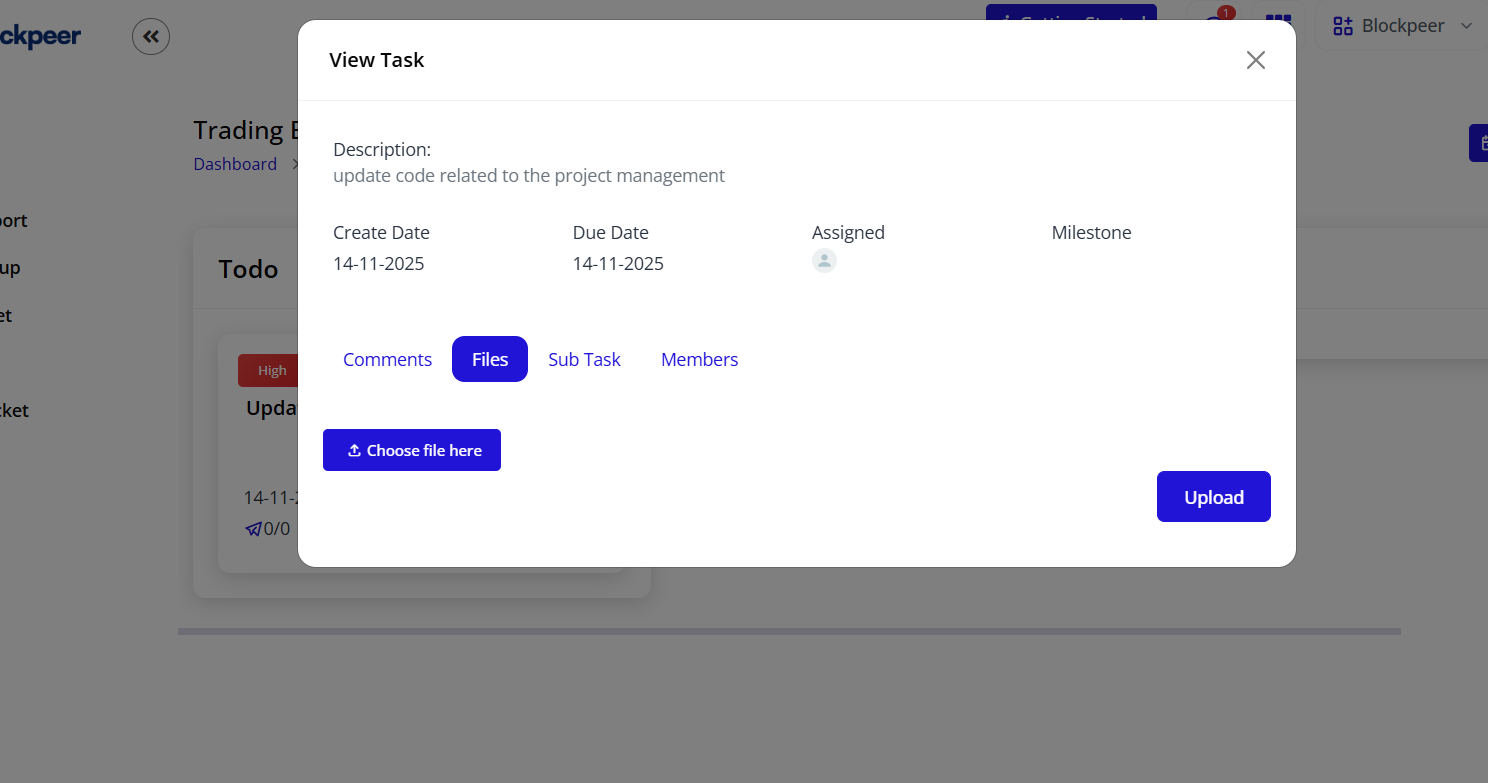
File Management Features:
- Upload multiple files
- Drag and drop support
- Preview documents
- Download files
- Delete attachments
- Version control
Uploading Files
Method 1: Click to Upload
- Click "Attach File" or paperclip icon
- Browse file system
- Select file(s)
- Upload begins automatically
- File appears in attachments list
Method 2: Drag and Drop
- Find file in file explorer
- Drag file to task detail page
- Drop in designated area
- Upload begins automatically
Supported File Types:
- Documents: PDF, DOC, DOCX, XLS, XLSX
- Images: JPG, PNG, GIF
- Archives: ZIP, RAR
- Others: CSV, TXT
File Size Limits:
- Maximum per file: 25MB (typical)
- Total per task: 100MB (typical)
- Contact admin for increases
Viewing Files
File List Display:
- File name
- File type icon
- File size
- Upload date
- Uploaded by user
File Actions:
- Preview: Click to view
- Download: Save to computer
- Delete: Remove from task
- Share: Copy file link
Task Checklists and Subtasks
Creating Checklists
Purpose:
- Break down complex tasks
- Track completion progress
- Ensure nothing is missed
- Provide clear steps
Adding Checklist Items
To Create Checklist:
- Open task details
- Find "Checklist" section
- Click "+ Add Item" or "+ Add Checklist"
- Enter checklist name
- Add items one by one
Checklist Item Fields:
- Item description (required)
- Assignee (optional)
- Due date (optional)
- Status checkbox
Example Checklist:
☐ Prepare shipping documents
☐ Get approval from manager
☐ Submit to customs
☐ Arrange pickup with carrier
☐ Send tracking to client
Checking Off Items
To Mark Complete:
- Click checkbox next to item
- Item becomes checked ✓
- Progress updates automatically
- Percentage completion shown
Progress Display:
- "3/5 items completed"
- "60% complete"
- Visual progress bar
Task Dependencies
Understanding Dependencies
Dependency Types:
- Finish-to-Start: Task B starts after Task A finishes
- Start-to-Start: Task B starts when Task A starts
- Finish-to-Finish: Task B finishes when Task A finishes
Setting Dependencies
To Add Dependency:
- Open task details
- Find "Dependencies" section
- Click "+ Add Dependency"
- Select related task
- Choose dependency type
- Save relationship
Dependency Indicators:
- Link icon on dependent tasks
- Warning if trying to complete before dependency
- Visual connections on timeline view
Task Filtering and Search
Filtering Tasks
Filter Options:
By Status:
- Todo only
- In Progress only
- Review only
- Done only
- All statuses
By Assignee:
- My tasks
- Unassigned tasks
- Specific team member
- Multiple assignees
By Priority:
- High priority only
- Medium and high
- All priorities
By Due Date:
- Overdue
- Due today
- Due this week
- Due this month
- Custom date range
By Milestone:
- Specific milestone
- No milestone
- All milestones
Searching Tasks
Search Functionality:
- Use search box at top
- Enter task title or keywords
- Results filter in real-time
- Click task to open
Search Tips:
- Search by task ID
- Search by assignee name
- Search in description text
- Use quotes for exact phrase
Task Templates
Creating Task Templates
Purpose:
- Standardize recurring tasks
- Save time on creation
- Ensure consistency
- Share best practices
To Create Template:
- Create a well-structured task
- Include all standard fields
- Add checklist items
- Set typical duration
- Save as template
Using Templates:
- Click "+ Create Task"
- Select "From Template"
- Choose template
- Customize as needed
- Create task
Task Bulk Operations
Bulk Actions
Available Bulk Operations:
- Change status of multiple tasks
- Reassign multiple tasks
- Change priority
- Delete multiple tasks
- Export tasks
To Perform Bulk Actions:
- Select multiple task checkboxes
- Bulk actions menu appears
- Choose desired action
- Confirm operation
- Changes applied to all selected
Bulk Selection:
- Click checkbox on each task
- Or click "Select All" in column
- Selected tasks highlighted
Task Notifications
Notification Settings
Users Receive Notifications For:
- Task assigned to them
- Task due date approaching
- Task overdue
- Comments on their tasks
- Status changes
- Priority changes
- @mentions in comments
Notification Channels:
- In-app notifications (bell icon)
- Email notifications
- Mobile push notifications
- Desktop notifications
Managing Notifications:
- Go to user settings
- Navigate to notifications
- Toggle specific notification types
- Set notification frequency
- Save preferences
Task Best Practices
Creating Effective Tasks
Task Title Guidelines:
- Use action verbs (Review, Approve, Prepare, Submit)
- Be specific and clear
- Keep under 100 characters
- Include key identifiers
Examples:
- ✅ "Review Q1 shipping documents for Client ABC"
- ✅ "Approve trade finance application #12345"
- ❌ "Documents"
- ❌ "Check stuff"
Task Description Best Practices
Include:
- Clear objective
- Deliverables expected
- Acceptance criteria
- Resources needed
- Relevant links
- Special instructions
Template:
Objective: [What needs to be accomplished]

Deliverables:
- [Item 1]
- [Item 2]

Acceptance Criteria:
- [Criterion 1]
- [Criterion 2]

Resources:
- [Link to document]
- [Contact person]

Notes:
- [Any special considerations]
Assignment Best Practices
When Assigning Tasks:
- Assign to one primary owner
- Add collaborators if needed
- Consider workload balance
- Match skills to requirements
- Communicate expectations
Avoid:
- Assigning without notification
- Over-assigning team members
- Unclear responsibilities
- Missing assignment altogether
Timeline Management
Setting Due Dates:
- Be realistic with timelines
- Account for dependencies
- Build in buffer time
- Consider team availability
- Update if scope changes
Monitoring Deadlines:
- Review daily for overdue tasks
- Address blockers immediately
- Communicate delays early
- Adjust timelines when needed
Task Workflow Scenarios
Scenario 1: Standard Task Completion
Flow:
- Task created in Todo
- Assignee moves to In Progress
- Work completed
- Move to Review
- Manager approves
- Move to Done
Timeline: Typically 2-5 days
Scenario 2: Task with Dependencies
Flow:
- Task A created (prerequisite)
- Task B created (dependent on A)
- Task A completed first
- Task B automatically unblocked
- Task B can now start
- Both tasks completed
Note: System prevents completing Task B before Task A
Scenario 3: Urgent Task Handling
Flow:
- Urgent task created with High priority
- Marked as Critical
- Team notified immediately
- Resources reallocated
- Task fast-tracked through stages
- Completed ahead of schedule
Best Practice: Reserve high priority for truly urgent items
Scenario 4: Task Requiring Revision
Flow:
- Task completed, moved to Review
- Reviewer finds issues
- Task moved back to In Progress
- Comments added with revision notes
- Assignee makes corrections
- Resubmitted for review
- Approved and moved to Done
Troubleshooting Tasks
Cannot Create Task
Issue: Create button disabled or form won't submit
Solutions:
- Check all required fields are filled (marked with *)
- Verify project is selected
- Ensure dates are valid (end after start)
- Check you have permission to create tasks
- Try refreshing the page
- Clear browser cache
Task Not Appearing on Board
Issue: Created task doesn't show up
Solutions:
- Check which column you're looking in
- Verify filters aren't hiding the task
- Refresh the board view
- Check if task was assigned to correct project
- Verify task wasn't accidentally deleted
Cannot Drag and Drop
Issue: Tasks won't move between columns
Solutions:
- Ensure you have edit permissions
- Try clicking and holding longer
- Check browser compatibility
- Disable browser extensions temporarily
- Try using the edit method instead
- Clear browser cache
Notifications Not Received
Issue: Not getting task notifications
Solutions:
- Check notification settings in profile
- Verify email address is correct
- Check spam/junk folder
- Ensure you're assigned to the task
- Check browser notification permissions
- Review notification frequency settings
Task Overdue but Not Alerted
Issue: Missed deadline without warning
Solutions:
- Check notification settings
- Verify due date was set correctly
- Ensure notification frequency includes overdue alerts
- Check if notifications are being sent to correct email
- Review task list daily as backup
Task Metrics and Reporting
Task Metrics
Key Metrics to Track:
Completion Rate:
- Percentage of tasks completed on time
- Overall task completion ratio
- By team member performance
Velocity:
- Tasks completed per week/sprint
- Team productivity trends
- Capacity planning
Time Metrics:
- Average time to complete task
- Time spent in each status
- Cycle time analysis
Priority Distribution:
- High vs low priority ratio
- Urgent task frequency
- Priority escalation trends
Generating Task Reports
Available Reports:
- Tasks by status
- Tasks by assignee
- Overdue tasks report
- Completed tasks summary
- Time tracking report
- Milestone progress
To Generate Report:
- Navigate to Project Report
- Select report type
- Choose date range
- Apply filters (assignee, status, etc.)
- Generate report
- Export to PDF or Excel
Advanced Task Features
Recurring Tasks
Setting Up Recurring Tasks:
- Create initial task
- Enable "Recurring" option
- Set recurrence pattern:
- Daily
- Weekly (select days)
- Monthly (select date)
- Custom interval
- Set end condition:
- After X occurrences
- By specific date
- Never (indefinite)
- Save task
Recurrence Behavior:
- New task created automatically
- Previous task must be completed first
- Maintains all original settings
- Can modify recurrence pattern anytime
Task Labels/Tags
Using Labels:
- Categorize tasks beyond status
- Filter by multiple criteria
- Color-coded identification
- Custom label creation
Common Labels:
- Urgent
- Blocked
- Waiting on Client
- Documentation
- Testing Required
- Approved
Creating Labels:
- Go to System Setup
- Navigate to Labels section
- Click "+ Add Label"
- Choose color
- Enter label name
- Save label
Applying Labels:
- Open task details
- Click "Add Label" section
- Select from existing labels
- Or create new label
- Multiple labels can be applied
Task Automations
Available Automations:
Auto-Assignment:
- Assign based on workload
- Round-robin distribution
- Skill-based assignment
Status Transitions:
- Auto-move to Review when checklist complete
- Auto-close tasks after X days in Done
- Auto-remind for overdue tasks
Notifications:
- Daily digest of your tasks
- Weekly summary for managers
- Client updates on milestones
Setting Up Automations:
- Navigate to System Setup
- Select Automations
- Click "+ New Automation"
- Choose trigger event
- Define action to take
- Set conditions
- Enable automation
Task Integration Features
Email Integration
Create Task via Email:
- Send email to specific address
- Subject becomes task title
- Email body becomes description
- Attachments added automatically
Task Update via Email:
- Reply to task notification email
- Your reply becomes a comment
- Mentioned users notified
Calendar Integration
Sync Tasks to Calendar:
- Export tasks to calendar
- View due dates in calendar app
- Set calendar reminders
- Sync updates both ways
Supported Calendars:
- Google Calendar
- Outlook Calendar
- Apple Calendar
- Any iCal-compatible calendar
Third-Party Integrations
Available Integrations:
- Slack: Task notifications in channels
- Microsoft Teams: Task updates
- Webhooks: Custom integrations
- API: Build custom solutions
Task Security and Permissions
Task Access Levels
Permission Levels:
Owner:
- Full control over task
- Can delete task
- Can modify all aspects
- Can change assignees
Assigned User:
- Can update status
- Can add comments
- Can attach files
- Can log time
- Cannot delete task
Project Member:
- Can view task details
- Can add comments
- Cannot edit task
- Cannot change status
Viewer:
- Read-only access
- Can view details
- Cannot comment
- Cannot edit
Task Privacy
Private Tasks:
- Visible only to assigned users
- Not shown on project board to others
- Comments restricted
- Use for sensitive work
Making Task Private:
- Edit task details
- Toggle "Private" option
- Select users who can access
- Save changes
Task Export and Backup
Exporting Tasks
Export Options:
- Export to Excel
- Export to CSV
- Export to PDF
- Print task list
To Export Tasks:
- Navigate to task list view
- Apply desired filters
- Click "Export" button
- Choose format
- Select fields to include
- Download file
Exported Data Includes:
- Task ID
- Title
- Description
- Status
- Assignee
- Dates
- Priority
- Comments (optional)
- Time logs (optional)
Task Backup
Automatic Backups:
- System backs up daily
- 30-day retention
- Restore available on request
Manual Backup:
- Export full task list
- Save to secure location
- Regular backup schedule recommended
Summary
Effective task management in Trackr requires:
✅ Clear task creation with descriptive titles and details
✅ Proper assignment to right team members
✅ Regular status updates through drag-and-drop or editing
✅ Active collaboration via comments and mentions
✅ Organized documentation with files and checklists
✅ Timely completion with proper time tracking
✅ Consistent monitoring of progress and metrics
Master these task management skills to ensure projects stay on track and teams remain productive.