Project Details
Introduction
The Project Details page is your comprehensive command center for managing individual projects. It provides complete visibility into project status, team members, tasks, milestones, financials, and all project-related activities in one centralized location.
Accessing Project Details
Navigation Methods:
Method 1: From Projects Page
- Navigate to Project in sidebar
- Find the project card
- Click the eye icon (👁️) in orange
- Project details page opens
Method 2: From Project Report
- Navigate to Project Report
- Find project in table
- Click the eye icon in ACTION column
- Project details page opens
Method 3: From Dashboard
- Click on project name if displayed
- Direct link to project details
- Quick access from recent items
Method 4: Direct Link
- Use bookmarked project URLs
- Share project links with team
- Email notifications include links
Project Details Overview Page
Page Header
Navigation Breadcrumb:
- Shows: Dashboard > Project Detail
- Click any breadcrumb to navigate back
- Always know your location in system
Top Action Bar:
Getting Started Button:
- Color: Blue
- Icon: Running person icon
- Function: Quick onboarding tips
- Use: New users guidance
Notification Bell:
- Icon: Bell with badge
- Badge: Shows unread count (e.g., "2")
- Click: View project notifications
- Function: Stay updated on changes
App Menu:
- Icon: Grid (9 dots)
- Function: Access other Blockpeer modules
- Quick Navigation: Switch between modules
Blockpeer Dropdown:
- Shows: Current module name
- Arrow: Dropdown indicator
- Function: Module switcher
- Access: All Blockpeer features
User Profile:
- Display: User avatar and name
- Example: "safan.risers+87"
- Dropdown: User menu
- Options: Settings, Profile, Logout
Project Overview Section
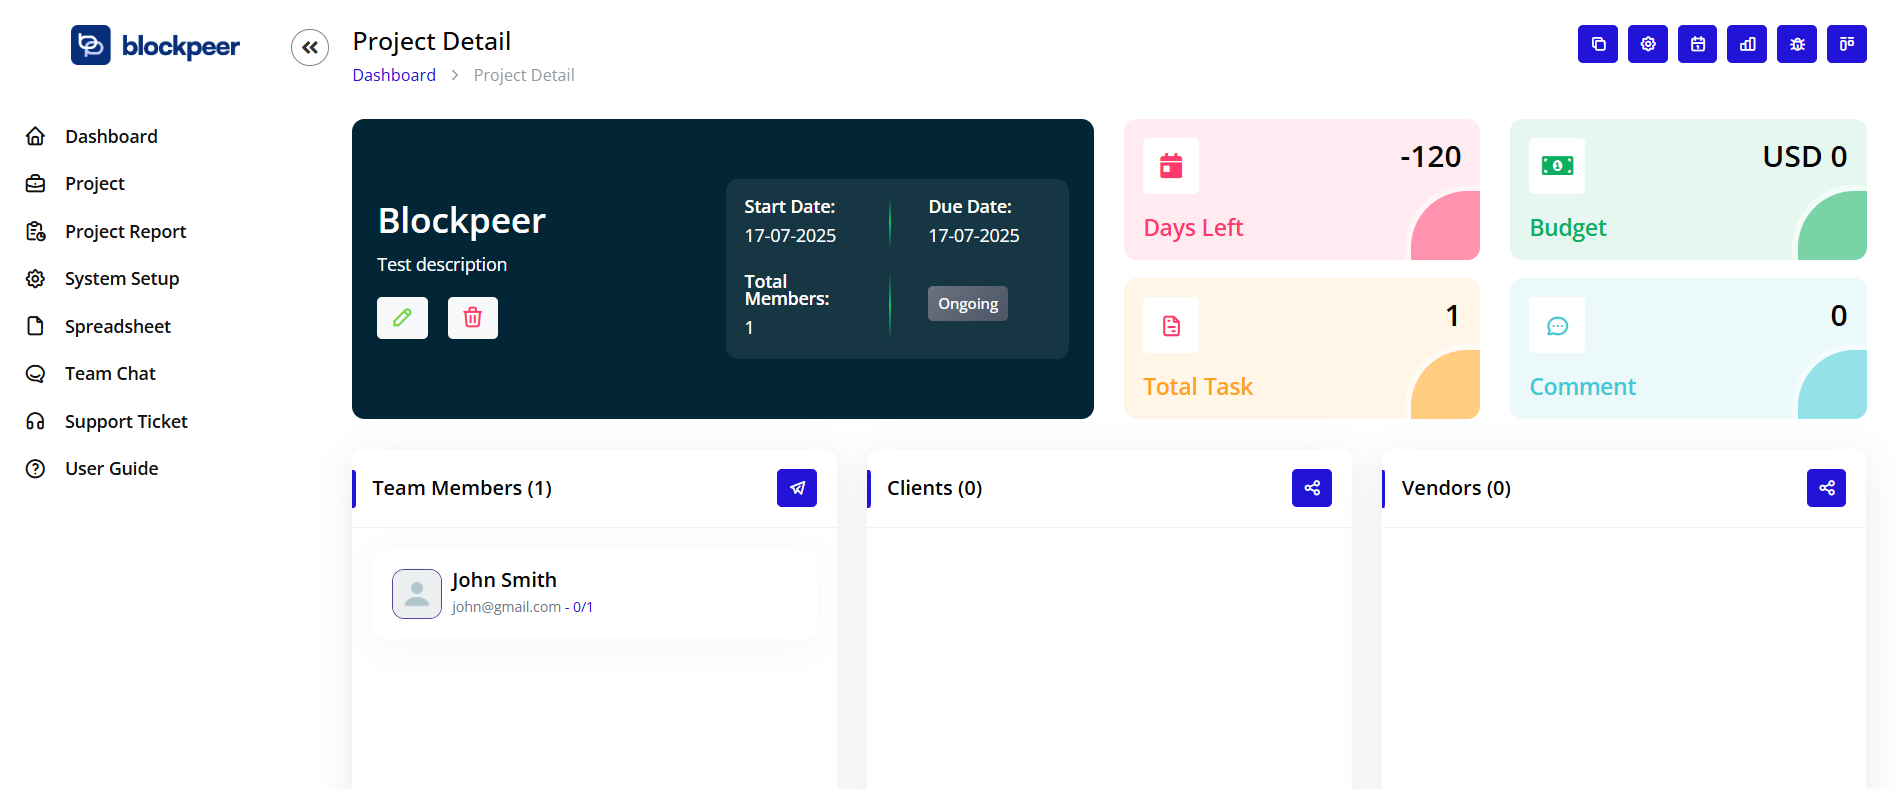
Project Header Card
The dark header card displays key project information at a glance:
Left Section - Project Identity
Project Name:
- Display: Large, prominent text
- Example: "Rahul"
- Editable: Click pencil icon to edit
- Location: Top left of header
Project Description:
- Display: Below project name
- Example: "Test description"
- Purpose: Brief project summary
- Format: Short text, 1-2 lines
Quick Actions:
Edit Icon (Pencil):
- Color: Blue background circle
- Function: Edit project details
- Click: Opens edit form
- Quick Access: Fast modifications
Delete Icon (Trash):
- Color: Red/pink background circle
- Function: Delete entire project
- Warning: Confirmation required
- Caution: Permanent action
Right Section - Project Details
Start Date:
- Label: "Start Date:"
- Display: DD-MM-YYYY format
- Example: "17-07-2025"
- Purpose: Project kickoff date
Due Date:
- Label: "Due Date:"
- Display: DD-MM-YYYY format
- Example: "17-07-2025"
- Color Coding: Red if overdue
Total Members:
- Label: "Total Members:"
- Display: Number count
- Example: "1"
- Purpose: Team size indicator
Project Status Badge:
- Display: Status tag
- Example: "Ongoing"
- Colors:
- Gray: Ongoing
- Green: Finished
- Orange: OnHold
- Location: Right side of header
Project Metrics Cards
Key Performance Indicators
Four metric cards display critical project statistics:
Days Left Card
Display:
- Number: "-119" (negative indicates overdue)
- Label: "Days Left"
- Color: Pink/red background
- Icon: Calendar icon
Interpretation:
- Positive Number: Days until deadline
- Negative Number: Days overdue
- Zero: Due today
- Color Changes: Red when overdue, green when healthy
Budget Card
Display:
- Amount: "USD 0"
- Label: "Budget"
- Color: Green background
- Icon: Money/dollar icon
Purpose:
- Track project budget
- Monitor spending
- Financial planning
- Cost control
Features:
- Click to view budget details
- Add budget entries
- Track expenses
- Compare actual vs planned
Total Task Card
Display:
- Number: "0"
- Label: "Total Task"
- Color: Orange/yellow background
- Icon: Document/task icon
Purpose:
- Count of all tasks
- Workload indicator
- Scope visibility
- Resource planning
Details:
- Includes all task statuses
- Updates in real-time
- Click for task breakdown
- Filter by status available
Comment Card
Display:
- Number: "0"
- Label: "Comment"
- Color: Cyan/light blue background
- Icon: Chat bubble icon
Purpose:
- Communication activity
- Discussion volume
- Collaboration level
- Engagement indicator
Features:
- Click to view all comments
- Recent comments highlighted
- @mention tracking
- Thread management
Team Management Section
Team Members Panel
Section Header:
- Title: "Team Members (1)"
- Count: Shows number in parentheses
- Action Button: Blue arrow/share icon
- Function: Invite additional members
Team Member Card
Member Information Display:
Avatar:
- Type: Circle with photo or initials
- Example: User profile picture
- Size: Standard avatar size
- Click: View member profile
Name:
- Display: Full name
- Example: "safan.risers+87"
- Format: Username or full name
- Click: Open member details
Email:
- Display: Email address
- Example: "safan.risers+87@gmail.com"
- Format: Clickable mailto link
- Purpose: Direct communication
Task Statistics:
- Format: "X/Y" (completed/total)
- Example: "0/0"
- Meaning: Task completion tracking
- Updates: Real-time
Adding Team Members
To Invite Users:
- Click the blue arrow icon
- "Invite Users" dialog opens
- Search for team members
- Select users to add
- Assign roles (optional)
- Click "Invite" or "Add"
- Users receive notification
Member Roles:
- Owner: Full control
- Manager: Edit permissions
- Member: Standard access
- Viewer: Read-only access
Permissions by Role:
Owner:
- Edit project details
- Delete project
- Invite/remove members
- Modify all tasks
- Access all features
Manager:
- Edit project details
- Invite members
- Assign tasks
- Approve work
- View reports
Member:
- View project
- Complete assigned tasks
- Add comments
- Upload files
- Log time
Viewer:
- View project details
- View tasks
- Read comments
- Download files
- No editing rights
Clients Section
Client Management Panel
Section Header:
- Title: "Clients (0)"
- Count: Number of clients
- Action Button: Blue share icon
- Function: Share project with clients
Purpose of Clients Section
Why Add Clients:
- Provide project visibility
- Share progress updates
- Enable collaboration
- Maintain transparency
- Facilitate communication
What Clients Can Access:
- Project overview
- Selected tasks
- Timeline information
- Deliverables
- Status updates
- Comments (if permitted)
What Clients Cannot Access:
- Internal discussions
- Budget details (unless shared)
- Team member information
- System settings
- Other projects
Adding Clients
To Share with Client:
- Click the blue share icon
- "Share to Clients" dialog opens
- Enter client email address
- Set permission level:
- View Only
- View and Comment
- Custom permissions
- Select what to share:
- Project overview
- Tasks
- Milestones
- Documents
- Timeline
- Add message (optional)
- Click "Share" or "Invite"
Client Invitation Process:
- Client receives email invitation
- Click link to access project
- Create account or login
- View shared project information
- Interact based on permissions
Managing Client Access:
- View list of clients
- Modify permissions
- Revoke access
- Track client activity
- Send updates
Best Practices:
- Only share necessary information
- Use appropriate permission levels
- Regularly review access
- Update clients on progress
- Remove access after project completion
Vendors Section
Vendor Management Panel
Section Header:
- Title: "Vendors (0)"
- Count: Number of vendors
- Action Button: Blue share icon
- Function: Add vendors to project
Purpose of Vendors Section
Why Track Vendors:
- Manage external service providers
- Track vendor deliverables
- Monitor vendor performance
- Centralize vendor information
- Coordinate third-party work
Vendor Types:
- Shipping companies
- Freight forwarders
- Customs brokers
- Insurance providers
- Inspection agencies
- Documentation services
- Banking partners
- Other service providers
Adding Vendors
To Add Vendor:
- Click the share icon
- Enter vendor details:
- Company name
- Contact person
- Email address
- Phone number
- Service type
- Contract details
- Upload relevant documents:
- Contracts
- Certificates
- Insurance papers
- Rate sheets
- Set permissions
- Save vendor information
Vendor Information Tracked:
- Company details
- Services provided
- Contact information
- Contract terms
- Performance metrics
- Documents and certificates
- Communication history
- Invoice and payment details
Managing Vendors:
- View vendor list
- Update vendor details
- Track vendor tasks
- Monitor deliverables
- Review performance
- Manage documents
- Track payments
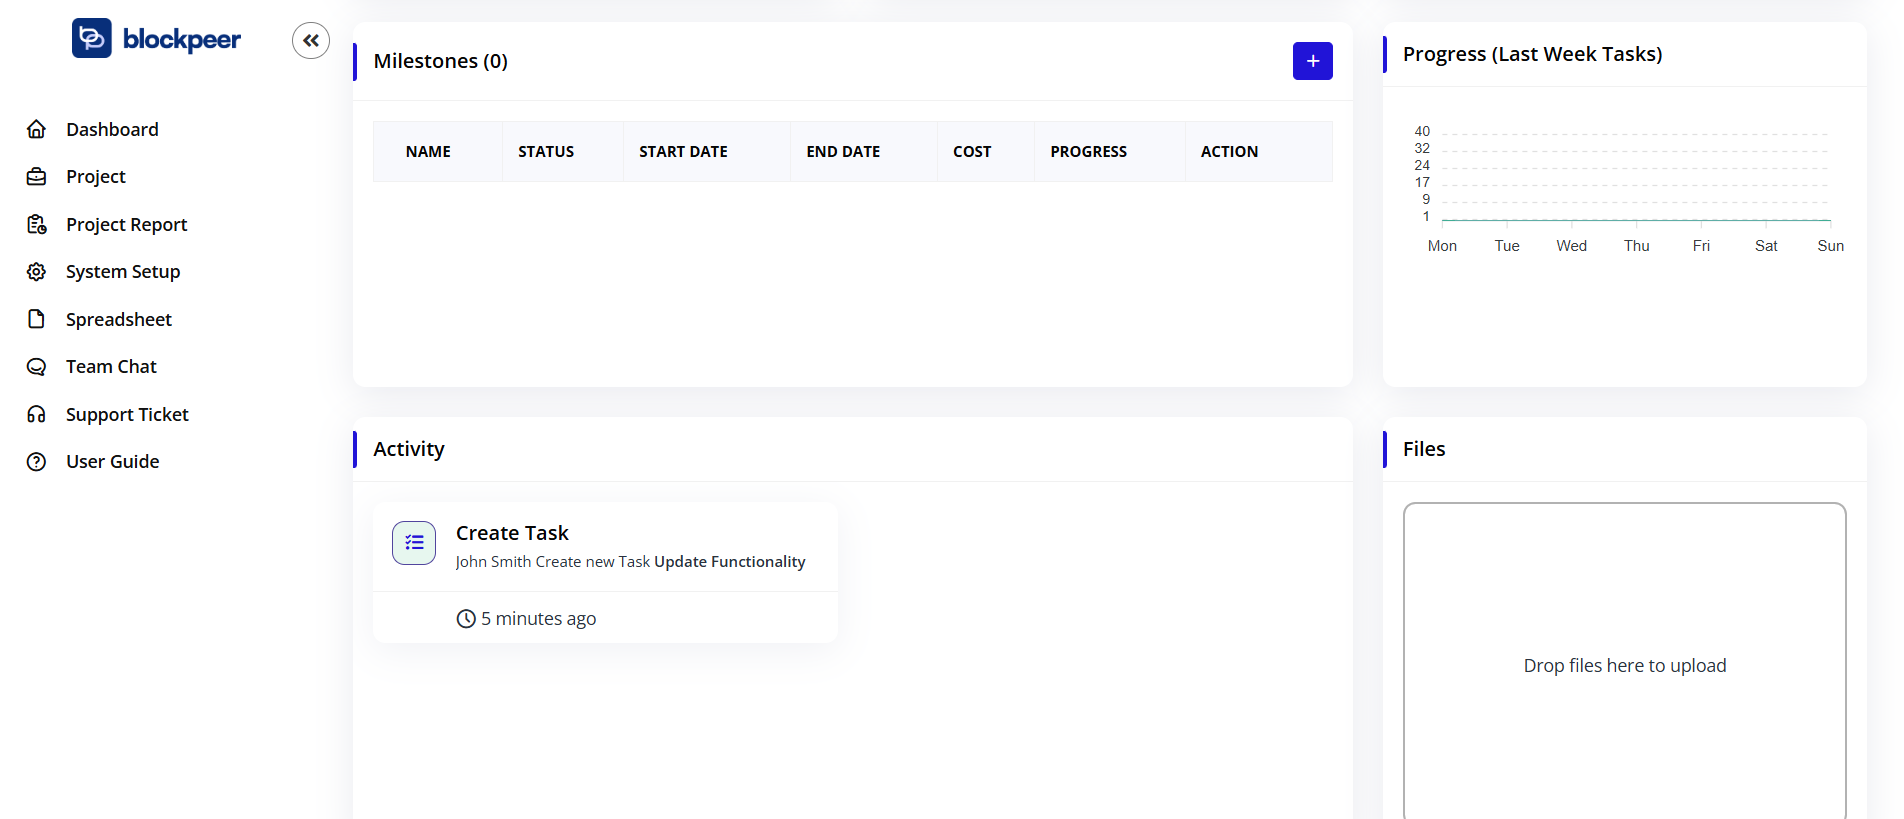
Milestones Section
Project Milestones Panel
Section Header:
- Title: "Milestones (0)"
- Action Button: Blue plus icon
- Function: Create new milestone
Understanding Milestones
What are Milestones:
- Major project checkpoints
- Significant deliverables
- Phase completions
- Key decision points
- Project gates
Why Use Milestones:
- Break project into phases
- Track major progress
- Set intermediate goals
- Manage dependencies
- Communicate progress to stakeholders
Milestone vs Task:
- Milestone: Major checkpoint, no duration
- Task: Work item, has start and end dates
- Relationship: Tasks contribute to milestones
Milestone Table Columns
NAME:
- Milestone title
- Descriptive label
- Easy identification
- Sortable column
STATUS:
- Current milestone state
- Options:
- Not Started
- In Progress
- Completed
- Delayed
- Color-coded badges
START DATE:
- When milestone work begins
- Format: DD-MM-YYYY
- Planning reference
- Sortable
END DATE:
- Milestone deadline
- Target completion date
- Critical for scheduling
- Sortable
COST:
- Budget allocated
- Expected expenses
- Financial tracking
- Resource planning
PROGRESS:
- Completion percentage
- Visual progress bar
- Calculated from tasks
- Updates automatically
ACTION:
- View details (eye icon)
- Edit milestone
- Delete milestone
- Manage tasks
Creating Milestones
To Create Milestone:
- Click the blue plus (+) icon
- "Create Milestone" form opens
- Fill required fields:
- Name: Milestone title
- Status: Initial status
- Start Date: Begin date
- End Date: Target completion
- Cost: Budget allocation
- Description: Details
- Click "Create" to save
Milestone Examples:
Trading Project:
- Contract Signed
- Financing Secured
- Goods Shipped
- Documents Submitted
- Payment Received
Shipping Project:
- Booking Confirmed
- Cargo Loaded
- Departed Origin Port
- Arrived Destination
- Customs Cleared
- Delivered to Client
Best Practices:
- Limit to 5-8 major milestones
- Make them measurable
- Set realistic dates
- Align with project phases
- Communicate clearly
Progress Tracking
Last Week Tasks Progress
Section Header:
- Title: "Progress (Last Week Tasks)"
- Purpose: Visual task completion tracking
Chart Type:
- Bar chart or line graph
- X-axis: Days of week (Mon-Sun)
- Y-axis: Task count (0-40+ scale)
- Shows daily task activity
Metrics Displayed:
- Tasks created per day
- Tasks completed per day
- Active tasks
- Workload distribution
Interpretation:
- High bars: Busy days
- Low bars: Light days
- Trends: Workload patterns
- Spikes: Unusual activity
Use Cases:
- Monitor team velocity
- Identify busy periods
- Plan resource allocation
- Track progress trends
- Forecast completion
Activity Feed
Project Activity Panel
Section Header:
- Title: "Activity"
- Purpose: Chronological project events log
Activity Types Logged:
- Project created
- Members added/removed
- Tasks created/updated
- Status changes
- Comments posted
- Files uploaded
- Milestones reached
- Deadlines changed
Activity Entry Format:
User Avatar:
- Shows who performed action
- Profile picture or initials
- Clickable to view profile
Action Description:
- What happened
- Clear, concise language
- Past tense
- Examples:
- "John Doe created task 'Review Documents'"
- "Jane Smith changed status to In Progress"
- "Mike Johnson added comment"
Timestamp:
- When action occurred
- Relative time: "2 hours ago"
- Absolute time on hover
- Chronological order (newest first)
Additional Details:
- Links to related items
- Change details
- File names
- Previous/new values
Filtering Activity:
- Filter by user
- Filter by action type
- Filter by date range
- Search within activities
Use Cases:
- Audit trail
- Team coordination
- Status updates
- Accountability
- Problem investigation
Files and Documents
Files Section
Section Header:
- Title: "Files"
- Purpose: Project document management
Upload Area:
- Display: "Drop files here to upload"
- Function: Drag and drop interface
- Alternative: Click to browse files
File Upload Methods
Method 1: Drag and Drop
- Locate file in file explorer
- Drag file to upload area
- Drop when highlighted
- Upload begins automatically
- Progress bar shows upload status
Method 2: Click to Browse
- Click anywhere in upload area
- File browser opens
- Navigate to file
- Select file(s)
- Click "Open"
- Upload begins
Method 3: Paste
- Copy file or screenshot
- Click in upload area
- Paste (Ctrl+V or Cmd+V)
- File uploads automatically
Supported File Types
Documents:
- PDF (.pdf)
- Word (.doc, .docx)
- Excel (.xls, .xlsx)
- PowerPoint (.ppt, .pptx)
- Text (.txt)
Images:
- JPEG (.jpg, .jpeg)
- PNG (.png)
- GIF (.gif)
- BMP (.bmp)
- SVG (.svg)
Archives:
- ZIP (.zip)
- RAR (.rar)
- 7Z (.7z)
Other:
- CSV (.csv)
- Any common business file type
File Size Limits:
- Per file: 25MB (typical)
- Total project: 1GB (typical)
- Contact admin for increases
File Management Features
File List Display:
- File name with icon
- File size
- Upload date and time
- Uploaded by user
- Download count (optional)
File Actions:
- Preview: View file in browser
- Download: Save to computer
- Share: Generate shareable link
- Rename: Change file name
- Move: Organize into folders
- Delete: Remove file permanently
File Organization:
- Create folders
- Nested folder structure
- Drag to move files
- Bulk operations
- Search files
Version Control:
- Upload new version
- Version history
- Compare versions
- Restore previous version
- Version comments
Permissions:
- Control who can view
- Control who can download
- Control who can upload
- Control who can delete
- Role-based access
Documents Section
Project Documents Panel
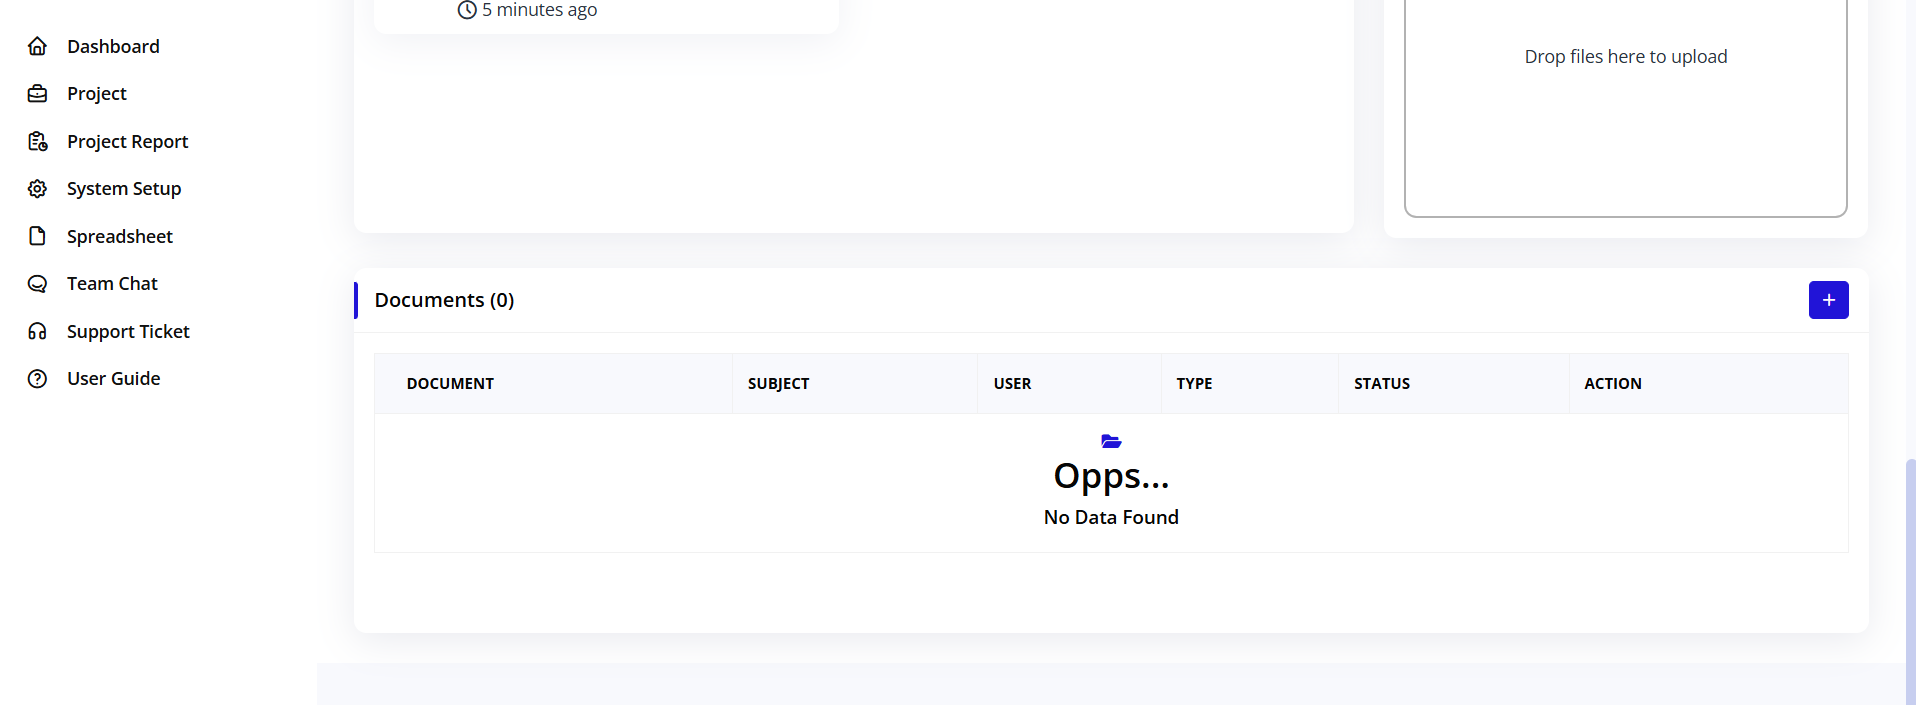
Section Header:
- Title: "Documents (0)"
- Count: Number of formal documents
- Action Button: Blue plus icon
- Purpose: Manage official project documents
Documents vs Files
Documents Section:
- Formal project documentation
- Contracts and agreements
- Proposals and quotes
- Invoices and receipts
- Reports and deliverables
- Official correspondence
Files Section:
- Working files
- Supporting materials
- Images and media
- Reference documents
- Informal files
Document Table Columns
DOCUMENT:
- Document name/title
- Document type icon
- Clickable to view
- Sortable column
SUBJECT:
- Document category or subject
- Business purpose
- Organizational aid
- Examples: "Contract", "Invoice", "Report"
USER:
- Who created/uploaded document
- User name or avatar
- Accountability
- Contact reference
TYPE:
- Document classification
- Examples:
- Contract
- Invoice
- Quote
- Report
- Agreement
- Certificate
STATUS:
- Document lifecycle state
- Options:
- Draft
- Under Review
- Approved
- Signed
- Archived
- Color-coded badges
ACTION:
- View document (eye icon)
- Download document
- Edit metadata
- Delete document
- Share document
Adding Documents
To Add Document:
- Click the blue plus (+) icon
- "Add Document" form opens
- Fill document details:
- Title: Document name
- Subject: Category
- Type: Document type
- Status: Current state
- Description: Brief summary
- Upload file
- Set permissions
- Click "Save" or "Add"
Document Metadata:
- Title and description
- Document type
- Subject/category
- Version number
- Author
- Creation date
- Status
- Approval chain
- Related tasks/milestones
- Tags and keywords
Document Workflow:
Draft Stage:
- Initial creation
- Work in progress
- Internal review
- Revisions
Review Stage:
- Submitted for review
- Stakeholder feedback
- Compliance check
- Quality assurance
Approved Stage:
- Final approval received
- Ready for use
- Official document
- Version locked
Signed Stage:
- Signatures obtained
- Legally binding
- Archived copy
- Distribution complete
Project Task Management
Accessing Project Tasks
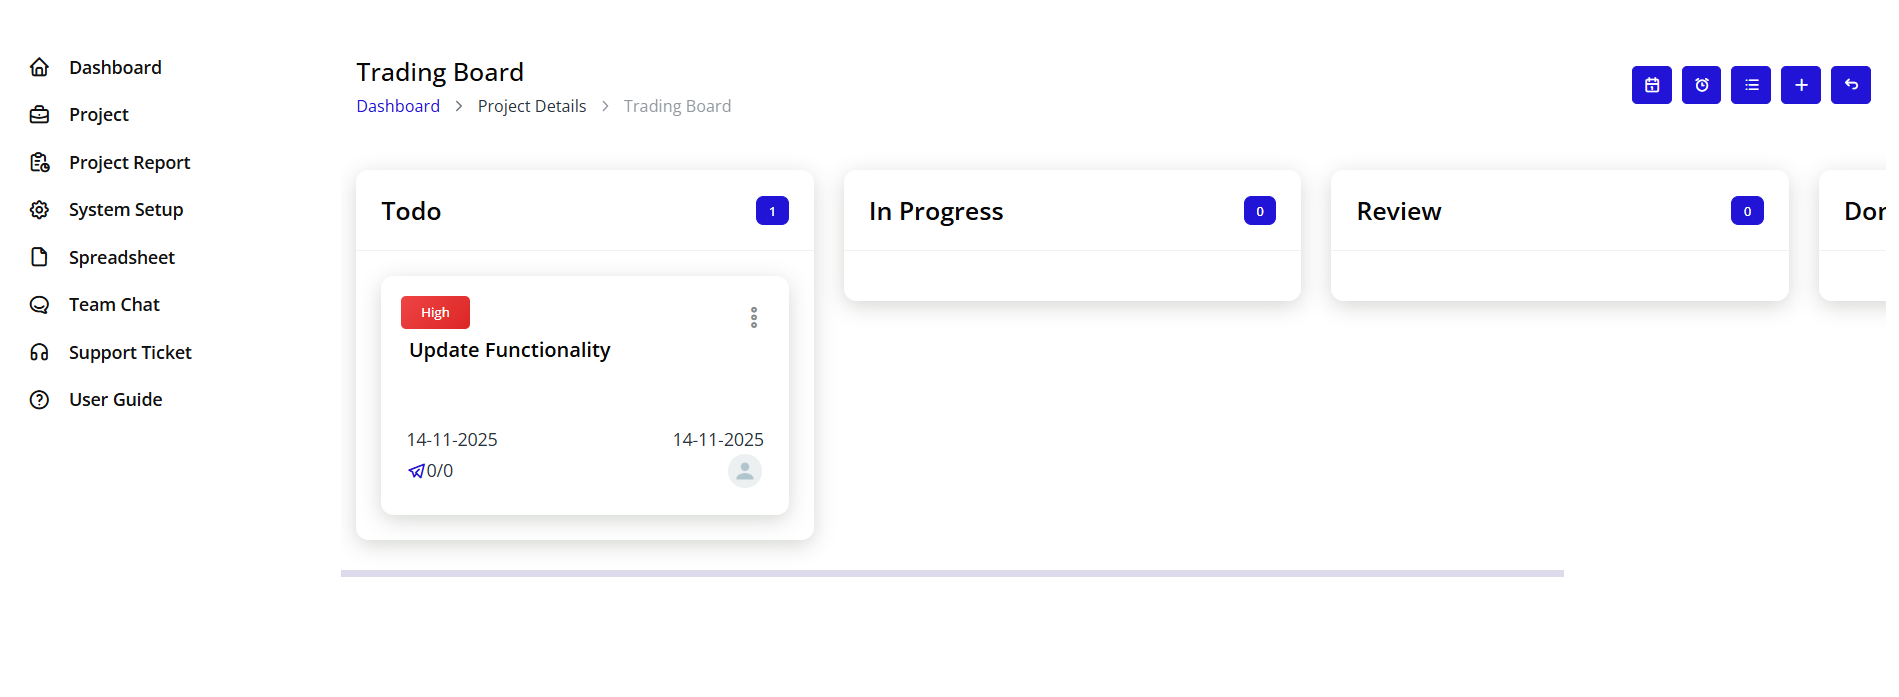
Navigation:
- From project details page
- Top right button sections
- click "Task Board" button
Filter Options:
All Users Dropdown:
- Filter tasks by assignee
- Select specific team member
- View individual workload
- Multi-select available
All Milestones Dropdown:
- Filter by milestone
- View milestone-related tasks
- Track milestone progress
- Unassigned tasks option
All Status Dropdown:
- Filter by task status
- Todo, In Progress, Review, Done
- Multiple status selection
- Custom status filters
All Priority Dropdown:
- Filter by priority level
- Low, Medium, High, Critical
- Focus on urgent items
- Prioritize workload
Action Buttons:
Search Button (Blue):
- Apply selected filters
- Refresh task list
- Execute filter combination
Clear Button (Pink):
- Reset all filters
- Show all tasks
- Return to default view
Task List Table
Display Options:
- 10 entries per page dropdown
- Options: 10, 25, 50, 100
- Pagination controls
- Search box for quick find
Table Columns:
TASK NAME:
- Task title
- Click to view details
- Sortable
- Primary identifier
MILESTONE:
- Associated milestone
- Links to milestone
- Groups related tasks
- Optional field
START DATE:
- Task start date
- Format: DD-MM-YYYY
- Timeline reference
- Sortable
DUE DATE:
- Task deadline
- Format: DD-MM-YYYY
- Color-coded if overdue
- Sortable
ASSIGNED TO:
- Task owner
- Team member name
- Avatar display
- Multiple assignees possible
PRIORITY:
- Low, Medium, High, Critical
- Color-coded badge
- Sortable
- Quick visual indicator
STATUS:
- Current task stage
- Color-coded
- Drag to change (on board view)
- Dropdown to change (list view)
Empty State:
- "No entries found" message
- Appears when no tasks match filters
- Or when no tasks exist
- Prompt to create first task
Summary
The Project Details page is your comprehensive project management hub:
✅ Complete project visibility - all information in one place
✅ Team collaboration - manage members, clients, and vendors
✅ Progress tracking - milestones, tasks, and metrics
✅ Financial management - budget and cashflow tracking
✅ Document control - centralized file and document management
✅ Activity monitoring - full audit trail of all changes
✅ Quick actions - edit, share, and manage efficiently
Master the Project Details page to maintain full control over your trading and shipping operations.