Creating Project
Introduction
Projects are the foundation of Trackr's project management system. A project represents a complete trading or shipping operation with its own timeline, team members, tasks, and deliverables.
Accessing Project Management
Navigation Steps
- Click on Project in the left sidebar navigation
- You'll land on the "Manage Projects" page
- Breadcrumb navigation shows: Dashboard > Projects
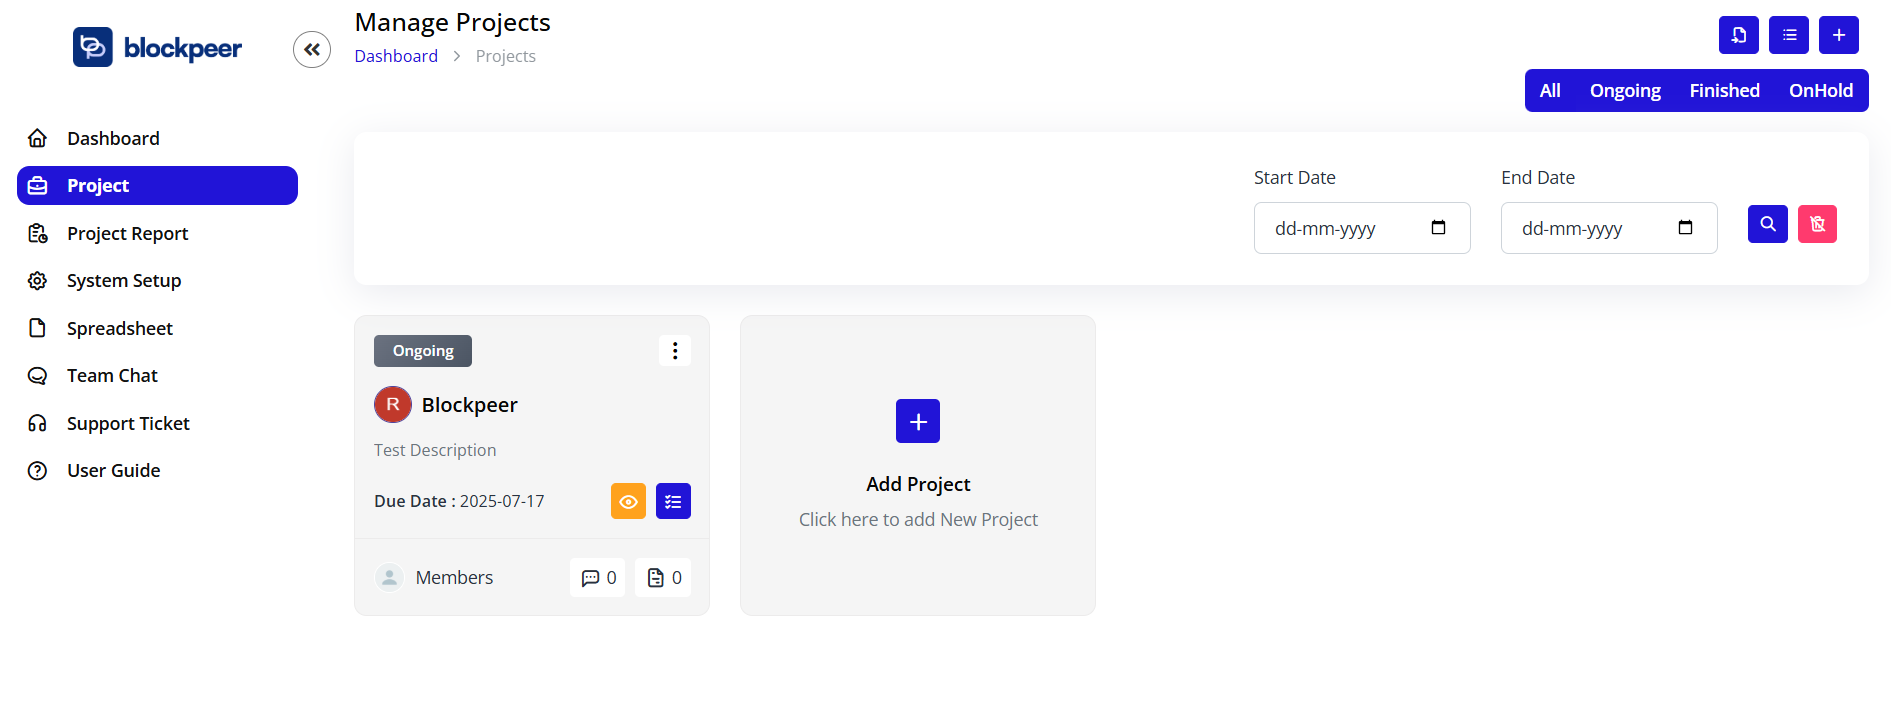
Manage Projects Interface
Page Header
Title: "Manage Projects"
Action Buttons (Top Right):
- Save Icon: Save current view settings
- List View Icon: Toggle between list and grid views
- Plus Icon (+): Create new project
Filtering Projects
Filter Options
The Manage Projects page provides comprehensive filtering capabilities:
Status Filter
Location: Top right of the page
Available Status Options:
- All: Shows all projects regardless of status
- Ongoing: Only active projects
- Finished: Completed projects
- OnHold: Paused projects
How to Use:
- Click on the desired status button
- Projects list filters automatically
- Status button highlights in blue when selected
Date Range Filter
Start Date Field:
- Label: "Start Date"
- Format: dd-mm-yyyy
- Function: Filter projects starting from this date
End Date Field:
- Label: "End Date"
- Format: dd-mm-yyyy
- Function: Filter projects ending before this date
Action Buttons:
- Search Icon (Blue): Apply the date filters
- Clear Icon (Pink): Reset all filters
How to Use Date Filters:
- Click on the Start Date field
- Select a date from the calendar picker
- Click on the End Date field
- Select an end date
- Click the blue Search button to apply filters
- Click the pink Clear button to reset
Project Card View
Understanding Project Cards
Each project is displayed as a card with the following information:
Card Header
Status Badge:
- Location: Top left of card
- Color Coding:
- Gray background for "Ongoing"
- Green for "Finished"
- Orange for "OnHold"
- Text: Current project status
Options Menu (⋮):
- Location: Top right of card
- Click to reveal: Project actions menu
Project Owner
Avatar Circle:
- Display: First letter of owner's name
- Color: Red background (customizable)
- Example: "B" for "Blockpper"
Owner Name:
- Display: Full name below avatar
- Example: "Blockpeer"
Project Description
Location: Below owner name
Content: Brief project description text
Example: "Test Description"
Project Timeline
Due Date Display:
- Label: "Due Date :"
- Format: YYYY-MM-DD
- Example: "2025-07-17"
- Purpose: Shows project deadline
Project Statistics
Members Section:
- Icon: People icon
- Label: "Members"
- Count: Number displayed to the right
- Example: Shows team size
Comments Section:
- Icon: Chat bubble icon
- Count: "0"
- Purpose: Number of comments/discussions
Attachments Section:
- Icon: Document icon
- Count: "0"
- Purpose: Number of files attached
Quick Actions
View Button:
- Icon: Eye icon in orange circle
- Function: Opens project details page
- Hover: Button color intensifies
List Button:
- Icon: List icon in blue circle
- Function: Shows project task list
- Hover: Button color intensifies
Creating a New Project
Step 1: Open Project Creation Form
- On the Manage Projects page, look for the "Add Project" section
- You'll see a large plus (+) icon
- Text reads: "Click here to add New Project"
- Click anywhere in this section to open the creation form
Step 2: Fill Project Details
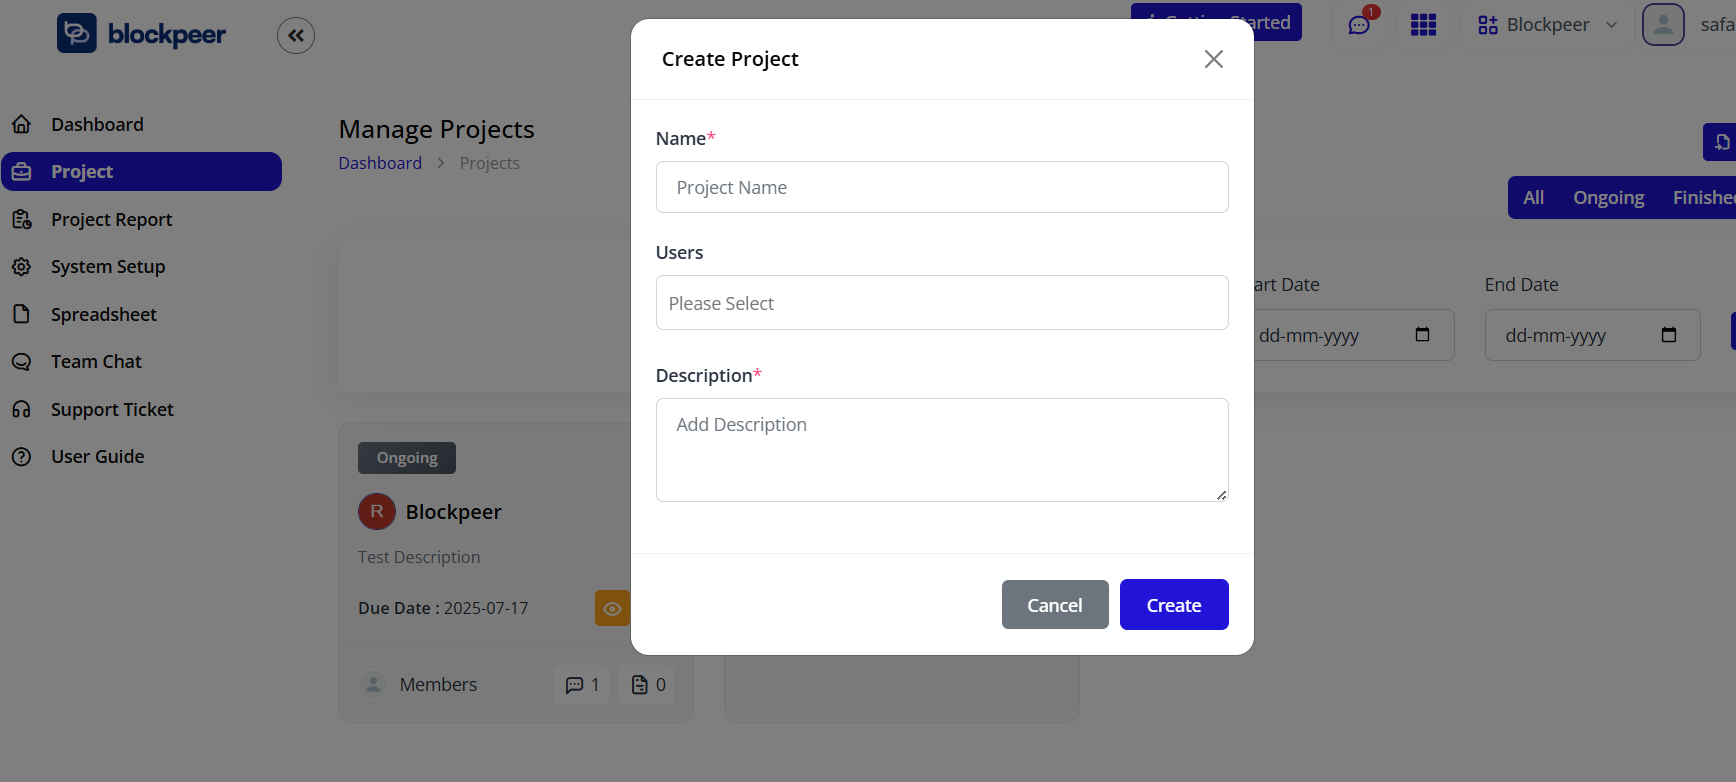
The "Create New Project" modal will appear with the following fields:
Required Fields (marked with *)
1. Name*
- Label: "Name*"
- Placeholder: "Project Name"
- Purpose: Give your project a descriptive name
- Example: "Q1 Shipping Operations", "Trade Finance Project"
- Validation: Required field, cannot be empty
2. Description*
- Label: "Description*"
- Placeholder: "Add Description"
- Type: Text area (multi-line input)
- Purpose: Provide detailed project information
- Validation: Required field with tooltip "Please fill out this field."
- Best Practice: Include:
- Project objectives
- Key deliverables
- Special requirements
- Stakeholder information
Optional Fields
3. Users
- Label: "Users"
- Type: Dropdown/multi-select
- Placeholder: "Please Select"
- Purpose: Assign team members to the project
- Function: Select multiple users from your organization
- Note: You can add users later if not known at creation
Step 3: Submit Project
Action Buttons:
Cancel Button:
- Color: Gray
- Position: Bottom left
- Function: Close form without saving
- Behavior: Discards all entered data
Create Button:
- Color: Blue
- Position: Bottom right
- Function: Create the project
- Validation: Checks all required fields before submission
Project Creation Steps:
- Fill in the Project Name (required)
- Add a Description (required)
- Select Users (optional - can be added later)
- Click "Create" button
- System validates the form
- If valid, project is created
- You're redirected to the project details page
- New project card appears on the Manage Projects page
Project Actions Menu
Accessing Project Options
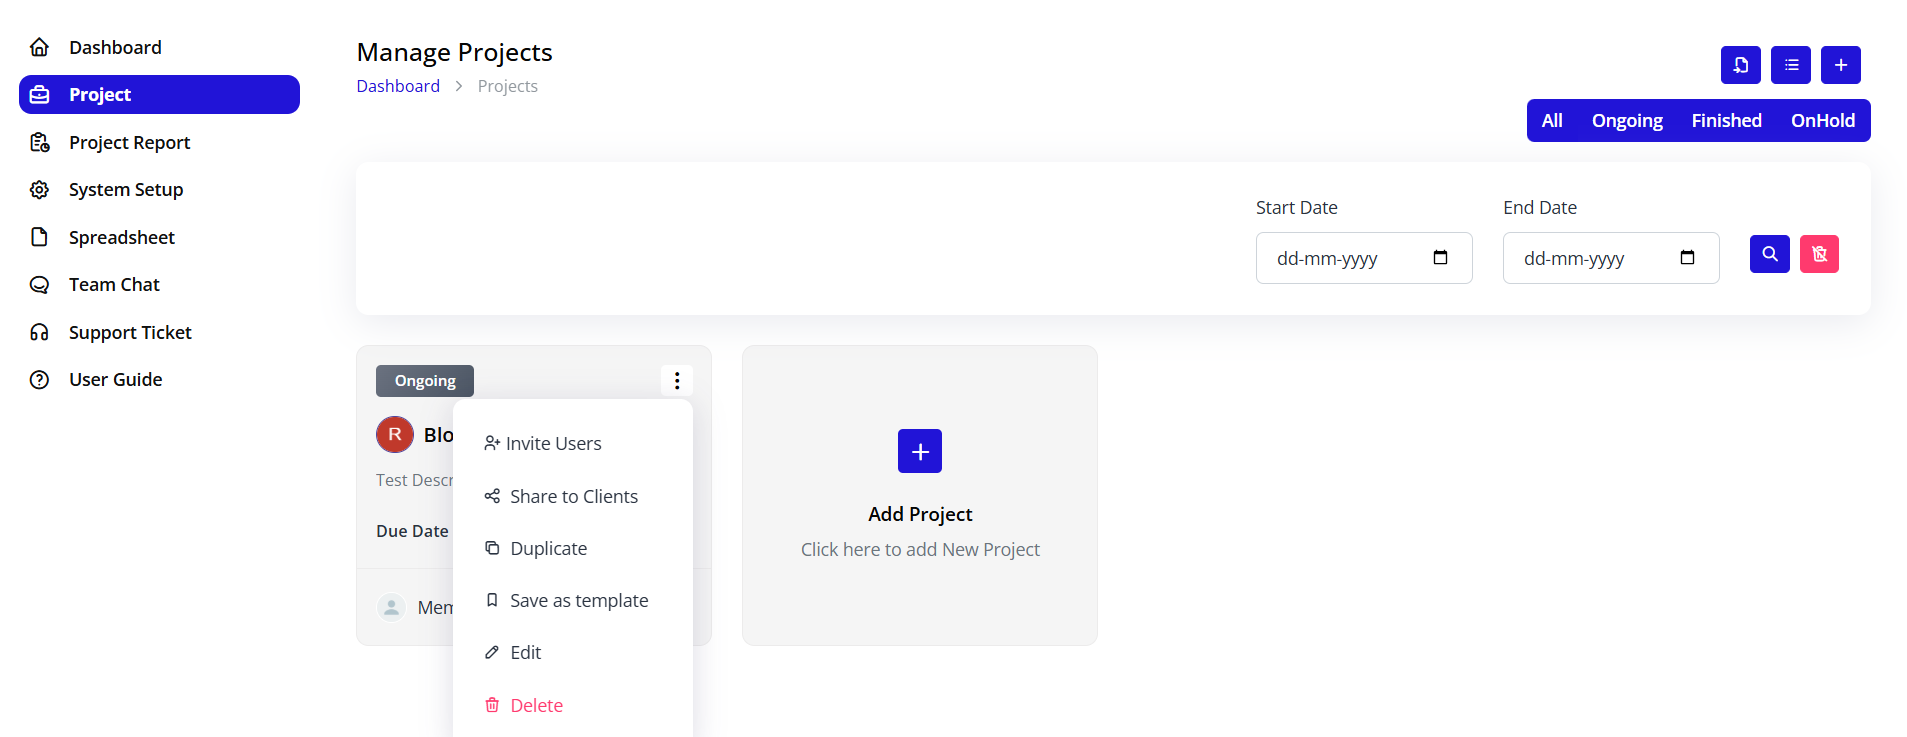
From any project card, click the three-dot menu (⋮) in the top right corner.
Available Actions
1. Invite Users
- Icon: Person with plus icon
- Function: Add team members to the project
- Use Case: Expanding the project team
- Action: Opens user invitation modal
2. Share to Clients
- Icon: Share icon
- Function: Provide client access to project
- Use Case: External stakeholder collaboration
- Action: Generates shareable link or sends invitation
3. Duplicate
- Icon: Copy icon
- Function: Create a copy of the project
- Use Case: Starting similar projects quickly
- Action: Creates duplicate with same settings
- Note: Tasks and data are copied as templates
4. Save as Template
- Icon: Save icon
- Function: Convert project into reusable template
- Use Case: Standardizing project structures
- Action: Saves project structure for future use
- Benefit: Faster project setup for recurring operations
5. Edit
- Icon: Pencil icon
- Function: Modify project details
- Use Case: Updating project information
- Action: Opens project edit form
- Editable Fields: Name, description, dates, users
6. Delete
- Icon: Trash icon (red color)
- Function: Remove project from system
- Use Case: Cleaning up cancelled projects
- Action: Prompts confirmation before deletion
- Warning: This action cannot be undone
- Note: Consider archiving instead of deleting
Managing Existing Projects
Viewing Project List
The Manage Projects page displays all projects in a grid layout:
Default View:
- Projects shown as cards
- Status-coded for quick identification
- Most recent projects first
Empty State:
- When no projects match filters
- Shows appropriate message
- Prompts to create first project
Project Organization
Sorting Options:
- By creation date (newest first)
- By due date (soonest first)
- By status (Ongoing > OnHold > Finished)
- Alphabetically by name
View Options:
- Grid View: Cards layout (default)
- List View: Table format
- Toggle using list icon button
Inviting Users to Projects
Invite Users Process
Step 1: Access Invite Function
- Find the project card
- Click the three-dot menu (⋮)
- Select "Invite Users"
Step 2: Select Users
- Modal appears with user selection
- Search available users
- Select one or multiple users
- Assign roles/permissions if applicable
Step 3: Send Invitations
- Review selected users
- Add invitation message (optional)
- Click "Invite" or "Send"
- Users receive notification
User Permissions:
- View project details
- Access assigned tasks
- Collaborate with team
- Receive project updates
Sharing Projects with Clients
Client Access Setup
Step 1: Enable Client Sharing
- Open project options menu
- Click "Share to Clients"
Step 2: Configure Access
- Select information to share
- Set permission levels (view-only, comment, etc.)
- Generate shareable link or send direct invitation
Step 3: Manage Client Access
- Track who has access
- Revoke access when needed
- Monitor client interactions
Best Practices:
- Only share necessary information
- Use view-only permissions for external parties
- Regularly review access permissions
- Remove access after project completion
Duplicating Projects
When to Duplicate
Use project duplication for:
- Similar trading operations
- Recurring shipping cycles
- Standardized workflows
- Testing project variations
Duplication Process
Step 1: Select Project to Duplicate
- Find the source project
- Open options menu (⋮)
- Click "Duplicate"
Step 2: Review Duplicated Elements
What Gets Copied:
- Project name (with "Copy" suffix)
- Description
- Task structure
- Milestone setup
- Custom fields
- Workflow stages
What Doesn't Get Copied:
- Task completion status (all reset to initial state)
- Comments and discussions
- File attachments
- Actual dates (reset to current date)
- Historical data
Step 3: Customize Duplicated Project
- Rename the project
- Update description if needed
- Adjust dates and timeline
- Assign team members
- Modify tasks as needed
Creating Project Templates
Template Benefits
Templates help you:
- Standardize operations
- Ensure consistency
- Save time on setup
- Share best practices
- Onboard new team members faster
Creating a Template
Step 1: Prepare Source Project
- Create a comprehensive project
- Add all standard tasks
- Include milestones
- Set up workflows
- Add documentation
Step 2: Save as Template
- Open project options menu
- Select "Save as template"
- Name your template
- Add template description
- Categorize template (optional)
- Save
Step 3: Using Templates
To Create Project from Template:
- Go to Manage Projects page
- Click "Add Project"
- Select "From Template" option
- Choose your template
- Customize as needed
- Create project
Template Management:
- Edit templates anytime
- Version control for templates
- Share templates across organization
- Archive outdated templates
Editing Projects
Edit Project Details
Step 1: Access Edit Mode
- Find the project card
- Click three-dot menu (⋮)
- Select "Edit"
Step 2: Modify Information
Editable Fields:
- Project name
- Description
- Start date
- Due date
- Status
- Team members
- Budget information
- Custom fields
Step 3: Save Changes
- Make your modifications
- Click "Save" or "Update"
- Changes reflect immediately
- Team receives notification (if configured)
Best Practices:
- Document major changes in comments
- Notify affected team members
- Update related tasks if timeline changes
- Maintain change history
Deleting Projects
Before You Delete
Consider Alternatives:
- Change status to "OnHold" instead
- Archive the project
- Mark as "Finished" if completed
- Save as template for future reference
When to Delete:
- Duplicate projects created by mistake
- Test projects no longer needed
- Cancelled projects with no historical value
Deletion Process
Step 1: Initiate Deletion
- Open project options menu (⋮)
- Click "Delete" (red text)
Step 2: Confirm Deletion
- Confirmation dialog appears
- Warning: "This action cannot be undone"
- Type project name to confirm (security measure)
- Click "Delete" to proceed
Step 3: Post-Deletion
- Project removed from system
- Associated tasks deleted
- Team members notified
- Project data cannot be recovered
⚠️ Important Warning:
- Deletion is permanent
- All project data is lost
- Tasks and milestones are removed
- Comments and files are deleted
- Consider exporting data before deletion
Project Status Management
Status Types
1. Ongoing
- Indicator: Gray badge
- Meaning: Active project
- Use: Default status for active work
- Actions: All features available
2. Finished
- Indicator: Green badge
- Meaning: Completed project
- Use: Delivered and closed projects
- Actions: Read-only or limited editing
3. OnHold
- Indicator: Orange badge
- Meaning: Temporarily paused
- Use: Waiting for resources, decisions, or dependencies
- Actions: Can be reactivated anytime
Changing Project Status
Method 1: Via Edit
- Edit project details
- Change status dropdown
- Save changes
Method 2: Quick Status Change
- Some views offer quick status toggle
- Click current status badge
- Select new status
- Confirm change
Status Change Notifications:
- Team members receive alerts
- Status visible on project card
- Dashboard metrics update
- Reports reflect new status
Project Best Practices
Naming Conventions
Effective Project Names Should:
- Be descriptive and specific
- Include key identifiers (client, product, date)
- Be consistent across similar projects
- Be searchable
Examples:
- ✅ "Q1 2025 - Client ABC - Cotton Shipment"
- ✅ "Trade Finance - XYZ Corp - Jan 2025"
- ❌ "Project 1"
- ❌ "New Trading"
Description Guidelines
Include:
- Project objectives and goals
- Scope of work
- Key deliverables
- Important stakeholders
- Special requirements or constraints
- Success criteria
Best Practices:
- Keep it concise but comprehensive
- Use bullet points for clarity
- Update as project evolves
- Include relevant links or references
Team Assignment
When Assigning Users:
- Assign only relevant team members
- Define roles clearly
- Communicate responsibilities
- Update assignments as needed
- Remove users when no longer involved
Timeline Management
Setting Due Dates:
- Be realistic with timelines
- Build in buffer time
- Consider dependencies
- Account for holidays and absences
- Update dates if scope changes
Project Collaboration Features
Team Members Section
Viewing Team Members:
- Shows on project detail page
- Displays avatars and names
- Indicates roles
- Shows task assignments
Member Capabilities:
- View project information
- Access assigned tasks
- Comment and collaborate
- Upload files
- Receive notifications
Clients Section
Client Management:
- Separate section for external stakeholders
- Limited access compared to team members
- View-only permissions typical
- Controlled information sharing
Adding Clients:
- Use "Share to Clients" option
- Select information to share
- Send invitation
- Monitor client engagement
Vendors Section
Vendor Tracking:
- Track external service providers
- Monitor vendor deliverables
- Manage vendor communications
- Link vendor documents
Common Project Scenarios
Scenario 1: Starting a New Trading Operation
Steps:
- Create new project: "Q1 Trade - [Client Name]"
- Add description with trade details
- Assign trading team members
- Set timeline based on shipment schedule
- Create tasks for each stage
- Add clients for visibility
- Track progress through completion
Scenario 2: Managing Multiple Shipments
Approach:
- Create separate project for each shipment
- Use consistent naming: "Shipment [ID] - [Product]"
- Duplicate template for efficiency
- Assign logistics team
- Track each shipment independently
- Generate reports across all projects
Scenario 3: Long-term Trading Partnership
Strategy:
- Create master project for partnership
- Add milestones for major deliveries
- Invite client for ongoing visibility
- Update status as partnership evolves
- Document all activities
- Generate periodic reports
Troubleshooting Projects
Cannot Create Project
Issue: Create button disabled or error on submission
Solutions:
- Ensure all required fields (*) are filled
- Check that project name is unique
- Verify you have permission to create projects
- Try refreshing the page
- Contact administrator if issue persists
Project Not Appearing
Issue: Created project doesn't show in list
Solutions:
- Check applied filters (status, date range)
- Click "Clear" to reset filters
- Refresh the page
- Verify project was saved successfully
- Check if project was assigned to different status
Cannot Edit Project
Issue: Edit option grayed out or not working
Solutions:
- Verify you have edit permissions
- Check if project is locked
- Ensure you're not in view-only mode
- Contact project owner for access
- Check system permissions with administrator
Team Members Not Receiving Notifications
Issue: Users don't get project updates
Solutions:
- Verify users are properly added to project
- Check notification settings
- Ensure email addresses are correct
- Check spam/junk folders
- Review system notification configuration
Project Metrics and Reporting
Key Project Metrics
Track these metrics for project success:
Timeline Metrics:
- Days until due date
- Days overdue (if applicable)
- Percentage of timeline elapsed
Task Metrics:
- Total tasks
- Completed tasks
- In-progress tasks
- Blocked tasks
Resource Metrics:
- Team members assigned
- Hours logged
- Budget utilized
Engagement Metrics:
- Comments count
- Files uploaded
- Last activity date
Accessing Project Reports
Navigate to Project Report in sidebar for:
- Individual project analytics
- Cross-project comparisons
- Team performance metrics
- Timeline analysis
- Budget tracking
Summary
Effective project management in Trackr involves:
✅ Creating well-defined projects with clear names and descriptions
✅ Assigning the right team members to appropriate roles
✅ Using templates and duplication for efficiency
✅ Managing project status throughout lifecycle
✅ Collaborating with clients and vendors effectively
✅ Tracking metrics and progress continuously
✅ Maintaining organized project portfolio with proper filters
Master these project management skills to ensure successful trading and shipping operations.