System Setup
Introduction
System Setup is where you configure Trackr to match your organization's workflows. This section covers configuring task stages, trading stages, shipping stages, and other system-wide settings that affect how your projects operate.
Accessing System Setup
Navigation:
- Click on System Setup in the left sidebar
- The System Setup menu expands to show options:
- Trading Stage
- Shipping Stage
- Task Stage
Purpose:
- Customize workflow stages
- Match your business processes
- Standardize operations
- Improve team efficiency
Managing Task Stages
Overview
Task stages define the workflow that tasks move through from creation to completion. Customizing these stages ensures they match your operational processes.
Default Task Stages:
- Todo (Blue)
- In Progress (Gray/Dark)
- Review (Blue)
- Done (Green)
Access Task Stages:
- Navigate to System Setup
- Click on Task Stage
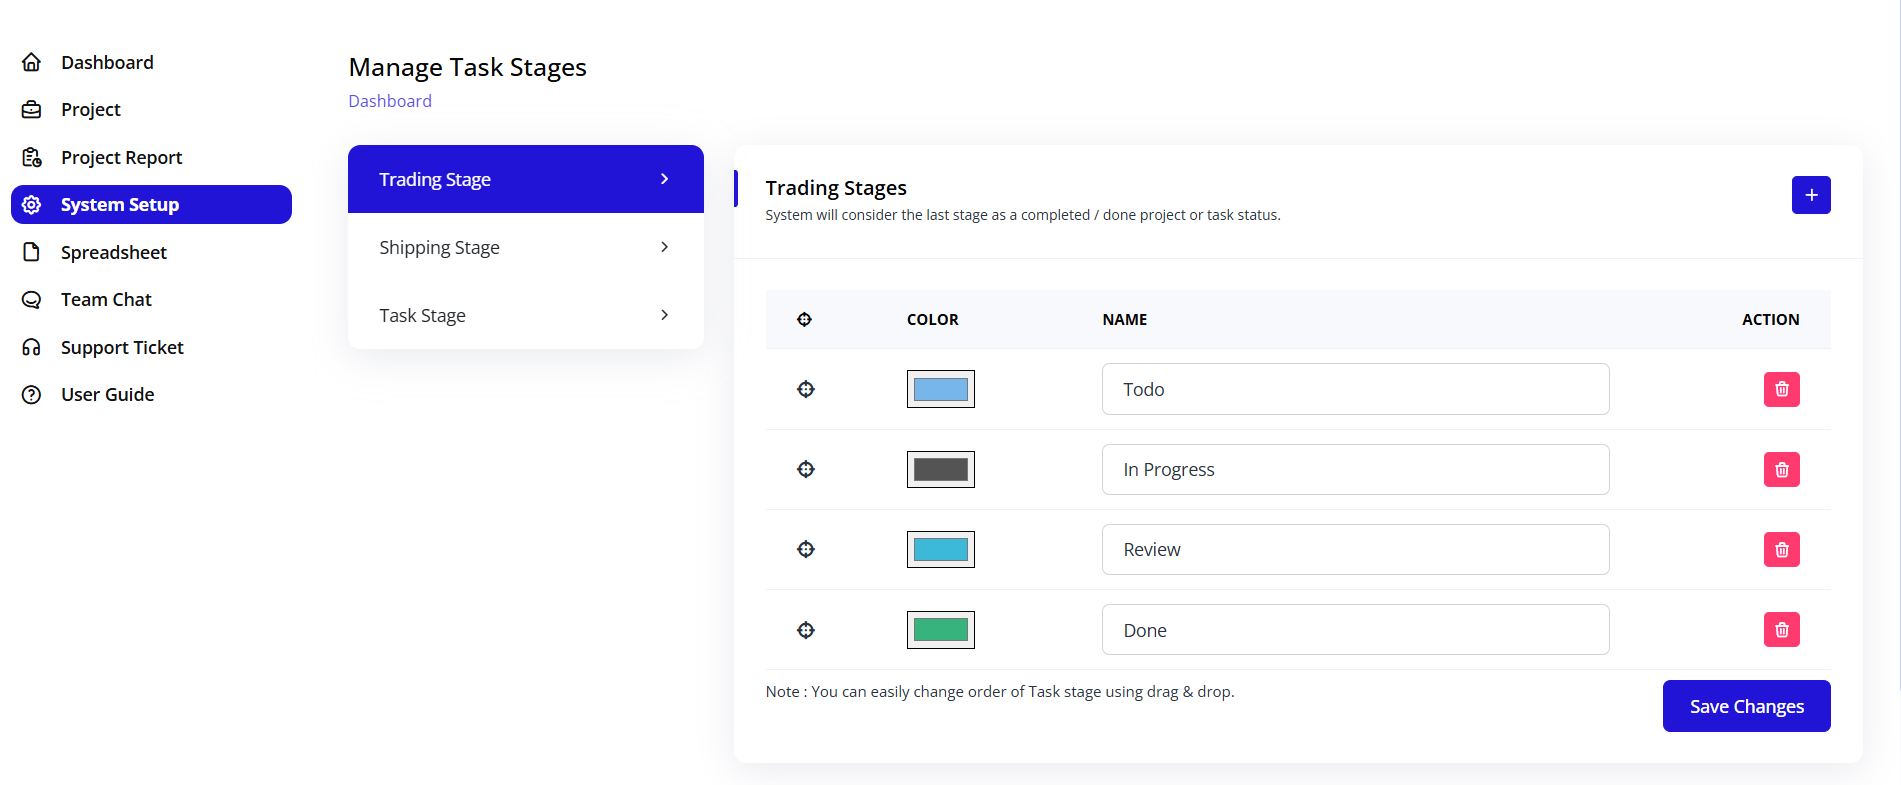
- View "Manage Task Stages" page
Task Stage Configuration
Trading Stages Section
Description: "System will consider the last stage as a completed / done project or task status."
This means the final stage in your list will mark tasks as complete.
Trading Stages Table:
Columns:
- ☰ (Drag Handle): Reorder stages
- COLOR: Visual indicator for stage
- NAME: Stage name/label
- ACTION: Delete button (trash icon)
Default Trading Stages:
-
Todo (Light blue color)
- Initial stage for new tasks
- Represents backlog or planning
-
In Progress (Dark gray color)
- Active work stage
- Tasks being worked on
-
Review (Light blue color)
- Completed work awaiting approval
- Quality check stage
-
Done (Green color)
- Final completion stage
- Archived completed work
- Marks task as 100% complete
Adding New Task Stage
To Add Stage:
- Scroll to "Trading Stages" section
- Click the + (Plus) button in the top right
- New row appears at the bottom
- Configure the new stage:
Stage Configuration Fields:
☰ Drag Handle:
- Click and hold to reorder
- Drag up or down
- Position determines workflow sequence
COLOR Selector:
- Click color box
- Color picker appears
- Choose from palette
- Or enter hex code
- Color appears on task board
NAME Field:
- Enter stage name
- Keep it concise (1-2 words)
- Use action-oriented names
- Examples: "Awaiting Approval", "Testing", "On Hold"
ACTION Column:
- Trash icon (red) to delete
- Confirm deletion prompt
- Cannot delete if tasks exist in that stage
Reordering Task Stages
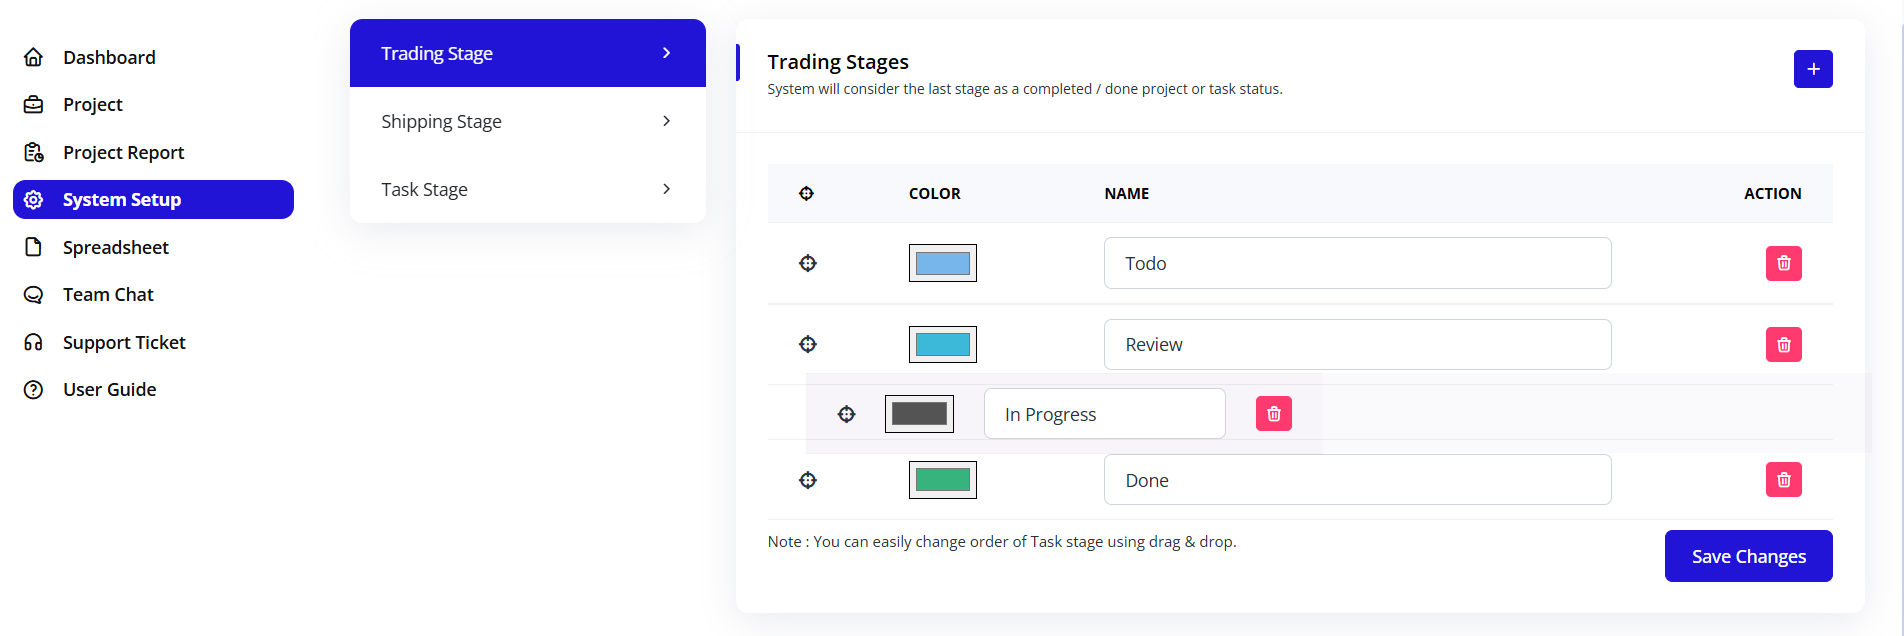
Important Note: "You can easily change order of Task stage using drag & drop."
To Reorder:
- Click and hold the drag handle (☰) on the left
- Drag stage up or down to new position
- Drop in desired location
- Order updates immediately
- Task board reflects new order
Workflow Sequence:
- Stages appear left-to-right on task board
- Order in this list = order on board
- First stage = leftmost column
- Last stage = rightmost column (completion)
Deleting Task Stages
To Delete a Stage:
- Click the trash icon (🗑️) in ACTION column
- Confirmation dialog appears
- Confirm deletion
- Stage removed from system
⚠️ Important Warnings:
- Cannot delete stage with active tasks
- Must move tasks to different stage first
- Cannot delete if only one stage exists
- Must have minimum 2 stages
Before Deleting:
- Check if tasks exist in this stage
- Move tasks to appropriate alternate stage
- Ensure workflow still makes sense
- Consider hiding instead of deleting
Saving Stage Changes
Save Changes Button:
- Location: Bottom right
- Color: Blue
- Function: Apply all stage modifications
To Save:
- Make your changes (add, edit, delete, reorder)
- Click "Save Changes" button
- System validates configuration
- Changes applied across all projects
- Task boards update automatically
- Team members notified of changes
Validation Checks:
- Minimum 2 stages required
- All stages must have names
- All stages must have colors
- No duplicate stage names
- Last stage designated as completion stage
Managing Shipping Stages
Overview
Shipping stages track the progress of shipment-related projects. These stages represent the physical movement and documentation flow of goods.
Access Shipping Stages:
- Navigate to System Setup
- Click on Shipping Stage
- View "Manage Shipping Stages" page
Default Shipping Stages
Typical Shipping Workflow:
- Order Placed - Initial booking
- Documentation - Paperwork preparation
- In Transit - Goods moving
- Customs Clearance - Import/export processing
- Delivered - Final delivery
Configuring Shipping Stages
Configuration Works Same as Task Stages:
Shipping Stages Table:
- ☰ (Drag Handle): Reorder stages
- COLOR: Visual color coding
- NAME: Stage name
- ACTION: Delete button
Adding Shipping Stage
To Add New Stage:
- Click + (Plus) button
- New row appears
- Select color
- Enter stage name
- Position using drag handle
Common Shipping Stages:
- Pre-shipment
- Documentation Prepared
- Cargo Loaded
- In Transit
- At Port
- Customs Processing
- Out for Delivery
- Delivered
- POD Received (Proof of Delivery)
Stage Color Coding
Recommended Colors:
- Blue: Planning/Documentation stages
- Orange: In-transit stages
- Yellow: Waiting/pending stages
- Green: Completed stages
- Red: Issue/problem stages
Shipping Stage Order
Logical Flow:
- Pre-shipment activities
- Documentation preparation
- Physical movement
- Customs/regulatory
- Final delivery
Best Practice:
- Order should match actual shipment flow
- Consider both export and import steps
- Include regulatory checkpoints
- Account for delays and holds
Managing Trading Stages
Overview
Trading stages track the progression of trade finance and trading operations from initiation to settlement.
Access Trading Stages:
- Navigate to System Setup
- Click on Trading Stage
- View "Manage Trading Stages" page
Default Trading Stages
Typical Trading Workflow:
- Inquiry - Initial client contact
- Quotation - Price and terms provided
- Negotiation - Terms discussion
- Contract - Agreement signed
- Financing - Payment arrangements
- Execution - Trade fulfillment
- Settlement - Payment completion
Configuring Trading Stages
Trading Stages Section:
Description: "System will consider the last stage as a completed / done project or task status."
Important Notes:
- Last stage = completion
- All previous stages = in-progress
- Stage order matters
- Color coding aids visibility
Adding Trading Stage
Common Trading Stages:
- Lead Generation
- RFQ (Request for Quote)
- Quote Sent
- Under Negotiation
- Contract Preparation
- Contract Signed
- LC Opened (Letter of Credit)
- Documents Prepared
- Documents Submitted
- Payment Received
- Trade Completed
Financial Stages:
- Financing Requested
- Credit Approval
- LC Application
- LC Issued
- Documents Negotiated
- Payment Released
Trading Stage Best Practices
Stage Naming:
- Use industry-standard terms
- Be specific and clear
- Avoid ambiguous names
- Keep consistent with documentation
Stage Progression:
- Follow logical business flow
- Include approval gates
- Account for financing steps
- Include documentation milestones
Color Strategy:
- Blue: Initial stages
- Orange: Negotiation/approval
- Purple: Financing stages
- Yellow: Documentation
- Green: Completion
Stage Management Best Practices
Workflow Design
Principles for Effective Stages:
-
Keep it Simple
- Minimum necessary stages
- Avoid over-complication
- 4-8 stages optimal
- Too many stages = confusion
-
Match Reality
- Reflect actual processes
- Include key milestones
- Account for common scenarios
- Test with real projects
-
Clear Definitions
- Each stage has clear entry criteria
- Exit criteria well-defined
- No ambiguity about transitions
- Document stage meanings
-
Visual Clarity
- Distinct colors
- Meaningful names
- Logical progression
- Easy to understand at glance
Multi-Type Projects
If You Handle Multiple Operation Types:
Option 1: Single Unified Workflow
- Generic stages that work for all types
- Example: Planning → Execution → Review → Complete
- Pros: Simplicity, consistency
- Cons: May not capture specifics
Option 2: Type-Specific Stages
- Different stage sets for different project types
- Example: Trading stages vs Shipping stages
- Pros: Precise tracking
- Cons: More complex setup
Recommendation:
- Start with unified workflow
- Split only if necessary
- Use custom fields for specifics
- Keep stage count manageable
Stage Transition Rules
Define Clear Rules:
Entry Criteria:
- What must be complete before entering?
- Who approves the transition?
- What documentation is required?
Exit Criteria:
- What must be done in this stage?
- What deliverables are required?
- Who approves moving to next stage?
Example: Review Stage
Entry Criteria:
- All tasks completed
- All deliverables submitted
- Team lead notified

Exit Criteria:
- Quality check passed
- Stakeholder approval received
- Documentation updated
Common Stage Configurations
Configuration 1: Simple Workflow
Use Case: Small teams, straightforward projects
Stages:
- To Do (Blue)
- In Progress (Orange)
- Done (Green)
Benefits:
- Easy to understand
- Quick to implement
- Minimal training needed
- Fast transitions
Configuration 2: Standard Workflow
Use Case: Medium teams, standard operations
Stages:
- Backlog (Gray)
- To Do (Blue)
- In Progress (Orange)
- Review (Purple)
- Done (Green)
Benefits:
- Balances simplicity and detail
- Includes quality check
- Common industry standard
- Suitable for most teams
Configuration 3: Advanced Workflow
Use Case: Large teams, complex operations
Stages:
- Backlog (Gray)
- Planned (Light Blue)
- In Progress (Orange)
- Code Review (Purple) [if tech]
- Testing (Yellow)
- UAT (Pink)
- Approved (Light Green)
- Done (Green)
Benefits:
- Detailed tracking
- Multiple checkpoints
- Clear accountability
- Comprehensive audit trail
Configuration 4: Trading Operations
Use Case: Trade finance operations
Stages:
- Inquiry (Light Blue)
- Quotation (Blue)
- Negotiation (Orange)
- Contract (Purple)
- Financing (Yellow)
- Execution (Pink)
- Settlement (Green)
Benefits:
- Matches trading lifecycle
- Clear financial milestones
- Regulatory compliance
- Stakeholder visibility
Configuration 5: Shipping Operations
Use Case: Logistics and shipping
Stages:
- Booking (Light Blue)
- Documentation (Blue)
- Loaded (Orange)
- In Transit (Yellow)
- At Port (Pink)
- Customs (Purple)
- Delivered (Green)
Benefits:
- Physical progress tracking
- Customs checkpoint
- Client visibility
- Proof of delivery
Testing Stage Configuration
Test Before Rollout
Testing Steps:
-
Create Test Project
- Set up sample project
- Use new stage configuration
- Don't use live data
-
Create Test Tasks
- Add tasks to each stage
- Try moving between stages
- Test drag and drop
-
Verify Workflow
- Does progression make sense?
- Are transitions logical?
- Any missing stages?
- Any unnecessary stages?
-
Check Visualizations
- View task board
- Check color coding
- Verify stage order
- Test filters
-
Team Review
- Show to key team members
- Get feedback
- Make adjustments
- Document any confusion
-
Training Materials
- Update documentation
- Create stage definitions
- Prepare transition guidelines
- Plan training session
Pilot Program
Before Full Rollout:
-
Select Pilot Team
- Choose one team or project
- Brief participants
- Set timeline (2-4 weeks)
-
Monitor Usage
- Track how stages are used
- Note any issues
- Collect feedback
- Watch for workarounds
-
Gather Feedback
- What works well?
- What's confusing?
- What's missing?
- What's unnecessary?
-
Adjust Configuration
- Make refinements
- Test again
- Document changes
- Update training
-
Full Rollout
- Train all users
- Migrate existing projects
- Provide support
- Monitor adoption
Migrating to New Stages
Planning Migration
When Changing Existing Stages:
Consider Impact:
- How many active projects affected?
- How many active tasks affected?
- Will historical data remain accessible?
- Can we map old to new stages?
Migration Strategy:
Option 1: Immediate Switch
- Change stages all at once
- Remap existing tasks
- Brief disruption
- Clean cutover
Option 2: Gradual Transition
- New projects use new stages
- Old projects continue with old
- Eventually migrate all
- Longer transition period
Option 3: Hybrid Approach
- Keep both stage sets
- Gradually phase out old
- Parallel operation period
- Flexibility for teams
Mapping Old to New Stages
Create Mapping Document:
Old Stage → New Stage
-------------------
To Do → Backlog
Started → In Progress
Checking → Review
Finished → Done
Automated Remapping:
- Export current task data
- Create mapping rules
- Update stage assignments
- Verify all tasks mapped
- Import updated data
Manual Review:
- Check edge cases
- Verify critical tasks
- Update any custom workflows
- Notify affected teams
Stage Reporting and Analytics
Stage Metrics
Key Metrics to Track:
Cycle Time by Stage:
- How long tasks spend in each stage
- Identify bottlenecks
- Optimize workflow
- Resource allocation
Stage Distribution:
- Number of tasks per stage
- Balance across workflow
- Capacity planning
- Workload visibility
Transition Patterns:
- Common paths through stages
- Backwards movements (rework)
- Skipped stages
- Process optimization
Completion Rates:
- Tasks reaching final stage
- Time from start to finish
- Success rates
- Trend analysis
Generating Stage Reports
To View Stage Analytics:
- Navigate to Project Report
- Select "Stage Analysis"
- Choose date range
- Select projects to include
- Generate report
Report Includes:
- Stage duration averages
- Current stage distribution
- Historical trends
- Bottleneck identification
- Recommendations
Advanced Stage Features
Stage Automation Rules
Automate Stage Transitions:
Auto-Advance Rules:
- When checklist 100% complete → Move to Review
- When all subtasks done → Move to Testing
- When approval received → Move to Done
Setting Up Auto-Advance:
- Go to System Setup
- Select Automations
- Click "+ New Rule"
- Choose trigger (e.g., "Checklist Complete")
- Choose action (e.g., "Move to Review")
- Set conditions
- Enable rule
Notification Rules:
- Alert when task enters stage
- Notify when task stuck in stage
- Escalate if stage time exceeded
Stage-Specific Fields
Custom Fields per Stage:
Example:
- Review stage shows "Reviewer" field
- Testing stage shows "Test Results" field
- Approval stage shows "Approver" field
Configuration:
- Define custom fields
- Associate with specific stages
- Fields appear/disappear based on stage
- Conditional field requirements
Stage Templates
Save Stage Configurations:
- Export stage setup
- Save as template
- Apply to new instances
- Share across organizations
Template Use Cases:
- Multiple Blockpeer instances
- Different departments
- Client-specific setups
- Best practice sharing
Stage Permissions and Security
Stage-Based Permissions
Control Who Can:
- Move tasks to specific stages
- Edit tasks in certain stages
- View tasks in restricted stages
- Approve stage transitions
Example Permission Structure:
Todo Stage:
- Anyone can create tasks
- Anyone can move to In Progress

Review Stage:
- Only team leads can move tasks here
- Only managers can move to Done

Done Stage:
- Read-only for most users
- Only admins can modify
Setting Stage Permissions:
- Navigate to System Setup
- Select Permissions
- Choose stage
- Define user roles and actions
- Save permissions
Approval Gates
Require Approval Before Stage Transition:
Use Cases:
- Manager approval before completion
- Quality check before delivery
- Compliance review before submission
- Client sign-off before closure
Configuration:
- Select stage requiring approval
- Enable "Approval Required"
- Designate approvers
- Set approval criteria
- Configure notifications
Approval Process:
- User attempts stage transition
- Approval request sent
- Approver receives notification
- Approver reviews and decides
- If approved, task moves
- If rejected, task remains with comments
Troubleshooting Stage Issues
Common Issues and Solutions
Issue: Tasks Stuck in One Stage
Symptoms:
- Many tasks pile up in one stage
- Workflow bottleneck
- Delayed completions
Solutions:
- Identify the bottleneck stage
- Review stage definition
- Add resources to that stage
- Split stage into smaller steps
- Automate where possible
- Reassign tasks for balance
Issue: Stages Skipped
Symptoms:
- Tasks jumping stages
- Missing quality checks
- Incomplete workflows
Solutions:
- Enable stage validation
- Require all stages in sequence
- Add approval gates
- Train team on proper flow
- Use automation rules
- Monitor compliance
Issue: Too Many Backwards Movements
Symptoms:
- Tasks frequently moved back
- High rework rate
- Extended cycle times
Solutions:
- Improve entry criteria
- Add validation checks earlier
- Better task descriptions
- Enhance review process
- Training on quality standards
- Earlier stakeholder involvement
Issue: Confusing Stage Names
Symptoms:
- Team unsure where to place tasks
- Inconsistent stage usage
- Frequent questions
Solutions:
- Rename stages clearly
- Add stage descriptions
- Create visual guide
- Provide examples
- Conduct training
- Document stage definitions
Issue: Too Many Stages
Symptoms:
- Overwhelming board view
- Slow transitions
- Admin overhead
Solutions:
- Consolidate similar stages
- Remove rarely-used stages
- Combine sequential stages
- Simplify workflow
- Use sub-statuses instead
- Aim for 4-7 stages maximum
Stage Documentation Template
Document Your Stages
For Each Stage, Document:
Stage Name: [Name]
Purpose:
- What this stage represents
- Why it exists in workflow
Entry Criteria:
- What must be completed before entering
- Required approvals or checks
- Necessary documentation
Activities:
- What work happens in this stage
- Who is responsible
- Typical duration
Exit Criteria:
- What must be completed to exit
- Required deliverables
- Quality standards
Approvals:
- Who must approve transition
- Approval process
- Escalation path
Common Issues:
- Known bottlenecks
- Troubleshooting tips
- Workarounds
Example: Review Stage
Stage Name: Review

Purpose:
- Quality assurance checkpoint
- Ensure deliverables meet standards
- Client/stakeholder approval

Entry Criteria:
- All task activities completed
- All deliverables submitted
- Self-review performed
- Ready for external review

Activities:
- Reviewer examines deliverables
- Tests against acceptance criteria
- Documents findings
- Provides feedback
- Duration: 1-2 days

Exit Criteria:
- All acceptance criteria met
- No critical issues found
- Stakeholder approval received
- Documentation updated

Approvals:
- Team Lead or Manager
- Client (if external review)
- Compliance (if required)

Common Issues:
- Incomplete deliverables → Return to In Progress
- Missing documentation → Request from assignee
- Scope changes → Update requirements first
Summary
Effective stage configuration ensures:
✅ Clear workflow that matches your business processes
✅ Appropriate stages for each operation type (trading, shipping, tasks)
✅ Logical progression from initiation to completion
✅ Visual clarity with color coding and naming
✅ Flexible management with drag-and-drop reordering
✅ Easy tracking of progress and bottlenecks
✅ Consistent operations across all projects and teams
Properly configured stages are the foundation of effective project tracking in Trackr.