Getting Started
Initial Setup
Step 1: Access Blockpeer Signet
- Log in to your BlockPeer account
- From the module selection screen, click on Signet (eSignature)
- You'll be taken to the Signet dashboard
Step 2: Understanding the Dashboard
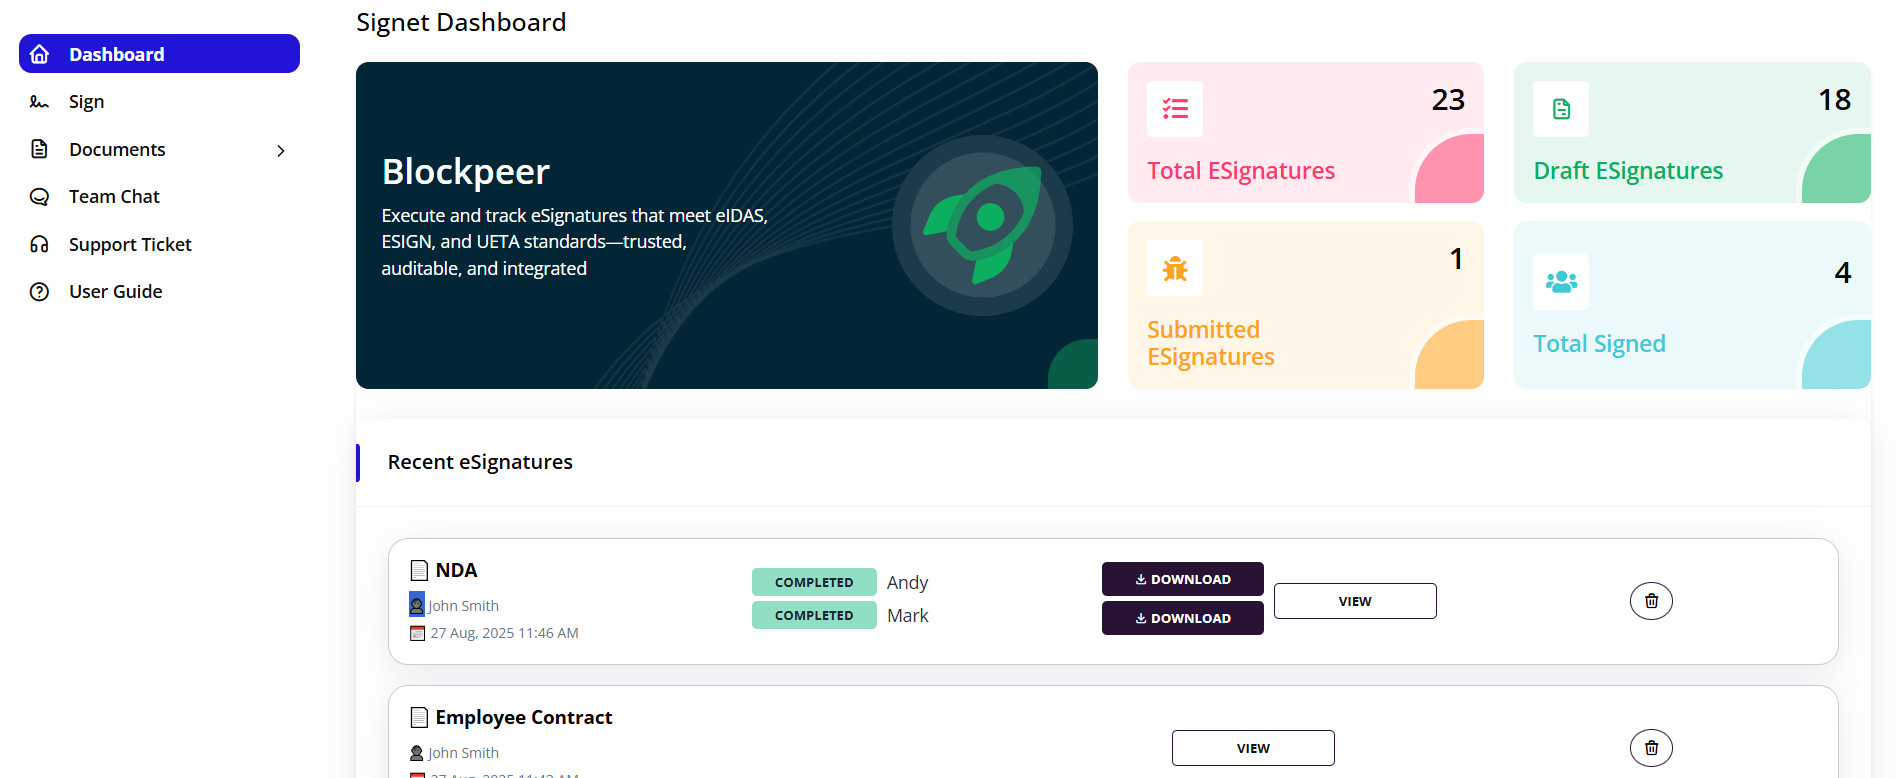
The Signet dashboard provides a comprehensive overview of your eSignature activities:
Key Metrics:
- Total ESignatures: All eSignature requests created (23)
- Draft ESignatures: Documents being prepared (18)
- Submitted ESignatures: Documents sent for signatures (1)
- Total Signed: Completed documents with all signatures (4)
Dashboard Features:
- Real-time statistics on signature status
- Compliance with eIDAS, ESIGN, and UETA standards
- Trusted, auditable, and integrated signature tracking
- Quick access to recent eSignatures
Step 3: Understanding the Two Signature Options

When you click Sign from the menu, you'll see two options:
Option 1: Send for Signatures
- Request others to sign your document
- Distribute documents to multiple parties
- Track signing progress
- Receive notifications when signed
- Use for: Contracts, agreements, NDAs requiring external signatures
Option 2: Sign Yourself
- Complete your own eSignature process
- Sign documents immediately
- No external parties needed
- Use for: Personal documents, internal forms, self-signing requirements
Step 4: Choose Your Workflow
When to use "Send for Signatures":
- Multi-party agreements
- Contracts requiring client/vendor signatures
- Employment agreements
- Service contracts
- Any document requiring external authorization
When to use "Sign Yourself":
- Personal document signing
- Internal acknowledgments
- Quick self-certifications
- Testing signature process
- Documents where you're the only signer
Quick Start Guide
Creating Your First eSignature Request
For Sending to Others:
- Click Sign in the sidebar
- Select Send for signatures
- Enter document title
- Upload your document
- Add parties and signature fields
- Click Send
- Track signatures in dashboard
For Self-Signing:
- Click Sign in the sidebar
- Select Sign yourself
- Enter document title
- Upload your document
- Add your signature fields
- Complete signature
- Download signed document
Navigation Overview
Main Menu Structure
Dashboard
- View signature statistics
- Access recent eSignatures
- Monitor signing activity
- Quick overview of pending items
Sign
- Initiate new signature requests
- Choose between send or self-sign
- Quick access to signature workflows
Documents
- All: View all signature requests
- Pending: Documents awaiting signatures
- Scheduled: Future-dated signature requests
- Completed: Fully signed documents
Team Chat
- Discuss signature requests with team
- Collaborate on documents
- Internal communication
Support Ticket
- Get help with signature issues
- Technical support
- Account assistance
User Guide
- Detailed documentation
- Tutorial videos
- Best practices
Understanding Document Status
eSignature documents have different states throughout their lifecycle:
Draft
- Document is being prepared
- Not yet sent to signers
- Can be edited and modified
- Signature fields being configured
Pending
- Document sent to signers
- Awaiting signatures
- Notifications sent to parties
- Tracking views and interactions
Scheduled
- Signature request scheduled for future date
- Will be sent automatically at scheduled time
- Can be edited before send date
Completed
- All required signatures collected
- Document is legally binding
- Available for download
- Audit trail complete
Best Practices
Document Preparation
- Ensure document is finalized before sending
- Review all content for accuracy
- Check that file is in supported format (PDF recommended)
- Remove any editing restrictions
Adding Parties
- Verify email addresses are correct
- Use full legal names
- Include role or title of signers
- Specify signing order if sequential
Signature Field Placement
- Place signature fields clearly
- Ensure fields don't overlap text
- Label each field appropriately
- Add date fields next to signatures
- Include initials for multi-page documents
Sending Process
- Add a clear message to signers
- Set appropriate deadline if needed
- Include signing instructions
- Send test document first (for important contracts)
Tracking and Follow-up
- Monitor dashboard regularly
- Send reminders to pending signers
- Check analytics for viewing activity
- Download completed documents promptly
Common Use Cases
Business Contracts
- Service agreements
- Vendor contracts
- Partnership agreements
- Client proposals
Human Resources
- Employment contracts
- Offer letters
- Non-disclosure agreements
- Policy acknowledgments
Sales and Marketing
- Sales agreements
- Customer contracts
- Subscription agreements
- Terms and conditions acceptance
Legal Documents
- NDAs (Non-Disclosure Agreements)
- Settlement agreements
- Legal notices
- Authorization forms
Real Estate
- Lease agreements
- Property documents
- Rental contracts
- Authorization letters
Security and Compliance
Standards Compliance
Blockpeer Signet meets international eSignature standards:
eIDAS (EU)
- European Union regulation for electronic identification
- Legally binding across EU member states
- Advanced and qualified electronic signatures
ESIGN (US)
- Electronic Signatures in Global and National Commerce Act
- Federal law governing electronic signatures in the USA
- Ensures legal validity
UETA (US)
- Uniform Electronic Transactions Act
- Adopted by most US states
- Provides legal framework for electronic records
Security Features
Document Security:
- End-to-end encryption
- Secure document storage
- Tamper-evident technology
- Access controls
Signature Verification:
- Multi-factor authentication
- Email verification
- IP address tracking
- Timestamp recording
Audit Trail:
- Complete signing history
- All actions logged
- Signer identification details
- Court-admissible evidence
Troubleshooting
Q: I don't see the Sign option in my menu A: Ensure you have the necessary permissions. Contact your administrator to grant Signet module access.
Q: Can I edit a document after sending it? A: No, once sent, documents are locked to maintain integrity. You must cancel and create a new signature request if changes are needed.
Q: How do signers receive documents? A: Signers receive an email notification with a secure link to view and sign the document.
Q: What file formats are supported? A: PDF is the recommended format. Other formats like Word, images, and text files can be uploaded and will be converted.
Q: Is there a limit on document size? A: Documents should be under 25MB for optimal performance. Larger documents may need to be compressed.
Q: Can I add more signers after sending? A: Not to an active document. You need to cancel the current request and create a new one with all signers.
Q: How long are completed documents stored? A: Signed documents are stored indefinitely in the system. You can download them anytime for external storage.
Q: What happens if a signer doesn't receive the email? A: Check spam/junk folders first. You can resend the notification from the document's detail page.
Getting Help
Support Resources
In-App Support:
- Click Support Ticket from the menu
- Submit detailed description of your issue
- Attach screenshots if helpful
- Track ticket status
User Guide:
- Access comprehensive documentation
- Watch tutorial videos
- Review FAQs
- Learn best practices
Team Chat:
- Ask colleagues for help
- Share tips and tricks
- Discuss common issues
- Collaborate on solutions
Email Support:
- Contact support@blockpeer.com
- Include account details
- Describe issue clearly
- Expect response within 24 hours
Next Steps
Now that you understand the basics:
- Read the detailed Sign documentation to learn about creating and managing eSignature requests
- Practice with a test document using the "Sign yourself" option
- Set up your first multi-party signature using "Send for signatures"
- Explore the Documents section to manage all your signature requests
- Configure notifications to stay updated on signature progress
Quick Reference
Common Actions
| Action | Steps |
|---|---|
| Create new signature request | Sign > Choose method > Enter title > Upload document |
| View all documents | Documents > All |
| Check pending signatures | Documents > Pending |
| Download signed document | Open completed document > Download |
| Track signature progress | Dashboard > Recent eSignatures > View |
| Cancel signature request | Open document > Cancel (available for pending only) |
| Resend notification | Open document > Resend to signer |
Keyboard Shortcuts
| Shortcut | Action |
|---|---|
| Ctrl/Cmd + N | New signature request |
| Ctrl/Cmd + D | Go to dashboard |
| Ctrl/Cmd + F | Search documents |
| Esc | Close dialog/modal |
Status Icons Guide
- 🟢 Completed - All signatures collected
- 🟡 Pending - Awaiting signatures
- ⚪ Draft - Being prepared
- 🔵 Scheduled - Will send on future date
- 🔴 Expired - Deadline passed
- ⚫ Cancelled - Request cancelled