Booking Management
Introduction
The Booking Management section is the starting point of your freight workflow. Here you create, review, and process booking requests from customers. Once accepted, bookings can be converted to shipments for further processing.

Accessing Booking Management
Navigation:
- Log in to your Blockpeer account
- Click Booking in the left sidebar
- The booking list page will display
Booking List Overview
Understanding the Booking Table
The booking list displays all booking requests with the following columns:
NO
- Sequential number
- Booking order in list
NAME
- Booking reference number
- Auto-generated format: #BOOK00001, #BOOK00002, etc.
- Click to view booking details
- Unique identifier for each booking
CUSTOMER
- Customer name who made the booking
- From customer database
- Bill To customer reference
VESSEL
- Vessel name or number
- Transportation vessel details
- Example: "123"
TRANSPORT
- Mode of transportation
- Options: ocean, air, land
- Example: "ocean"
STATUS
- Current booking status
- Color-coded badge:
- Draft (Blue): Initial state, not submitted
- Pending (Yellow): Awaiting review
- Accepted (Green): Approved booking
- Rejected (Red): Declined booking
ACTION
- Action buttons for booking management:
- Accept (Green checkmark): Approve the booking
- Reject (Red X): Decline the booking
- Convert To Ship (Blue ship icon): Move to shipping (appears after acceptance)
- View/Edit (Blue eye/pencil icon): View or modify booking details
- Delete (Red trash icon): Remove booking
Table Features
Search Functionality
- Search box in top right corner
- Search by booking name, customer, or vessel
- Real-time filtering
Pagination
- "Entries Per Page" dropdown (top left)
- Options: 10, 25, 50, 100 entries
- Shows "Showing X to Y of Z entries"
- Navigation arrows at bottom
Export Options (Top right buttons)
- Download (Cyan button): Export booking list
- PDF (Pink button): Generate PDF report
- Print (Orange button): Print booking list
Creating a New Booking
Step-by-Step Process
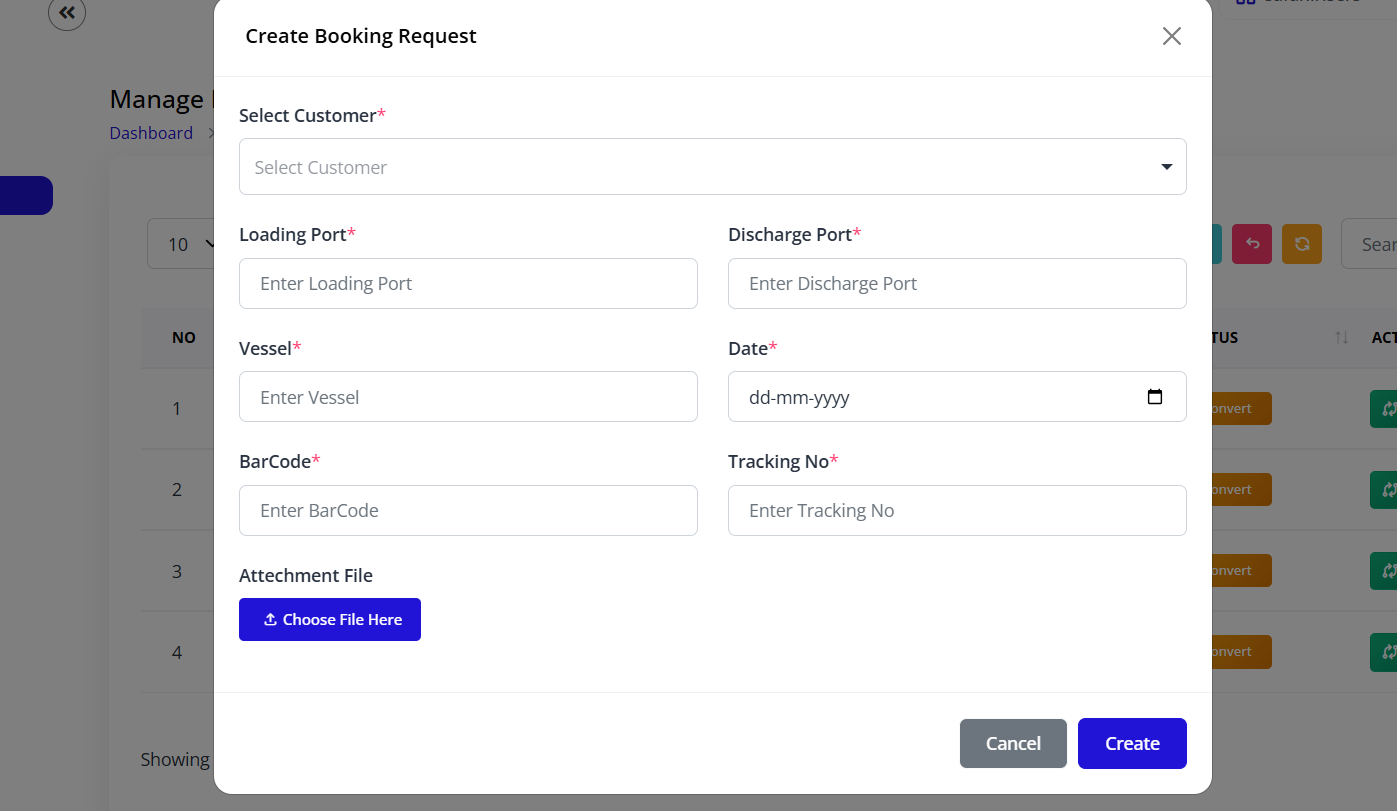
Step 1: Open Create Booking Form
- Click the + (Plus) button in the top right corner
- The "Create Booking Request" dialog will open
Step 2: Select Customers
Bill To Customer
- Customer who will receive the invoice
- Responsible for payment
- Click "Change" to select different customer
- Click "Edit Detail" to modify customer information
Displays:
- Customer name
- Customer email
- Ellipsis (...) for additional details
- Contact number (e.g., 1234567890)
Ship To Customer
- Consignee receiving the shipment
- Delivery destination
- Click "Change" to select different customer
- Click "Edit Detail" to modify customer information
Displays:
- Customer name
- Customer email
- Ellipsis (...) for additional details
- Contact number (e.g., 1234567890)
Step 3: Fill Shipping Details
Loading Port (Required)
- Port of origin
- Where cargo will be loaded
- Example: "Port 1"
Discharge Port (Required)
- Destination port
- Where cargo will be unloaded
- Example: "Port 2"
Vessel (Required)
- Vessel name or identification
- Transportation vessel details
- Example: "123"
Date (Required)
- Booking date or sailing date
- Use date picker for selection
- Format: DD-MM-YYYY
- Example: "22-11-2025"
BarCode (Required)
- Barcode identifier
- Unique tracking reference
- Example: "123"
Tracking No (Required)
- Tracking number for shipment
- Used for monitoring shipment progress
- Example: "12345"
Step 4: Attach Files (Optional)
Attechment File section
- Click Choose File Here button
- Select supporting documents
- Multiple files can be attached
- Supported formats: PDF, DOC, DOCX, XLS, XLSX, images
- Use for: Purchase orders, packing lists, certificates, etc.
Step 5: Submit Booking
- Review all entered information
- Ensure all required fields are filled
- Verify customer selection is correct
- Click Submit button (bottom right)
- Booking will be created with "Draft" or "Pending" status
- Success message will appear
- Booking appears in booking list
Tips for Creating Bookings
✅ Do:
- Verify customer information before submitting
- Double-check port names for accuracy
- Ensure date is correct and in future
- Use unique tracking numbers
- Attach all relevant documentation
- Review form before submission
❌ Don't:
- Leave required fields empty
- Use incorrect customer selection
- Enter past dates (if not allowed)
- Duplicate tracking numbers
- Skip file attachments if documentation required
- Rush through the form
Booking Status Workflow
Understanding Status Flow
Draft → Pending → Accepted → Convert to Ship
                ↓
            Rejected
Draft Status
- Initial state when booking is created
- Can be edited freely
- Not yet submitted for review
- No action required
Pending Status
- Booking submitted for review
- Awaiting acceptance or rejection
- Action buttons available: Accept, Reject
- Cannot be edited until decision made
Accepted Status
- Booking approved
- Ready for shipping process
- "Convert to Ship" button appears
- Can proceed to next stage
Rejected Status
- Booking declined
- No further action needed
- Remains in system for record
- Can be viewed but not converted
Accepting a Booking
When to Accept
Accept bookings when:
- All information is complete and accurate
- Customer requirements can be met
- Vessel/transport is available
- Ports are accessible
- Documentation is in order
- Payment terms are agreed
Acceptance Process
Step 1: Review Booking
- Locate booking in list
- Click on booking name to view details
- Verify all information:
- Customer details
- Loading and discharge ports
- Vessel information
- Date and schedule
- Tracking numbers
- Attached documents
Step 2: Accept Booking
- Return to booking list
- Locate the Accept button (green checkmark) in ACTION column
- Click Accept
- Confirmation may appear
- Status changes to "Accepted"
- "Convert to Ship" button appears
Step 3: Post-Acceptance
- Notify customer of acceptance (if not automatic)
- Prepare for shipping documentation
- Update internal systems
- Schedule vessel space if needed
What Happens After Acceptance
Automatic Changes:
- Status updates to "Accepted"
- Accept button is replaced with "Accept" badge (blue)
- Convert To Ship button appears in ACTION column
- Booking is locked from major edits
- Customer may receive notification
Next Steps:
- Convert booking to shipping
- Begin shipping documentation
- Fill container and order details
- Prepare shipping instructions
Rejecting a Booking
When to Reject
Reject bookings when:
- Information is incomplete or incorrect
- Cannot meet customer requirements
- Vessel/transport unavailable
- Ports not accessible
- Schedule conflicts
- Payment terms not acceptable
- Documentation missing or invalid
Rejection Process
Step 1: Review Booking
- Open booking details
- Identify issues or reasons for rejection
- Note rejection reason for records
Step 2: Reject Booking
- Return to booking list
- Locate the Reject button (red X) in ACTION column
- Click Reject
- Confirmation dialog may appear
- Enter rejection reason (if prompted)
- Confirm rejection
Step 3: Post-Rejection
- Status changes to "Rejected"
- Booking remains in system for records
- Cannot be converted to shipping
- Notify customer of rejection
- Provide reason and alternatives if possible
Rejection Best Practices
Communication:
- Inform customer promptly
- Provide clear rejection reason
- Offer alternatives when available
- Suggest corrections if applicable
- Maintain professional tone
Documentation:
- Record rejection reason
- Note date and time
- Keep correspondence
- Update internal notes
- Archive for reference
Converting Booking to Shipping
Prerequisites
Before converting, ensure:
- Booking status is "Accepted"
- All booking information is verified
- Customer has been notified
- Ready to begin shipping documentation
Conversion Process
Step 1: Locate Accepted Booking
- Find booking with "Accepted" status
- Verify "Convert To Ship" button is visible
- Ensure booking is correct one
Step 2: Convert to Shipping
- Click the Convert To Ship button (blue ship icon)
- Confirmation dialog may appear
- Confirm conversion
- System processes conversion
Step 3: Verify Conversion
- Success message appears
- Booking moves from Booking list
- New shipping record created
- Navigate to Shipping section to see new record
What Happens During Conversion
Automatic Actions:
- New shipping record created with format: #FSN-00001, #FSN-00002, etc.
- All booking data copied to shipping
- Booking marked as "Converted"
- Shipping appears in Shipping section
- Initial shipping status set (usually "Draft")
Data Transfer: The following information is automatically transferred:
- Customer information (Bill To and Ship To)
- Loading and discharge ports
- Vessel details
- Date information
- Barcode
- Tracking number
- Attached files
What Needs to Be Filled: After conversion, you must fill in shipping section:
- Main Carriage details
- Container information
- Order details
- Services required
- Route information
Editing a Booking
When to Edit
Edit bookings when:
- Corrections needed before submission
- Customer requests changes
- Dates need adjustment
- Port information changes
- Documentation needs updating
- Status is still Draft or Pending
Editing Process
Step 1: Open Edit Form
- Locate booking in list
- Click Edit button (blue pencil icon) or click on booking name
- Booking form opens with current data
Step 2: Modify Information
- Update any fields as needed
- Change customer selection if required
- Adjust dates, ports, or vessel
- Update tracking numbers
- Add or remove attachments
Step 3: Save Changes
- Review all modifications
- Ensure required fields are still filled
- Click Update or Save button
- Changes are applied
- Booking list refreshes
Editing Restrictions
Cannot Edit When:
- Status is "Accepted" and conversion started
- Booking has been converted to shipping
- Status is "Rejected" (may be view-only)
Limited Editing:
- After acceptance, major changes may require rejection and new booking
- System administrator may have override capabilities
- Some fields may be locked after submission
Viewing Booking Details
Detailed View
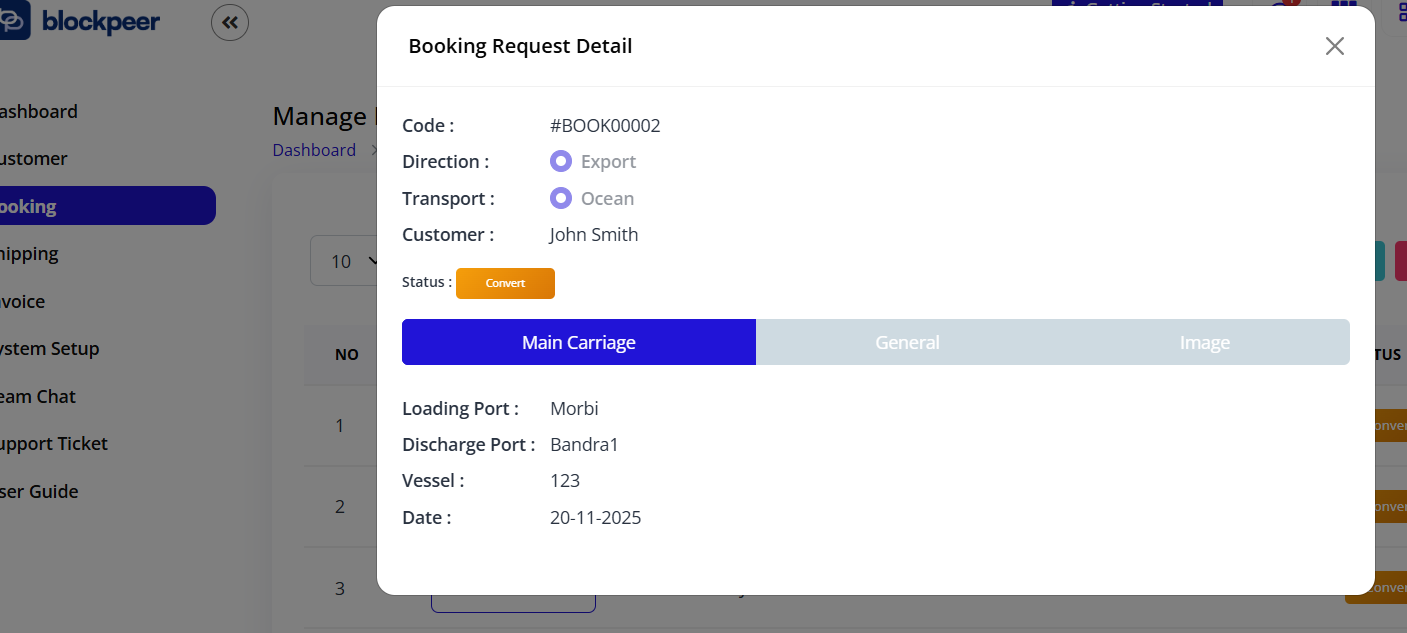
Accessing Details:
- Click on booking NAME (reference number)
- Or click View button if available
- Detailed view opens
Information Displayed:
- Full booking reference
- Complete customer information
- All shipping details
- Attached documents
- Status history
- Creation date and user
- Modification history
- Notes and comments
Actions Available:
- Edit booking (if status allows)
- Print booking details
- Export to PDF
- Send to customer
- Add notes
- Attach additional files
Deleting a Booking
When to Delete
Delete bookings when:
- Duplicate entry created
- Test booking needs removal
- Booking created in error
- Customer cancels before processing
- Data cleanup required
Deletion Process
Step 1: Verify Deletion Need
- Ensure booking should be deleted
- Check if already converted (may not be deletable)
- Verify no dependent records
Step 2: Delete Booking
- Locate booking in list
- Click Delete button (red trash icon)
- Confirmation dialog appears
- Confirm deletion
- Booking is removed
Deletion Warnings
⚠️ Important:
- Deleted bookings may not be recoverable
- Cannot delete converted bookings
- Historical data may be affected
- Consider archiving instead of deleting
- Check company policy on deletions
⚠️ Restrictions:
- Cannot delete accepted bookings (may need rejection first)
- Cannot delete converted bookings
- May require administrator permission
- Audit trail may retain deletion record
Booking Management Best Practices
Data Entry Standards
Accurate Information
- Verify customer details before submission
- Double-check port names
- Confirm vessel availability
- Use correct date formats
- Ensure unique tracking numbers
Consistent Naming
- Use standard port abbreviations
- Follow company vessel naming conventions
- Consistent tracking number formats
- Clear booking references
Documentation
- Attach all required documents
- Use clear file names
- Organize files logically
- Keep file sizes reasonable
- Update attachments as needed
Workflow Efficiency
Quick Processing
- Review bookings promptly
- Accept or reject without delay
- Communicate decisions quickly
- Convert accepted bookings immediately
- Keep status current
Batch Operations
- Review multiple bookings together
- Process similar bookings in batches
- Schedule regular review times
- Use filters for organization
Communication
- Update customers on status changes
- Provide rejection reasons
- Confirm acceptance details
- Share tracking information
- Follow up on pending items
Quality Control
Pre-Submission Checks
- Verify all required fields filled
- Confirm customer selection correct
- Check date validity
- Review port information
- Validate tracking numbers
- Ensure file attachments complete
Post-Creation Review
- Confirm booking created successfully
- Verify data accuracy
- Check status is correct
- Ensure booking appears in list
- Test tracking number uniqueness
Regular Audits
- Review pending bookings daily
- Clear old draft bookings
- Update stale information
- Remove test entries
- Maintain clean booking list
Searching and Filtering Bookings
Search Capabilities
Using Search Box
- Locate search box in top right
- Enter search term
- Results filter automatically
- Clear to show all bookings
Search By:
- Booking reference number (#BOOK00001)
- Customer name
- Vessel name/number
- Tracking number
- Date range
Filtering Tips
Effective Searching
- Use specific reference numbers for exact matches
- Search customer names for all their bookings
- Filter by status (manually in list)
- Use date sorting
- Combine search with pagination
Organization Methods
- Sort by date (newest first)
- Group by status
- Filter by customer
- Separate by transport type
- Organize by vessel
Exporting Booking Data
Export Options
Download (Excel/CSV)
- Click Download button (cyan)
- File generates with all booking data
- Save to computer
- Open in spreadsheet software
- Use for analysis or backup
PDF Export
- Click PDF button (pink)
- PDF report generates
- Includes all visible bookings
- Suitable for printing or archiving
- Professional format for sharing
- Click Print button (orange)
- Print dialog opens
- Select printer and settings
- Print booking list
- Use for physical records
Export Use Cases
Reporting
- Daily booking reports
- Customer booking history
- Status summaries
- Performance analytics
- Management dashboards
Backup and Archive
- Regular data backups
- End-of-period archives
- Compliance documentation
- Historical records
- Disaster recovery
Integration
- Import to accounting systems
- Share with partners
- Feed to analytics tools
- Update ERP systems
- Synchronize with CRM
Troubleshooting Common Issues
Cannot Create Booking
Problem: Submit button disabled or form won't save
Solutions:
- Check all required fields are filled (marked with *)
- Verify customer selected for both Bill To and Ship To
- Ensure date format is correct
- Check tracking number is unique
- Validate all field formats
- Try refreshing page
- Clear browser cache
- Contact administrator
Booking Not Appearing in List
Problem: Created booking doesn't show
Solutions:
- Refresh the page (F5 or browser refresh)
- Check pagination - may be on different page
- Search by booking reference
- Verify creation was successful
- Check if filtered or sorted differently
- Review in another browser
- Contact technical support
Cannot Accept/Reject Booking
Problem: Action buttons not working
Solutions:
- Verify booking status allows action
- Check user permissions
- Ensure not already processed
- Refresh page
- Clear browser cache
- Try different browser
- Contact administrator
Convert to Ship Not Available
Problem: Button doesn't appear after acceptance
Solutions:
- Confirm booking status is "Accepted"
- Refresh the page
- Check if already converted (look in Shipping section)
- Verify no system errors occurred
- Review user permissions
- Wait a moment and refresh again
- Contact administrator if persists
File Upload Issues
Problem: Cannot attach files to booking
Solutions:
- Check file size (may have limit, typically 5-10MB)
- Verify file format is supported
- Ensure stable internet connection
- Try different file
- Clear browser cache
- Use different browser
- Compress large files
- Contact technical support
Tips for Efficient Booking Management
Daily Operations
Morning Routine
- Review all pending bookings
- Accept or reject waiting bookings
- Convert accepted bookings to shipping
- Follow up on draft bookings
- Communicate with customers
Throughout the Day
- Monitor new booking submissions
- Respond to booking requests promptly
- Update statuses as needed
- Maintain communication with customers
- Document issues and resolutions
End of Day
- Review day's bookings
- Ensure no pending items overlooked
- Prepare next day's priorities
- Update status reports
- Clear completed items
Organization Strategies
Prioritization
- Urgent bookings first
- Customer priority levels
- Vessel departure dates
- Volume considerations
- Special requirements
Categorization
- Group by customer
- Sort by transport type
- Organize by destination
- Filter by urgency
- Separate by status
Performance Optimization
Speed Tips
- Use keyboard shortcuts
- Bookmark frequent filters
- Prepare standard responses
- Use templates when possible
- Batch similar operations
- Minimize tab switching
Accuracy Improvements
- Use checklists for verification
- Standard operating procedures
- Double-entry verification
- Regular training updates
- Peer reviews on complex bookings
Integration with Freight Workflow
Booking in Complete Workflow
Position in Process:
Customer Request → **BOOKING** → Shipping → Invoice → Payment
Booking Role:
- First formal step in freight process
- Captures initial customer requirements
- Determines feasibility
- Foundation for shipping documentation
- Basis for pricing and invoicing
Data Flow
From Booking to Shipping:
- All booking details transfer automatically
- Customer information copied
- Port details transferred
- Vessel and date information moved
- Tracking numbers carried forward
- Attachments linked
From Shipping to Invoice:
- Completed shipping generates invoice
- Container and service charges calculated
- Customer billing information used
- Payment terms applied
- Invoice sent automatically