Shipping Operations
Introduction
The Shipping Operations section is where you manage the complete shipping process after a booking is accepted and converted. This includes filling detailed shipping information, sending shipping instructions to customers, managing eBL (electronic Bill of Lading) documentation, and converting completed shipments to invoices.
Accessing Shipping Operations
Navigation:
- Log in to your Blockpeer account
- Click Shipping in the left sidebar
- The shipping list page will display
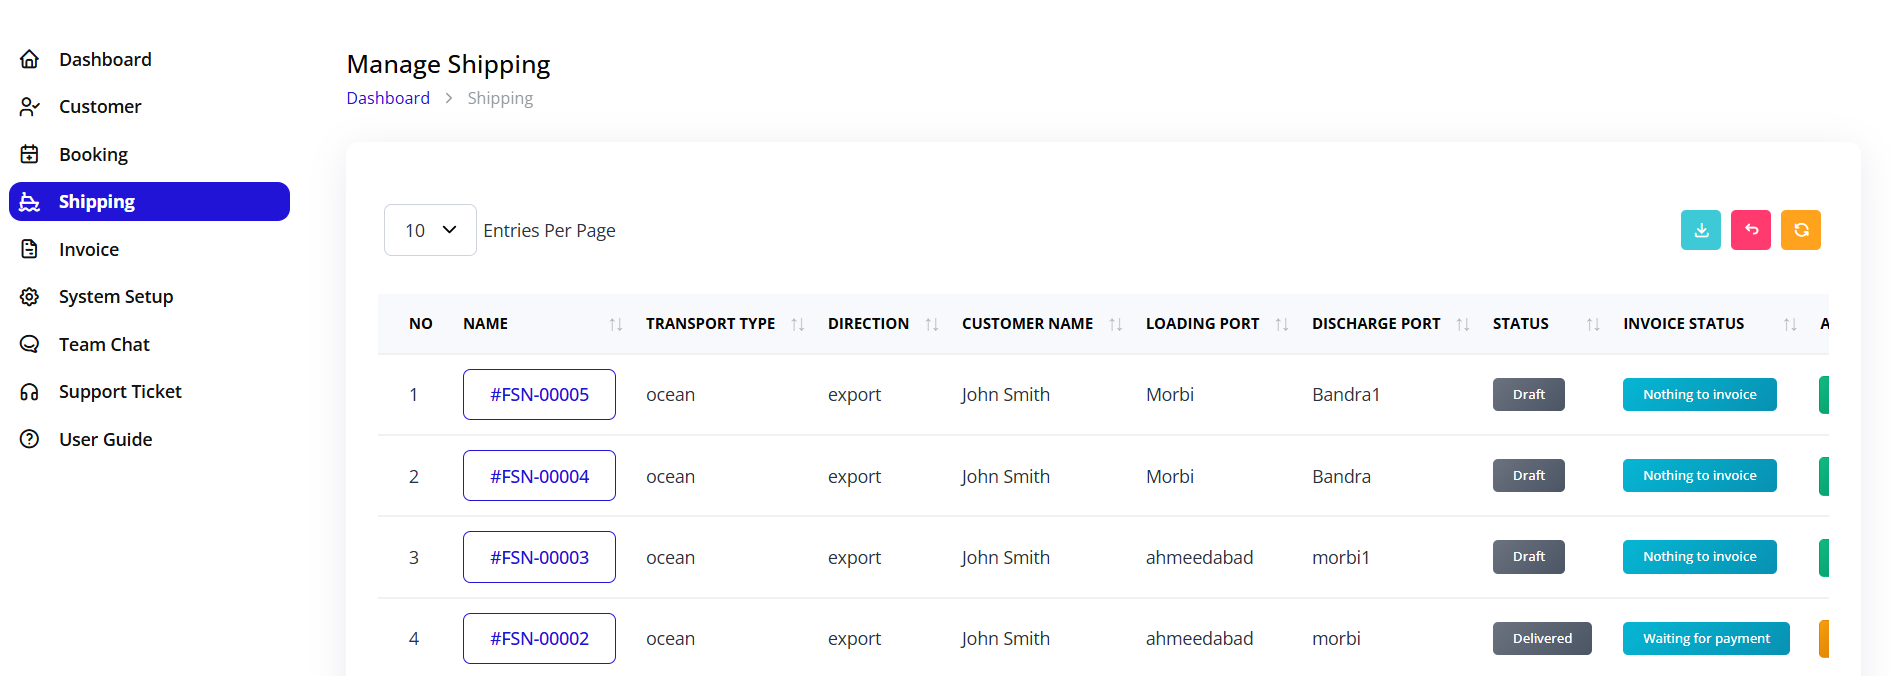
Shipping List Overview
Understanding the Shipping Table
The shipping list displays all shipments with the following columns:
| Column | Description |
|---|---|
| NO | Sequential number showing shipment order in list |
| NAME | Auto-generated shipping reference (e.g., #FSN-00006) - Click to view details |
| TRANSPORT TYPE | Mode of transportation: ocean, air, or land |
| DIRECTION | Shipment direction: export or import |
| CUSTOMER NAME | Customer associated with the shipment |
| LOADING PORT | Port of origin where cargo is loaded |
| DISCHARGING PORT | Destination port where cargo is unloaded |
| STATUS | Current shipping status (Draft, In Progress, Completed, Accept) |
| INVOICE STATUS | Invoice generation status |
| ACTION | Action buttons for shipment management |
Status Badges Explained
- Draft (Gray): Initial state, details being filled
- In Progress (Blue): Actively being processed
- Completed (Green): All steps finished
- Accept (Green): Shipment accepted
Invoice Status Badges
- Nothing to Invoice (Cyan): Not ready for invoicing
- Ready to Invoice (Blue): Can be converted to invoice
- Invoiced (Green): Already converted to invoice
Table Features
Search Functionality
- Use the search box in the top right corner
- Search by shipping number, customer name, or port names
- Real-time filtering of results
Pagination
- "Entries Per Page" dropdown (top left)
- Options: 10, 25, 50, 100 entries
- Shows "Showing X to Y of Z entries"
Export Options (Top right)
- Download (Cyan button): Export shipping list as file
- PDF (Pink button): Generate PDF report
- Print (Orange button): Print shipping list
From Booking to Shipping
Converting Booking to Shipping
When you accept a booking in the Booking section, it becomes ready to convert to a shipping record.
Steps to Convert:
- Navigate to Booking section
- Locate the booking you want to convert
- Click the Convert to Ship button (blue button with ship icon)
- The booking is now converted to a shipping record
- The new shipping record appears in the Shipping section
What Transfers:
- Customer information (Bill To and Ship To)
- Loading and discharging ports
- Vessel details
- Date information
- Barcode and tracking number
- Transport type and direction
Shipping Workflow Overview
Booking Accepted
        ↓
Convert to Shipping
        ↓
Step 1: Send Shipping Instruction (Email to Customer)
        ↓
Step 2: Awaiting Customer eBL Form Submission
        ↓
Fill Shipping Tabs (Main Carriage, Container, Order, Services, Route)
        ↓
Step 3: Mark eBL as Draft (Customer fills form)
        ↓
Step 4: Sign eBL (Finalize documentation)
        ↓
Accept Shipment
        ↓
Convert to Invoice
        ↓
Invoice Created
Accessing Shipping Details

Opening a Shipment
Method 1: Click Shipping Name
- Locate shipment in the list
- Click on the shipping reference number (e.g., #FSN-00001)
- Shipping detail page opens
Method 2: Action Button
- Locate shipment in the list
- Click the green checkmark icon in the ACTION column
- Shipping detail page opens
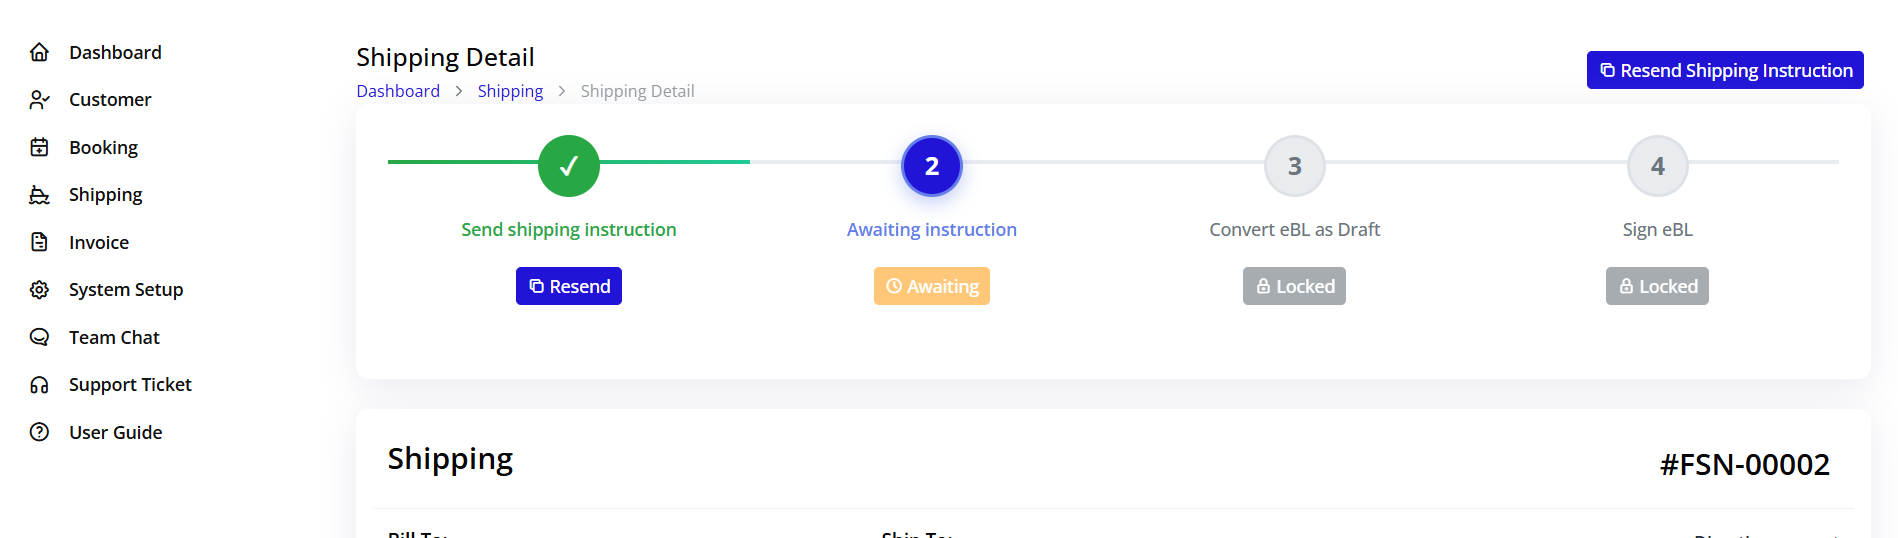
Shipping Detail Page Layout
The shipping detail page contains several key sections:
Header Section
- Shipping reference number (top right): #FSN-00001
- Send Shipping Instruction button (blue, top right)
Progress Tracker - 4 Steps:
- Send shipping instruction - Click "Send" to email instructions
- Awaiting instruction - Locked until Step 1 completed
- Convert eBL as Draft - Locked until customer submits form
- Sign eBL - Locked until Step 3 completed
Shipping Information
Left Side - Bill To:
- Customer name
- Email address
- Physical address
- Contact number
Right Side - Ship To:
- Customer name
- Email address
- Physical address
- Contact number
Bottom Right - Shipment Details:
- Direction: export/import
- Transport Type: ocean/air/land
- Order Date
- Status with badge
Step 1: Sending Shipping Instructions
Purpose of Shipping Instructions
Shipping instructions notify the customer and request them to fill the eBL form. The email contains:
- Shipment reference number and details
- Bill To and Ship To information
- Loading and discharging ports
- Vessel and transport details
- Link to fill the eBL form
- Company contact information
How to Send Shipping Instructions
Step 1: Open Shipping Detail
- Click on the shipment from the list
- You're now on the shipping detail page
- Locate the Send Shipping Instruction button (top right, blue button)
Step 2: Verify Information Before sending, ensure:
- Customer email is correct and active
- All basic information is filled
- Shipment details are accurate
- Ready to share with customer
Step 3: Send Instructions
- Click Send Shipping Instruction button
- System processes the email
- Confirmation message appears
- Email sent to customer automatically
- Step 1 becomes completed
- Step 2 status changes to "Awaiting instruction"
Customer Receives Email
The customer will receive an email containing:
- Complete shipment details
- Loading and discharging port information
- Vessel details and dates
- A clickable link to access the eBL form
- Instructions on how to fill the form
- Your company contact information
After Sending
System Changes:
- Step 1 marked as complete
- Step 2 becomes active (shows "Awaiting instruction")
- Email delivery is logged with timestamp
- Shipping status updates to "In Progress"
Your Next Actions:
- Wait for customer to submit the eBL form
- Begin filling remaining shipping details (Main Carriage, Container, Order, Services, Route)
- Monitor for eBL form submission notification
- Prepare for eBL review once customer submits
Filling Shipping Details
Detail Tabs Overview
After opening a shipment, you'll see five tabs at the bottom for entering detailed information:
- Main Carriage - Primary transportation details
- Container - Container information and quantities
- Order - Order line items and pricing
- Services - Additional services provided
- Route - Routing operations and costs
All tabs must be filled completely before shipment can be invoiced.
Tab 1: Main Carriage Details
Purpose
Main Carriage contains the primary transportation information including ports, vessel, dates, and barcode details.
Fields to Fill
Loading Port
- Port where cargo is loaded
- Usually copied from booking
- Example: "Port 1"
- Verify accuracy before saving
Discharge Port
- Destination port for cargo
- Usually copied from booking
- Example: "Port 2"
- Confirm correct destination
Vessel
- Vessel name or identification number
- Copied from booking information
- Example: "123"
- Update if changed after booking
Date
- Shipment or sailing date
- Format: DD-MM-YYYY
- Example: "22-11-2025"
- Use the date picker calendar
Barcode
- Unique barcode identifier
- Copied from booking
- Example: "123"
- Verify for uniqueness
Saving Main Carriage
- Review all copied data from booking
- Update any changed information
- Verify dates are current and correct
- Ensure port names and codes are accurate
- Click Update button (bottom right)
- Success message confirms save
Best Practices:
- Double-check all port names against booking
- Ensure vessel information matches actual ship
- Verify dates align with sailing schedule
- Confirm barcode is unique and trackable
Tab 2: Container Details
Purpose
The Container tab manages container information including type, quantity, and volume calculations for the shipment.
Adding Container Information
Step 1: Select Container Type
- Click "Select Container" dropdown
- Choose from configured container types
- Options typically include: 20ft, 40ft, 40HC, etc.
- Container type determines volume pricing
Step 2: Enter Quantity
- Enter number of containers in QUANTITY field
- Must be a numeric value
- Example: 1, 2, 5, etc.
- Total updates automatically
Step 3: Review Volume
- Volume field displays calculated volume
- Based on container type and quantity
- Used for pricing calculations
- Auto-calculated based on container configuration
Container Table
| Column | Description |
|---|---|
| CONTAINER | Type of container (dropdown) |
| QUANTITY | Number of containers |
| VOLUME | Calculated volume |
Total Row (Bottom):
- Quantity Total: Sum of all container quantities
- Volume Total: Sum of all volumes ($0.00)
Saving Container Details
- Add all containers needed for shipment
- Verify quantities are correct
- Check volume calculations are reasonable
- Click Update button (bottom right)
- Success message confirms save
Tips:
- Ensure container types are configured in System Setup first
- Add all containers before clicking Update
- Verify quantities match actual cargo
- Check volume calculations are reasonable
Tab 3: Order Details
Purpose
Order tab captures detailed order information including descriptions, containers, pricing, weight, and volume for each order line item.
Order Table Structure
| Column | Description |
|---|---|
| DESCRIPTION | Order item description |
| CONTAINER | Container type for this order |
| PRICING | Price calculation method |
| BILLING ON | Billing basis (weight/volume) |
| WEIGHT | Weight value |
| VOLUME | Volume value |
| PRICE | Unit price |
| SALE PRICE | Final sale price |
Filling Order Information
Step 1: Enter Description
- Enter description of goods or order
- Be specific and clear
- Examples: "Electronic Equipment", "Textiles", "Machinery Parts"
Step 2: Select Container
- Click "Select Container" dropdown
- Choose container type associated with this order
- Must match containers added in Container tab
- Links order to specific container
Step 3: Select Pricing
- Click "Select Price" dropdown
- Choose pricing structure (configured in System Setup)
- Determines how charges are calculated
- Options based on your configured prices
Step 4: Choose Billing Basis
- Click dropdown in "Billing On" column
- Select billing method:
- Weight: Charge based on weight
- Volume: Charge based on volume
- Determines which measurement is used for pricing
Step 5: Enter Weight
- Enter weight value in "Weight" field
- Numeric value with appropriate units (kg, lbs, etc.)
- Example: "500" (with units)
Step 6: Enter Volume
- Enter volume value in "Volume" field
- Numeric value with appropriate units (m³, ft³, etc.)
- Example: "2.5" (with units)
Step 7: Review Calculated Prices
- PRICE column shows unit price (auto-calculated)
- SALE PRICE column shows final calculated price
- Both update automatically after entries
Order Totals
Total Row (Bottom):
- Total Weight: Sum across all order lines
- Total Volume: Sum across all order lines
- Final Total: $0.00 (sum of all sale prices)
Saving Order Details
- Fill all fields for each order line
- Ensure container types match Container tab
- Verify pricing selection is correct
- Choose appropriate billing basis
- Enter accurate weight and volume
- Review calculated prices
- Click Update button (bottom right)
Best Practices:
- Match containers to those in Container tab
- Use accurate measurements
- Verify pricing is competitive
- Review totals before saving
- Save before moving to next tab
Tab 4: Services
Purpose
Services tab manages additional services provided for the shipment, including vendor selection, service type, quantity, and pricing.
Adding Services
Step 1: Click Add Service
- Click + Add Service button (top right)
- New blank row appears in table
- Ready for data entry
Step 2: Select Vendor
- Click "Select Vendor" dropdown
- Choose service provider
- Examples: Freight forwarder, customs broker, warehouse
Step 3: Select Service Type
- Click "Select Service" dropdown
- Choose type of service
- Examples: Container handling, Documentation fees, Storage charges, Customs clearance, Insurance
Step 4: Enter Quantity
- Enter service quantity in "Qty" field
- Numeric value (e.g., 1, 2, 5)
- Represents units of service
Step 5: Enter Sale Price
- Enter price per unit in "Sale Price" field
- Numeric value (e.g., 50.00)
- Price charged to customer
Step 6: Review Total
- TOTAL SALE column auto-calculates
- Formula: QTY × SALE PRICE
- Updates automatically when values change
Services Table
| Column | Description |
|---|---|
| VENDOR | Service provider |
| SERVICE | Type of service |
| QTY | Quantity of service |
| SALE PRICE | Price per unit |
| TOTAL SALE | Calculated total price |
Managing Services
Adding Multiple Services:
- Click + Add Service for each service
- Fill each row completely
- All services appear in table
- Totals update automatically
Removing Services:
- Click trash/delete icon on row (if available)
- Service removed from list
- Totals recalculate automatically
Services Totals
Total Row (Bottom):
- Subtotal: Sum of all service totals
- Final Total: Overall service charges
Saving Services
- Add all required services
- Select correct vendor for each
- Choose appropriate service types
- Enter accurate quantities
- Verify pricing is correct
- Review calculated totals
- Click Update button (if present)
Tab 5: Route
Purpose
Route tab manages routing operations including source and destination locations, transport method, and associated costs.
Adding Route Information
Step 1: Click Add Route
- Click + button (top right of Route tab)
- New route entry form appears
- Ready for data entry
Step 2: Fill Route Details
Route Operations:
- Select or enter operation type
- Examples: Port to Port, Door to Door, Port to Door, Inland transportation
Source Location:
- Enter origin location
- Could be: Port name, Warehouse address, Customer location
Destination Location:
- Enter destination location
- Could be: Port name, Delivery address, Final destination
Transport:
- Select transportation method
- Options: Ocean freight, Air freight, Road transport, Rail transport
Cost:
- Enter your cost for this routing operation
- Used for profit calculation
Sale:
- Enter sale price to customer
- Price charged for this routing operation
- Should be higher than cost
Route Table
| Column | Description |
|---|---|
| ROUTE OPERATIONS | Type of routing operation |
| SOURCE LOCATION | Origin location |
| DESTINATION LOCATION | Destination location |
| TRANSPORT | Transportation method |
| COST | Operation cost |
| SALE | Sale price |
| ACTION | Remove route option |
Managing Routes
Viewing Routes:
- All added routes display in table
- Shows all route details
- Review for accuracy
Removing Routes:
- Click trash icon in ACTION column
- Confirm deletion
- Route removed from list
Saving Route Details
- Add all route segments
- Ensure accurate location names
- Correct transport modes
- Realistic cost and sale prices
- Click Update button (if present)
Step 2: Awaiting Customer eBL Form
What is eBL?
eBL (Electronic Bill of Lading):
- Digital version of traditional Bill of Lading
- Legal document proving title to cargo
- Proof of shipment contract
- Required for cargo release and customs
- Filled by customer after receiving shipping instructions
eBL Form Fields
When customer fills the eBL form, they provide:
- Shipper details and information
- Consignee details and address
- Notify party information
- Cargo description and contents
- Marks and numbers on packages
- Container details and numbers
- Weight and volume information
- Special instructions or requirements
Customer Process
After Receiving Email:
- Customer receives email with shipment details
- Email contains clickable link to eBL form
- Customer clicks link to access form
- Customer fills all required eBL fields
- Customer submits completed form
- System notifies you of submission
Your Role During This Step
Monitoring:
- Wait for customer to submit eBL form
- Monitor for email notifications
- Check system for form submission status
- Follow up if form delayed (2-3 days recommended)
Meanwhile:
- Continue filling other shipping tabs (Container, Order, Services, Route)
- Verify Main Carriage information
- Prepare for eBL review
- Ensure all documentation is ready
Communication:
- Contact customer if form not received within timeframe
- Provide assistance if customer has questions
- Clarify any eBL form requirements
- Send reminders if needed
Step Status
While Awaiting:
- Step 2 shows "Awaiting instruction" (locked status)
- Cannot proceed to Step 3 until form received
- Other tabs can still be filled and updated
After Customer Submits:
- Step 2 completes automatically
- Step 3 "Convert eBL as Draft" becomes available
- Notification received in system
- Ready to review customer-submitted eBL
Step 3: Convert eBL as Draft

Purpose
Converting eBL as draft is a quality control step. It allows you to review the customer-submitted eBL information before finalizing and signing.
When Available
Step 3 becomes available when:
- Customer has submitted the eBL form
- Step 2 is completed
- System has received and processed eBL data
Reviewing eBL Submission
Before Marking as Draft:
- Return to shipping detail page
- Review all customer-submitted eBL data
- Check each field for accuracy:
- Shipper information correct
- Consignee details accurate
- Cargo description matches your records
- Container numbers correct
- Weight and volume reasonable
- Special instructions noted
- All required fields completed
Marking as Draft
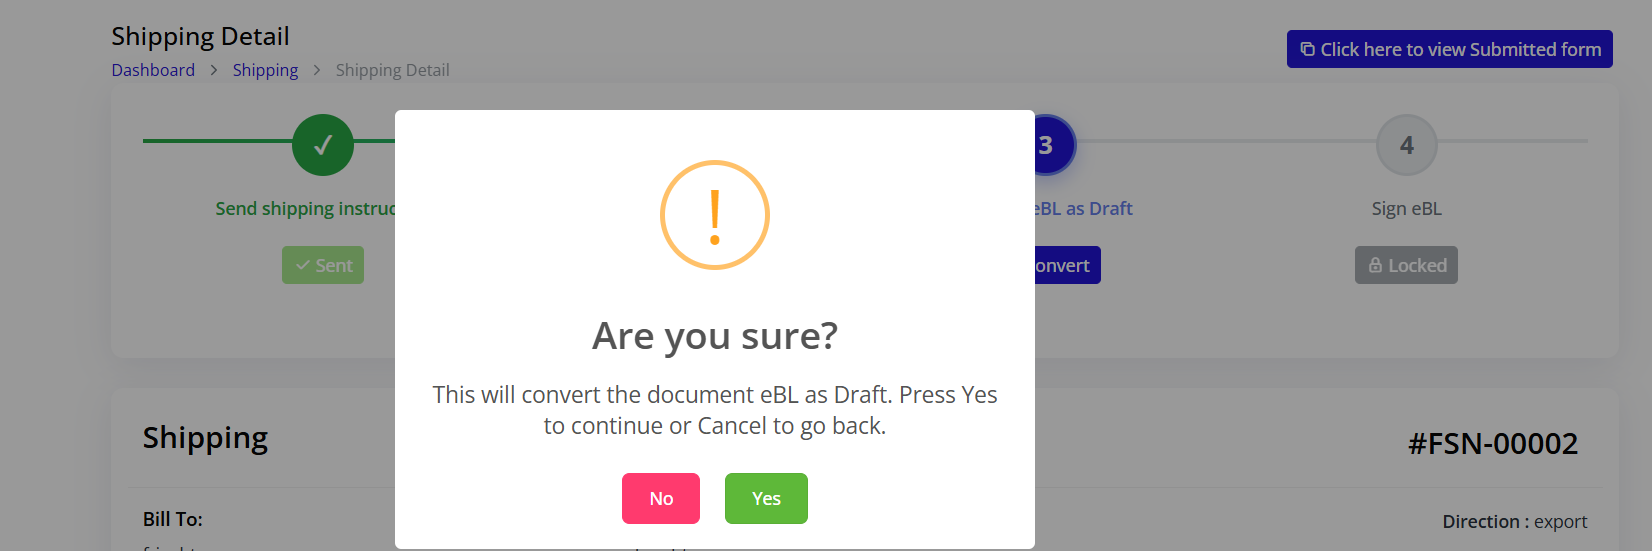
If Corrections Needed:
- Note errors or discrepancies found
- Click "Mark as Draft" button (or similar)
- eBL status changes to Draft
- Document corrections needed
- Contact customer about required changes
- Provide clear instructions for corrections
If eBL is Correct:
- Verify all information is accurate
- Can proceed directly to signing (Step 4)
- Skip draft status if no corrections needed
Draft Status Purpose
Why Use Draft:
- Identify errors before finalizing
- Request customer corrections
- Allow for internal review and approval
- Ensure compliance with regulations
- Verify accuracy before signing
Draft Actions:
- Review eBL data thoroughly
- Note all corrections needed
- Contact customer for revisions
- Update internal systems
- Prepare for final signing
After Marking as Draft
System Changes:
- Step 3 marked as complete
- Step 4 "Sign eBL" becomes available
- eBL status shows as Draft
- Ready for final signing
Your Next Steps:
- Complete final review
- Ensure all corrections made
- Verify all details are accurate
- Prepare to sign eBL
Step 4: Sign eBL

Purpose
Signing the eBL is the final step in eBL documentation. It makes the eBL legally binding and official, allowing the shipment to proceed to invoicing.
Prerequisites for Signing
Before signing, ensure:
- All eBL information verified as accurate
- Customer corrections (if any) completed
- All shipping tabs filled completely:
- Main Carriage ✓
- Container ✓
- Order ✓
- Services ✓
- Route ✓
- Internal approvals obtained
- Ready to finalize shipment
Signing Process
Step 1: Final Review
- Review all eBL information one last time
- Check shipping details are complete
- Verify all tabs have been filled
- Confirm all information is accurate
Step 2: Sign eBL
- Locate Step 4 "Sign eBL"
- Button is now active (not locked)
- Click "Sign" or similar button
- May require confirmation
- Confirm signing action
Step 3: System Processing
- System processes eBL signature
- eBL becomes official legal document
- Timestamp recorded automatically
- Signature logged in system
- eBL finalized
After Signing
Automatic Changes:
- Step 4 marked as complete
- All 4 steps in progress tracker completed
- eBL status changes to Signed/Final
- Shipment ready for acceptance
Document Generation:
- Official eBL PDF generated automatically
- Available for download
- Can be sent to customer
- Stored in system for records
Status Updates:
- Shipping status may update
- Shipment ready for acceptance decision
- Invoice conversion becomes possible
- Next action: Accept the shipment
Accepting or Rejecting Shipment
After All Steps Complete
Once all four eBL steps are complete and all shipping tabs are filled, you decide whether to accept or reject the shipment.
Accepting a Shipment
When to Accept:
- All information complete and accurate
- eBL properly signed and verified
- All documentation in order
- Ready to invoice and bill customer
- Shipment logistics confirmed
Acceptance Process:
- Return to shipping list or detail page
- Locate Accept button:
- On shipping detail page (right side)
- In shipping list ACTION column
- Click Accept button (green checkmark or button)
- Confirmation dialog may appear
- Confirm acceptance action
- Status changes to "Accepted"
After Acceptance:
- Shipping status updates to "Accepted"
- Invoice Status changes to "Ready to Invoice"
- Convert to Invoice button becomes available
- Shipment locked from major edits
- Ready for invoicing process
Rejecting a Shipment
When to Reject:
- Information found to be incorrect or incomplete
- Customer issues identified
- Documentation problems discovered
- Cannot proceed with shipment
- Quality control failure
- Customer cancellation
Rejection Process:
- Locate Reject button on shipping detail page
- Click Reject button (may be red X)
- Rejection reason dialog may appear
- Enter reason for rejection
- Confirm rejection action
- Status changes to "Rejected"
After Rejection:
- Shipping status updates to "Rejected"
- Cannot convert to invoice
- Remains in system for records and audit
- Customer should be notified immediately
- May need to create new shipping record
Converting Shipment to Invoice
Prerequisites
Before converting to invoice, verify:
- Shipment status is Accepted ✓
- All four eBL steps completed ✓
- All five tabs filled completely:
- Main Carriage ✓
- Container ✓
- Order ✓
- Services ✓
- Route ✓
- Invoice Status shows "Ready to Invoice" ✓
- All pricing information verified ✓
Conversion Process
Step 1: Verify Readiness
- Check shipment status is "Accepted"
- Verify all tabs have data
- Review pricing and totals
- Ensure customer information is correct
Step 2: Convert to Invoice
- Locate Convert to Invoice button:
- At top of shipping detail page (right side)
- Could be in ACTION column of shipping list
- Usually blue button with invoice icon
- Click Convert to Invoice button
- Confirmation dialog appears
- Confirm conversion action
- System processes conversion
Step 3: Invoice Generation
- System creates new invoice automatically
- Invoice number generated (e.g., #FRE-INVO00001)
- All shipping data transferred to invoice:
- Customer information
- Container details
- Order line items
- Service charges
- Route costs
- Total amounts calculated
Step 4: Verify Conversion
- Success message appears
- Shipment status updates
- Invoice Status changes to "Invoiced"
- Navigate to Invoice section to view new invoice
What Gets Transferred to Invoice
Customer Information:
- Bill To details and contact
- Ship To details and contact
- Email addresses
- Physical addresses
Product/Container Information:
- Container types and quantities
- Volumes calculated
- From Container tab
Order Details:
- Descriptions of goods
- Pricing calculations
- Weights and volumes
- From Order tab
Service Charges:
- All services added
- Quantities and prices
- Total service charges
- From Services tab
Route Costs:
- Routing operations details
- Sale prices for each route
- From Route tab
Calculated Totals:
- Subtotals from each section
- Total invoice amount
- Any taxes or fees
- Final amount due
After Conversion
In Shipping Section:
- Shipment remains in list
- Invoice Status shows "Invoiced"
- Cannot convert again
- Linked to generated invoice
In Invoice Section:
- New invoice appears in invoice list
- Status: "Unpaid" (initially)
- Can be viewed and sent to customer
- Payment can be tracked
- See Invoice Management for details
Shipping Status Flow
Draft (Initial)
    ↓
In Progress (After sending shipping instruction)
    ↓
Awaiting eBL (Customer filling form)
    ↓
eBL Draft (Marked for review)
    ↓
eBL Signed (Signed and finalized)
    ↓
Accepted / Rejected (Decision made)
    ↓
Invoiced (Converted to invoice - if Accepted)
Status Meanings
| Status | Meaning | Action |
|---|---|---|
| Draft | Shipment just converted from booking, initial state | Begin filling details |
| In Progress | Actively being processed, instruction sent | Wait for customer eBL |
| Awaiting eBL | Waiting for customer eBL form submission | Monitor for submission |
| eBL Draft | Customer submitted, marked for review | Review and correct |
| eBL Signed | eBL finalized and signed, all steps done | Accept or reject |
| Accepted | Shipment approved, ready for invoice | Convert to invoice |
| Rejected | Shipment declined, cannot invoice | Notify customer |
| Invoiced | Converted to invoice successfully | Track payment |
Best Practices for Shipping Operations
Data Entry Quality
Accuracy First:
- Double-check all copied data from booking
- Verify customer information for accuracy
- Confirm port names and codes match actual ports
- Review dates align with schedules
- Validate container types and quantities match cargo
Completeness:
- Fill all tabs completely before accepting
- Don't leave required fields blank
- Add all applicable services
- Include all route segments
- Ensure pricing is complete and accurate
Consistency:
- Use standardized naming conventions
- Follow company standard procedures
- Consistent units (weight/volume)
- Standard pricing methods
- Uniform documentation format
Workflow Efficiency
Sequential Processing:
- Send shipping instruction first (Step 1)
- Fill tabs while awaiting eBL (Steps 1-2)
- Complete all tabs before signing (Step 2-3)
- Review thoroughly before accepting (Step 3-4)
- Convert to invoice promptly (After acceptance)
Time Management:
- Process shipments in priority order
- Monitor eBL submission timeframes
- Follow up on delayed submissions within 2-3 days
- Complete daily shipment targets
- Don't let shipments sit incomplete
Communication:
- Send shipping instructions promptly (same day if possible)
- Follow up with customers on delays
- Clarify eBL requirements clearly
- Respond to customer queries quickly
- Keep customers informed of progress
eBL Management
Customer Guidance:
- Include clear instructions in email
- Provide eBL form completion guide
- Offer assistance if customer has questions
- Set clear expectations for timeframes
- Follow up on delays with reminders
Quality Review:
- Review all eBL fields carefully
- Check for common data entry errors
- Verify cargo descriptions match orders
- Confirm container numbers are correct
- Validate weights and volumes are reasonable
Documentation:
- Keep copies of all eBL versions
- Document any corrections requested
- Record customer communications
- Note approval timestamps
- Archive signed eBL properly
Pricing and Costing
Container Pricing:
- Use correct container types from dropdown
- Verify volume calculations are accurate
- Apply appropriate pricing structure
- Check quantity multiplications
- Review total amounts for reasonableness
Order Pricing:
- Choose correct billing basis (weight/volume)
- Enter accurate measurements
- Verify price calculations automatically
- Check final sale prices are correct
- Ensure profitability margins
Service Charges:
- Include all applicable services
- Use correct vendors in system
- Enter competitive prices
- Don't forget ancillary charges
- Review total service costs
Route Costing:
- Break down routing logically by segment
- Cost each segment separately
- Ensure sale price covers cost plus margin
- Consider all transportation legs
- Account for any transshipment charges
Common Issues and Solutions
| Issue | Cause | Solution |
|---|---|---|
| Customer eBL not received | Customer didn't receive email or forgot to submit | Send reminder email with link, verify email address |
| Step locked, can't proceed | Previous step not completed | Complete all steps in order, send shipping instruction first |
| Can't find shipment | Wrong section or not converted | Ensure booking was accepted and converted to ship |
| Invoice won't generate | Shipment not accepted or tabs incomplete | Accept shipment first, verify all tabs filled |
| Wrong container type | System setup missing container | Create container in System Setup before using |
| Prices showing as $0.00 | Pricing not configured | Create pricing in System Setup with weight/volume prices |
Summary
Shipping Operations in Blockpeer streamlines your entire shipping process from booking acceptance through invoicing. By following the sequential steps and best practices outlined in this guide, you'll ensure accurate documentation, timely customer communication, and smooth conversion to invoices. Always prioritize data accuracy and complete all tabs before finalizing shipments.