Customer Management
Introduction
The Customer Management section allows you to maintain a complete database of your freight customers. This is the foundation of your freight operations, as customers are required for creating bookings, shipments, and invoices.
Accessing Customer Management
Navigation:
- Log in to your Blockpeer account
- Click Customer in the left sidebar
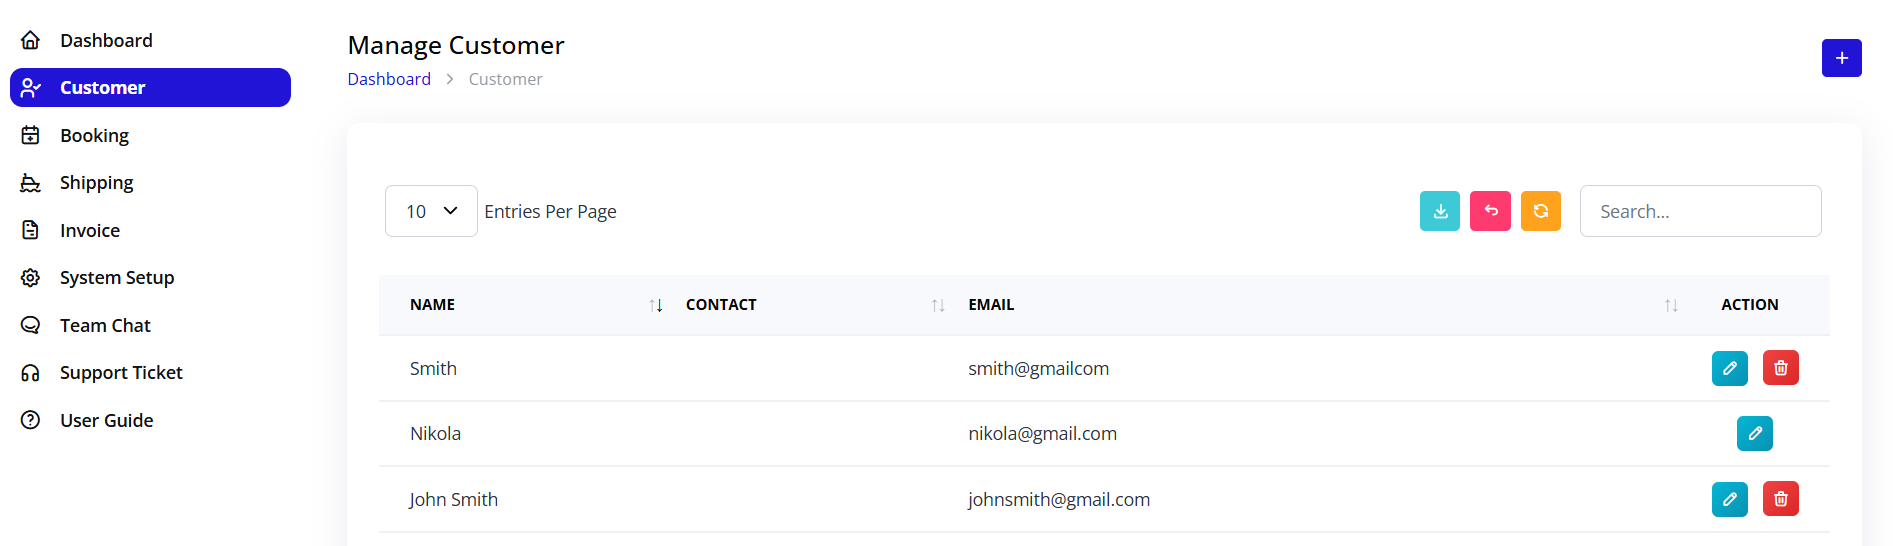
- The customer list page will display
Customer List Overview
Understanding the Customer Table
The customer list displays all your customers in a table format with the following columns:
NAME
- Customer's full name
- Click to view/edit customer details
CONTACT
- Customer's phone number
- Used for communication
- Customer's email address
- Used for sending shipping instructions and invoices
- Must be valid for email communications
ACTION
- Edit Button (Blue pencil icon): Modify customer information
- Delete Button (Red trash icon): Remove customer from system
Table Features
Search Functionality
- Search box in top right corner
- Search by name, contact, or email
- Real-time filtering as you type
Pagination
- "Entries Per Page" dropdown (top left)
- Options: 10, 25, 50, 100 entries
- Navigation arrows at bottom
- Shows "Showing X to Y of Z entries"
Export Options (Top right buttons)
- Download (Cyan button): Export customer list
- PDF (Pink button): Generate PDF report
- Print (Orange button): Print customer list
Adding a New Customer
Step-by-Step Process
Step 1: Open Create Form
- Click the + (Plus) button in the top right corner
- The "Create Customer" form will open
Step 2: Fill Customer Information
Fill in the following required fields:
Name (Required)
- Customer's full name or company name
- Example: "ABC Shipping Co."
Contact (Required)
- Customer's phone number
- Include country code if international
- Example: "1234567890"
Email (Required)
- Customer's primary email address
- Must be valid format
- Used for all system communications
- Example: "customer@example.com"
Step 3: Save Customer
- Review all entered information
- Click Create button
- Customer will be added to the list
- Success message will appear
Tips for Adding Customers
✅ Do:
- Use consistent naming conventions
- Verify email addresses are correct
- Include complete contact information
- Double-check spelling
❌ Don't:
- Leave required fields empty
- Use invalid email formats
- Duplicate customer entries
- Use temporary or fake email addresses
Editing Customer Information
How to Edit
Step 1: Locate Customer
- Find the customer in the list
- Use search if needed
- Identify the correct customer row
Step 2: Open Edit Form
- Click the Edit button (blue pencil icon)
- Customer information will load in edit form
Step 3: Modify Information
- Update any field as needed
- All fields are editable
- Maintain required field rules
Step 4: Save Changes
- Review modified information
- Click Update button
- Changes will be saved
- Customer list will refresh
Common Edits
Updating Contact Information
- Change phone number
- Update email address
- Modify customer name
Correcting Errors
- Fix spelling mistakes
- Update outdated information
- Correct email addresses
Deleting Customers
When to Delete
Delete customers when:
- Customer is no longer active
- Duplicate entry exists
- Test data needs removal
- Customer requested removal
Deletion Process
Step 1: Locate Customer
- Find customer in the list
- Verify it's the correct customer
- Check for existing bookings/shipments
Step 2: Delete Customer
- Click the Delete button (red trash icon)
- Confirmation dialog will appear
- Confirm deletion
- Customer will be removed
Important Warnings
⚠️ Before Deleting:
- Check if customer has active bookings
- Verify no pending shipments
- Ensure no unpaid invoices
- Consider archiving instead of deleting
⚠️ Deletion Impact:
- Customer data cannot be recovered
- Historical records may be affected
- Associated bookings may lose customer link
- Email communications will fail
Customer Management Best Practices
Data Entry Standards
Naming Conventions
- Use official company names
- Be consistent with capitalization
- Avoid abbreviations unless standard
- Include legal entity type if needed
Contact Information
- Always include area/country code
- Use standardized format
- Keep emergency contacts if available
- Update regularly
Email Management
- Use primary business email
- Verify email before saving
- Keep multiple contacts if needed
- Update when changes occur
Organization Tips
Regular Maintenance
- Review customer list monthly
- Update outdated information
- Remove duplicate entries
- Verify email deliverability
Categorization
- Group customers by type
- Track customer status
- Monitor active vs inactive
- Maintain customer notes
Data Quality
Verification Steps
- Confirm email addresses work
- Test phone numbers
- Verify physical addresses
- Update contact persons
Accuracy Checks
- Spell check all entries
- Verify email format
- Confirm phone number format
- Review before saving
Using Customers in Freight Operations
Customer Selection in Booking
When creating a booking, you'll select customers for:
Bill To
- Customer who receives the invoice
- Responsible for payment
- Can be different from Ship To
Ship To
- Consignee receiving the shipment
- Delivery destination customer
- May be same as Bill To
Customer Data Usage
Customer information is automatically used in:
Booking Requests
- Bill To and Ship To fields
- Contact information
- Email communications
Shipping Instructions
- Email recipient
- Contact details
- Delivery information
Invoice Generation
- Billing information
- Payment terms
- Invoice delivery
eBL Forms
- Consignee details
- Contact information
- Email notifications
Searching and Filtering
Search Functionality
Using the Search Box
- Locate search box in top right
- Type search term
- Results filter automatically
- Clear search to see all
Search Capabilities
- Search by customer name
- Find by email address
- Locate by contact number
- Partial text matching
Tips for Effective Searching
Quick Find Methods
- Type first few letters of name
- Use unique identifiers
- Search by email domain
- Use contact numbers
Search Best Practices
- Use specific terms
- Check spelling
- Try different keywords
- Clear filters between searches
Exporting Customer Data
Export Options
Download (Excel/CSV)
- Click the Download button (cyan)
- File will be generated
- Save to your computer
- Open in spreadsheet software
PDF Export
- Click the PDF button (pink)
- PDF will be generated
- View or save document
- Suitable for printing
- Click the Print button (orange)
- Print dialog will open
- Select printer
- Adjust print settings
- Print customer list
Export Use Cases
Backup Purposes
- Regular data backups
- Offline access
- Data archiving
- Disaster recovery
Reporting
- Customer analytics
- Contact lists
- Marketing purposes
- Business intelligence
Integration
- Import to other systems
- Share with partners
- Accounting integration
- CRM synchronization
Troubleshooting
Common Issues
Cannot Add Customer
Problem: Create button is disabled Solutions:
- Fill all required fields
- Check email format is valid
- Verify contact number format
- Remove special characters
Email Not Sending
Problem: Customer not receiving emails Solutions:
- Verify email address is correct
- Check spam/junk folders
- Test email deliverability
- Update customer email
Customer Not Appearing in List
Problem: Recently added customer missing Solutions:
- Refresh the page
- Check if creation was successful
- Search for customer by name
- Verify you're on correct page
Cannot Delete Customer
Problem: Delete button not working Solutions:
- Check for active bookings
- Verify no pending shipments
- Ensure no unpaid invoices
- Contact administrator if persists
Error Messages
"Email Already Exists"
- Customer with this email already exists
- Search for existing customer
- Use different email address
- Update existing customer instead
"Invalid Email Format"
- Email address format is incorrect
- Check for typos
- Ensure proper format (user@domain.com)
- Remove spaces or special characters
"Required Field Missing"
- One or more required fields empty
- Fill all fields marked with *
- Check for validation errors
- Review form before submitting
Tips for Efficient Customer Management
Daily Operations
Quick Actions
- Use search for fast customer location
- Keep frequently used customers bookmarked
- Update information immediately when changed
- Verify email addresses before important communications
Workflow Optimization
- Add customers before creating bookings
- Batch update customer information
- Regular data cleanup sessions
- Maintain backup customer lists
Data Integrity
Maintaining Quality
- Regular audits of customer data
- Remove duplicate entries
- Update stale information
- Verify contact details periodically
Prevention Measures
- Standard naming conventions
- Data entry guidelines
- Validation before saving
- Regular training for users