E-Invoice
Overview
E-Invoice (Electronic Invoice) is a blockchain-based digital invoicing system that creates legally valid, transferable, and verifiable invoices. Unlike traditional PDF invoices, eInvoices are stored on blockchain, can be transferred for trade financing, and are verifiable on TradeTrust.
What is E-Invoice?
Key Features
Blockchain-Based:
- Stored on immutable blockchain
- Tamper-proof and secure
- Permanently verifiable
- Global accessibility
Crypto Payment Enabled:
- Accept cryptocurrency payments
- Specify payment token (USDT, USDC, etc.)
- Link to DNS domain for verification
- Automatic payment tracking
Transferable:
- Transfer invoice ownership
- Enables invoice factoring
- Trade finance ready
- Discounting capability
TradeTrust Verified:
- Verifiable on tradetrust.io
- International recognition
- Legal validity
- Trusted by financial institutions
Use Cases
Business-to-Business:
- International trade invoices
- Service provider billing
- Product sales invoicing
- Subscription payments
Trade Financing:
- Invoice factoring
- Supply chain finance
- Working capital loans
- Early payment discounting
Cryptocurrency Commerce:
- Crypto payment acceptance
- Cross-border transactions
- Stablecoin settlements
- DeFi integration
Prerequisites
Before creating eInvoices, ensure:
- ✅ Configuration completed (Config module)
- ✅ Wallet connected
- ✅ Token registry created
- ✅ DNS verified
- ✅ Domain records added
- ✅ Sufficient gas tokens in wallet
Accessing E-Invoice
- Click Verifiable Documents in the sidebar
- Select E-Invoice from submenu
- E-Invoice dashboard opens

Filter Options
Filter by:
Issue Date
- Select date range
- Filter by specific date
- Date picker calendar
Customer
- Dropdown of all customers
- "Select Customer" default
- Filter by specific client
Status
- Select Status dropdown
- Options: Draft, Issued, Paid, Cancelled
- Filter by invoice state
Account Type
- "All" selected by default
- Filter by account category
- Custom account types
Search and Reset:
- 🔍 Search button (blue): Apply filters
- 🗑️ Reset button (red): Clear all filters
Invoice List View
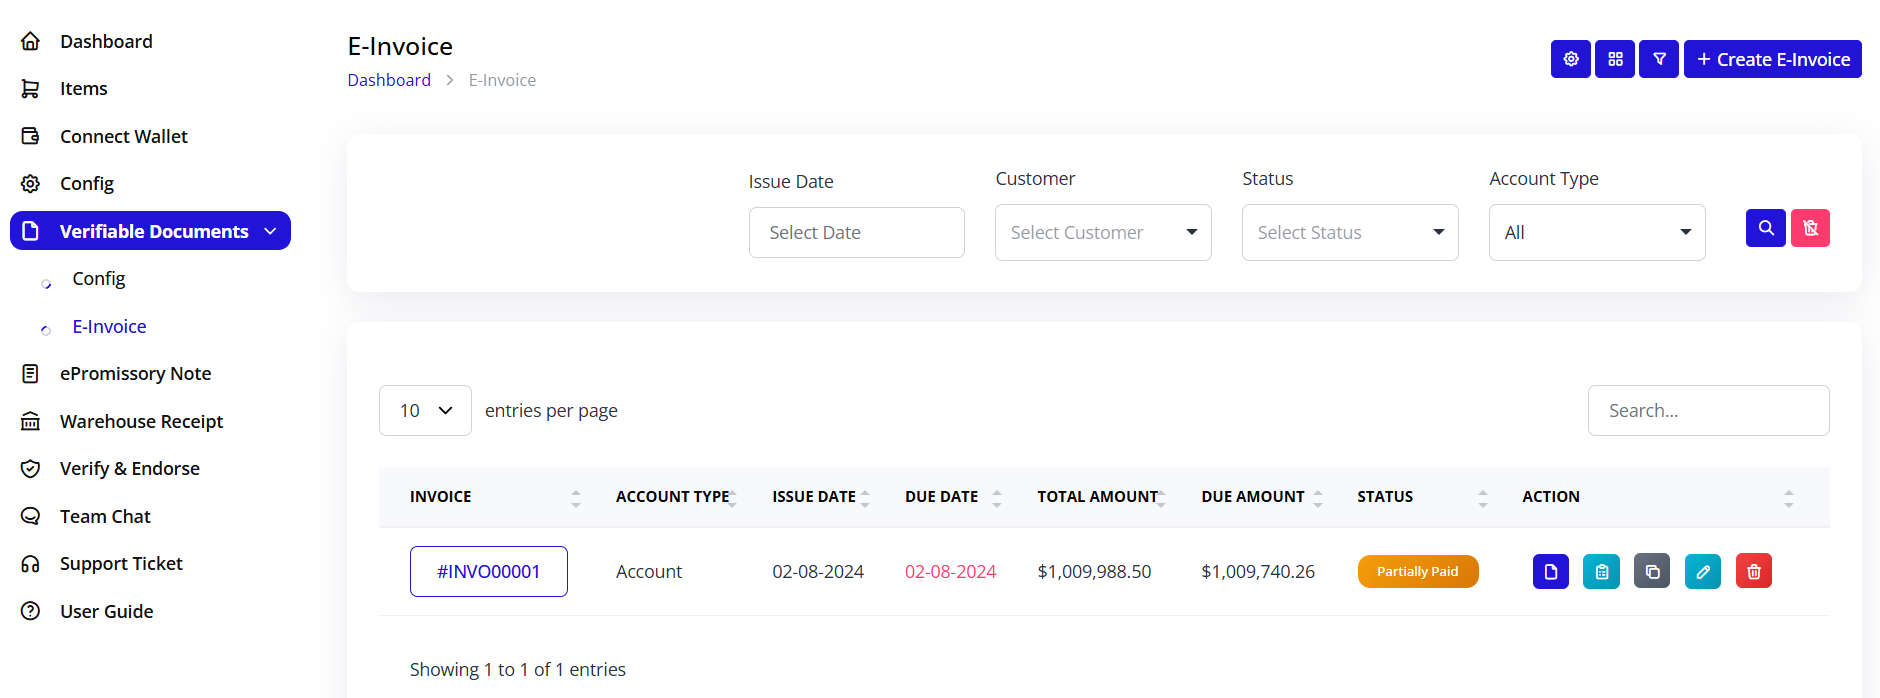
The main table displays all invoices with columns:
Column Headers:
- INVOICE: Invoice number (clickable)
- ACCOUNT TYPE: Account category
- ISSUE DATE: When invoice was created
- DUE DATE: Payment deadline
- TOTAL AMOUNT: Invoice total value
- DUE AMOUNT: Outstanding balance
- STATUS: Current state (badge)
- ACTION: Quick action buttons
Example Entry: #INVO00001 | Account | 02-08-2024 | 02-08-2024 | $1,009,988.50 | $1,009,740.26 | Partially Paid | [Actions]
Status Badges:
- Draft (gray): Being prepared
- Issued (blue): Sent to customer
- Partially Paid (orange): Partial payment received
- Paid (green): Fully paid
- Overdue (red): Past due date
- Cancelled (red): Cancelled invoice
Action Buttons
Each invoice has action icons:
📄 View (blue):
- View invoice details
- See payment history
- Check blockchain status
🗂️ Copy (cyan):
- Duplicate invoice
- Create similar invoice
- Reuse template
🖨️ Print (dark):
- Print invoice
- Download PDF
- Generate hard copy
✏️ Edit (cyan):
- Modify draft invoice
- Update details
- Change amounts
🗑️ Delete (red):
- Delete draft invoice
- Cannot delete issued invoices
- Confirmation required
Pagination
Bottom Controls:
- Dropdown: "10 entries per page"
- Options: 10, 25, 50, 100 entries
- Search box: Quick search invoices
- Navigation: Previous/Next pages
Creating E-Invoice
Step 1: Initiate Creation
- Click + Create E-Invoice button (top-right)
- Create E-Invoice form opens
- Breadcrumb shows: Dashboard > E-Invoice > Create E-Invoice
Step 2: Network and Wallet
Top-Right Controls:
Select Network Dropdown:
- Shows current network (e.g., "Sepolia")
- Click to change network
- Must match your token registry network
- Cannot change after creation
Connect Wallet Button:
- Blue button
- Ensure wallet connected
- Shows wallet address when connected
- Required for invoice issuance
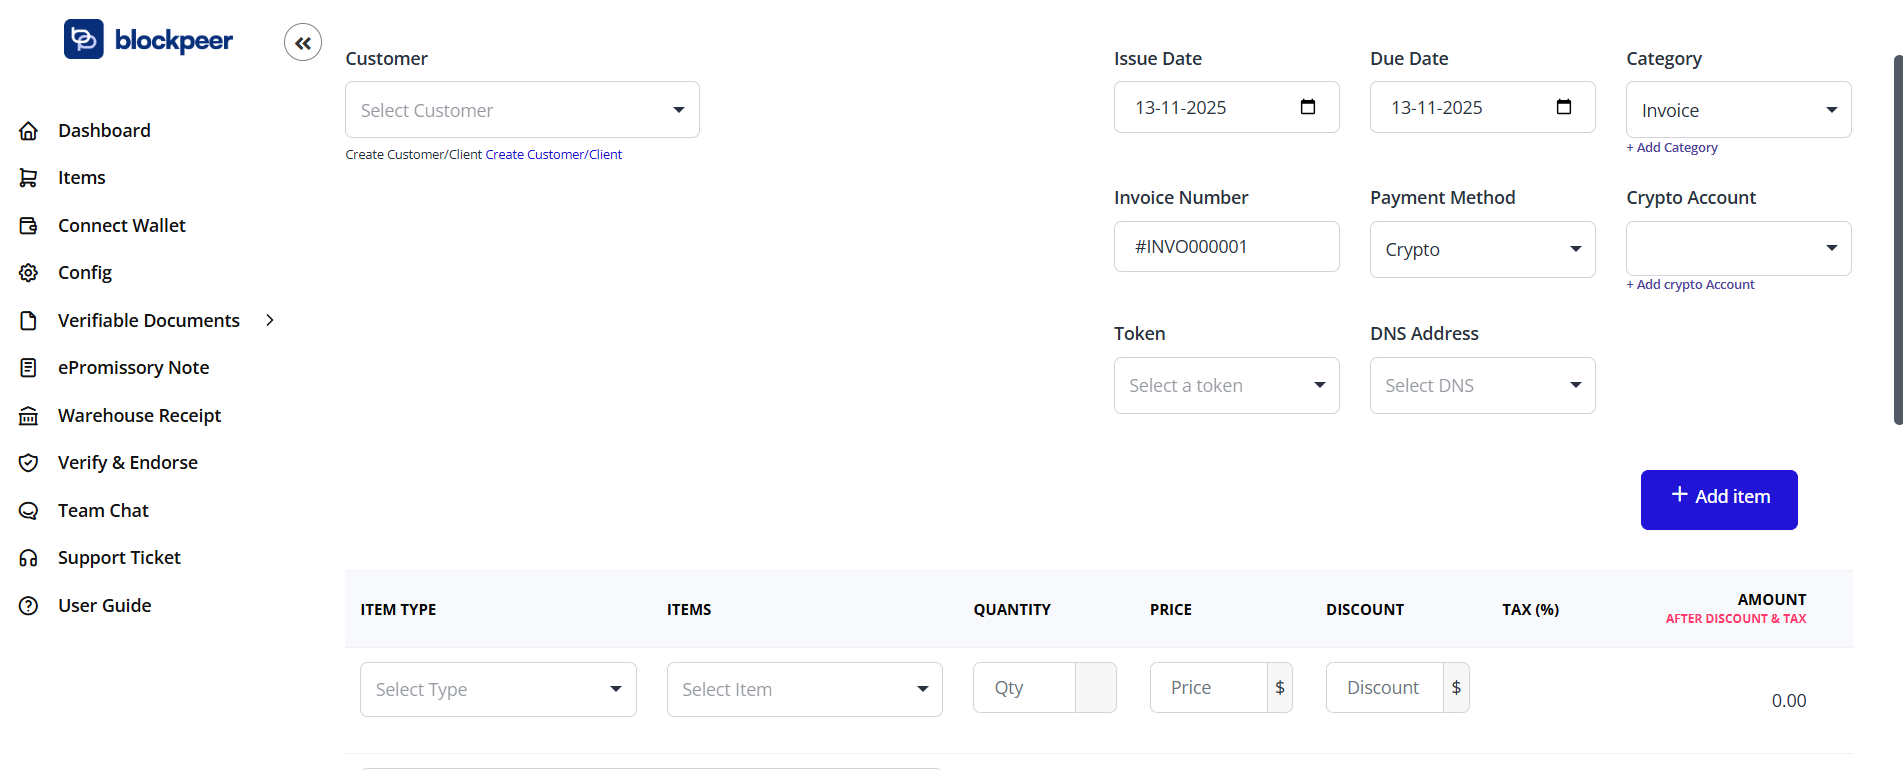
Step 3: Customer Information
Customer Field:
Select Customer Dropdown:
- Shows "Select Customer"
- Click to see customer list
- Select existing customer
- Or create new customer
Create New Customer:
If customer doesn't exist:
- Click Create Customer/Client link (below dropdown)
- Customer creation form appears
- Enter customer details:
- Customer Name: Full legal name
- Email: Customer email address
- Phone: Contact number
- Address: Physical/billing address
- Tax ID: Tax identification number (optional)
- Save customer
- Returns to invoice form with customer selected
Step 4: Invoice Dates
Issue Date:
- Date picker field
- Shows: "13-11-2025" (format: DD-MM-YYYY)
- Click to open calendar
- Select invoice creation date
- Usually today's date
Due Date:
- Date picker field
- Shows: "13-11-2025"
- Select payment deadline
- Must be same or after issue date
- Calculates based on payment terms
Date Calculation:
- System can auto-calculate due date
- Based on customer payment terms
- Can manually override
- Visual calendar picker
Step 5: Category and Invoice Number
Category:
- Dropdown field showing "Invoice"
- Select invoice category:
- Invoice (standard)
- Proforma Invoice
- Credit Note
- Debit Note
- Tax Invoice
- + Add Category link to create new categories
Invoice Number:
- Auto-generated field
- Shows: "#INVO000001"
- Format: #INVO + sequence number
- Increments automatically
- Can manually edit if needed
- Must be unique
Step 6: Payment Configuration
Payment Method:
- Dropdown: "Crypto"
- Currently only crypto payment supported
- Future: Fiat options
- Required field
Crypto Account:
- Dropdown: Select crypto account
- Shows available crypto wallets
- Links to your wallet addresses
- + Add crypto Account link
- Click to add new wallet address
Adding Crypto Account:
- Click + Add crypto Account
- Enter account details:
- Account Name
- Wallet Address
- Network
- Token Type
- Save account
- Appears in dropdown
Step 7: Token and DNS Selection
Token:
- Dropdown: "Select a token"
- Choose payment token:
- USDT (Tether)
- USDC (USD Coin)
- DAI
- Native tokens (ETH, XDC, MATIC)
- Token must exist on selected network
- Determines payment currency
DNS Address:
- Dropdown: "Select DNS"
- Shows your verified domains
- Required for TradeTrust verification
- Must select one of your configured domains
- Links invoice to your DNS record
Important: Both Token and DNS must be selected before adding items.
Step 8: Add Invoice Items
+ Add item Button:
- Located at bottom right
- Blue button
- Click to add line items
- Can add multiple items
Item Table Headers:
- ITEM TYPE: Product or Service
- ITEMS: Item name/description
- QUANTITY: Number of units
- PRICE: Unit price
- DISCOUNT: Discount amount or percentage
- TAX/VAT: Tax percentage
- AMOUNT: Calculated total
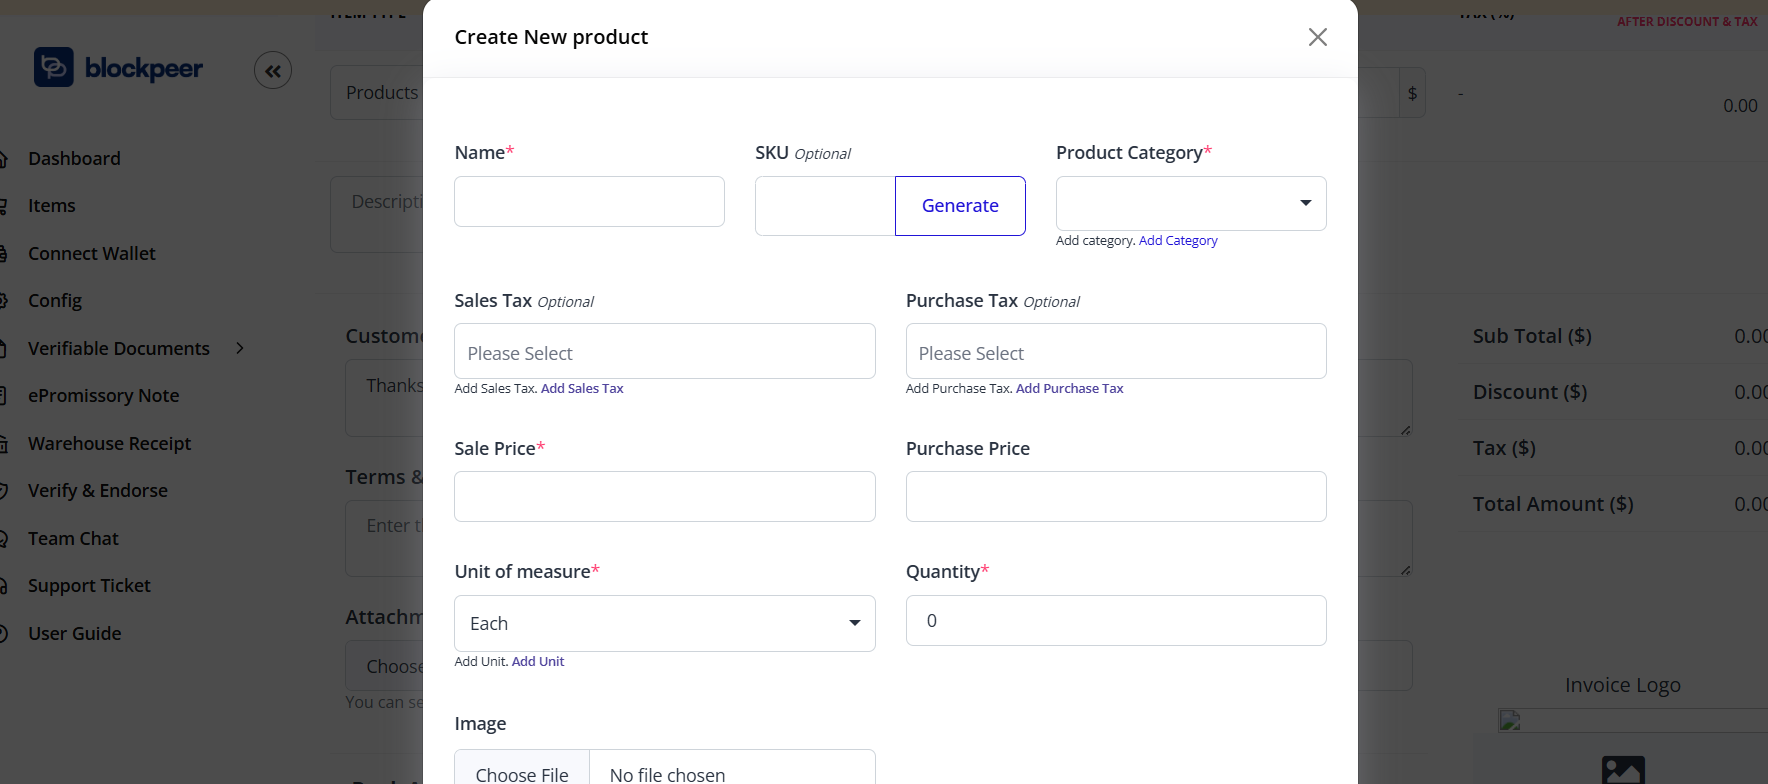
Adding Line Items
For Each Item:
- Click + Add item
- New row appears in table
Item Type:
- Dropdown selection
- Options:
- Product
- Service
- Categorizes the item
Items:
- Text field or dropdown
- Enter item name
- Or select from item catalog
- Description of goods/services
- Can be custom text
Quantity:
- Numeric input
- Number of units
- Decimals allowed
- Must be > 0
Price:
- Numeric input
- Price per unit
- In selected token
- Decimals allowed
Discount:
- Numeric input
- Can be:
- Percentage (e.g., 10%)
- Fixed amount (e.g., $100)
- Applied before tax
- Optional field
Tax/VAT:
- Numeric input
- Tax percentage
- Applied after discount
- Common values: 0%, 5%, 10%, 15%, 20%
- Varies by jurisdiction
Amount:
- Auto-calculated
- Formula: (Quantity × Price - Discount) × (1 + Tax%)
- Read-only field
- Updates automatically
Example Line Item:
- Item Type: Service
- Items: Web Development
- Quantity: 40
- Price: $150.00
- Discount: 5%
- Tax/VAT: 10%
- Amount: $6,270.00Calculation:
- Subtotal: 40 × $150 = $6,000
- After Discount: $6,000 - ($6,000 × 5%) = $5,700
- After Tax: $5,700 × 1.10 = $6,270
Multiple Line Items
Adding More Items:
- Click + Add item again
- New row appears below
- Fill in details
- Repeat for all items
- No limit on number of items
Managing Items:
Each row has actions:
- ✏️ Edit: Modify item details
- 🗑️ Delete: Remove line item
Invoice Totals
Automatic Calculation:
System calculates:
- Subtotal: Sum of all line items before discount and tax
- Total Discount: Sum of all discounts
- Total Tax: Sum of all taxes
- Grand Total: Final amount due
Display Location:
- Bottom-right of invoice
- Updates in real-time
- Shown in selected token
- Clear breakdown of totals
Step 9: Additional Information
Notes Section (Optional):
- Text area field
- Add invoice notes
- Payment instructions
- Terms and conditions
- Special instructions
- Visible to customer
Attachments (Optional):
- Upload supporting documents
- PDF, images, spreadsheets
- Purchase orders
- Contracts
- Supporting documentation
Step 10: Review Invoice
Before Saving:
Check all details:
- ✓ Customer information correct
- ✓ Dates are accurate
- ✓ Invoice number unique
- ✓ Payment method selected
- ✓ Token and DNS chosen
- ✓ All line items added
- ✓ Quantities and prices correct
- ✓ Discounts applied properly
- ✓ Tax rates accurate
- ✓ Total amount correct
- ✓ Notes and terms included
Step 11: Save or Issue
Action Buttons (bottom of form):
Save as Draft:
- Gray/white button
- Saves without issuing
- Can edit later
- Not on blockchain yet
- Status: Draft
Issue Invoice:
- Blue button
- Publishes to blockchain
- Sends to customer
- Cannot edit after issuing
- Requires blockchain transaction
Cancel:
- Link or button
- Discards invoice
- No changes saved
- Returns to invoice list
Issuing E-Invoice
Draft to Issued
When you click "Issue Invoice":
-
Wallet Confirmation
- Wallet popup appears
- Shows transaction details
- Gas fee displayed
- Review carefully
-
Approve Transaction
- Click "Confirm" in wallet
- Transaction submitted to blockchain
- "Pending" status shows
-
Blockchain Confirmation
- Wait for confirmation (15-60 seconds)
- Progress indicator shows
- Don't close page
-
Invoice Issued
- Success message appears
- Invoice status changes to "Issued"
- Blockchain transaction hash provided
- Customer notification sent (if configured)
What Happens After Issuance
On Blockchain:
- Invoice data stored permanently
- Unique token ID generated
- Ownership assigned to you
- Verifiable on blockchain explorer
- Immutable record created
Invoice Status:
- Changes from "Draft" to "Issued"
- Cannot be edited
- Can be transferred
- Can be viewed anytime
- Verifiable on TradeTrust
Customer Receives:
- Email notification (if configured)
- Link to view invoice
- Payment instructions
- Due date reminder
- Verification information
Viewing E-Invoice
Opening Invoice Details
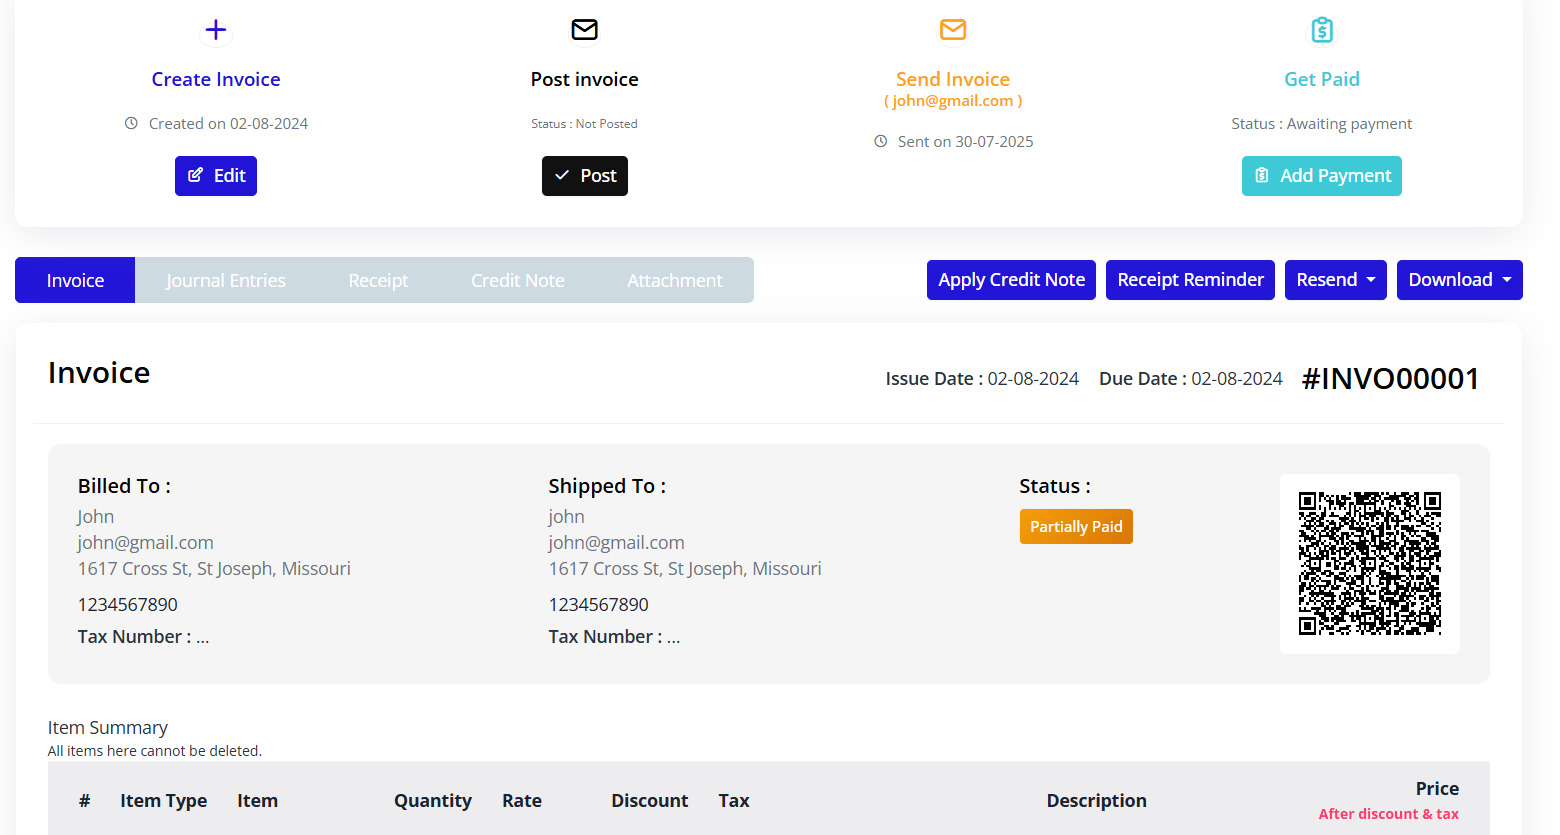
- From invoice list, click invoice number or View button
- Invoice detail page opens
- Complete invoice information displayed
Invoice Detail Sections
Header Information:
- Invoice number (#INVO00001)
- Status badge (Issued, Paid, etc.)
- Issue date
- Due date
- Customer name
Billing Details:
-
Bill To: Customer information
- Customer name
- Address
- Tax ID
- Contact details
-
Ship To: Customer information
- Customer name
- Address
- Tax ID
- Contact email
Invoice Items:
- Table of line items
- All item details
- Quantities and prices
- Tax breakdown
- Subtotals
Payment Information:
- Payment method: Crypto
- Token: USDT/USDC/etc.
- Crypto account address
- DNS domain
- Payment status
Totals:
- Subtotal
- Total discount
- Total tax
- Grand Total (highlighted)
- Amount paid
- Amount due
Blockchain Information:
- Transaction hash
- Block number
- Token registry address
- DNS record
- Verification link
Notes and Terms:
- Invoice notes
- Payment terms
- Additional information
- Attachments
Invoice Actions
Action Buttons:
Download:
- Download PDF version
- Print-ready format
- Includes QR code for verification
- Professional layout
Share:
- Generate shareable link
- Email to customer
- Share via messaging
- Copy link
Payment:
- Mark as paid
- Record payment
- Add payment details
- Update balance
Transfer:
- Transfer ownership
- For factoring/financing
- To another party
- Blockchain transaction required
Verify:
- Verify on TradeTrust
- Check blockchain status
- Confirm authenticity
- Generate verification report
Managing E-Invoices
Invoice Status Workflow
Invoice Status Workflow
Draft
  ↓
Issued
  ↓
Partially Paid (if partial payment)
  ↓
Paid
Or:
Draft
  ↓
Issued
  ↓
Overdue (if past due date)
  ↓
Paid
Or:
Draft
  ↓
Cancelled
Editing Invoices
Draft Invoices:
- Can be fully edited
- Click Edit button
- Modify any field
- Save changes
- Re-issue when ready
Issued Invoices:
- Cannot be edited
- Blockchain is immutable
- To correct: Create credit/debit note
- Or cancel and reissue
Payment Tracking
Recording Payments:
- Open invoice
- Click Record Payment button
- Enter payment details:
- Payment date
- Amount received
- Payment method
- Transaction reference
- Blockchain transaction hash (if crypto)
- Save payment
- Invoice status updates
Partial Payments:
- Record each payment separately
- Running balance maintained
- Status: "Partially Paid"
- Shows amount remaining
Full Payment:
- When total paid = invoice amount
- Status changes to "Paid"
- Due amount = $0.00
- Payment complete
Invoice Transfers
Why Transfer Invoices:
- Invoice factoring
- Supply chain finance
- Selling receivables
- Early payment discount
Transfer Process:
- Open issued invoice
- Click Transfer button
- Enter recipient information:
- Recipient wallet address
- Transfer reason
- Transfer amount (if partial)
- Approve blockchain transaction
- Wait for confirmation
- Ownership transferred
After Transfer:
- You no longer own invoice
- Recipient can claim payment
- Transfer recorded on blockchain
- Audit trail maintained
- Original issuer still visible
Cancelling Invoices
Cancel Draft:
- Open draft invoice
- Click Cancel or Delete
- Confirm cancellation
- Invoice removed
Cancel Issued Invoice:
- Cannot delete issued invoice
- Must create cancellation:
- Open issued invoice
- Click Cancel Invoice
- Provide reason
- Issue credit note
- Blockchain transaction required
- Original invoice marked "Cancelled"
- Credit note issued as offset
Crypto Payments
Accepting Cryptocurrency
Payment Flow:
-
Invoice Issued
- Customer receives invoice
- Payment address provided
- Amount in specified token
- QR code for easy payment
-
Customer Pays
- Sends crypto to payment address
- Exact amount in specified token
- From any compatible wallet
- Blockchain transaction created
-
Payment Detected
- System monitors blockchain
- Detects incoming transaction
- Verifies amount and token
- Auto-updates invoice status
-
Payment Confirmed
- After blockchain confirmations
- Invoice marked as paid
- Notification sent
- Receipt generated
Supported Tokens
Stablecoins:
- USDT (Tether): Pegged to USD
- USDC (USD Coin): Regulated stablecoin
- DAI: Decentralized stablecoin
- BUSD: Binance USD
Native Tokens:
- ETH: Ethereum
- XDC: XinFin
- MATIC: Polygon
- Other network native tokens
Token Selection:
- Choose stable token to avoid volatility
- Ensure customer has selected token
- Consider network fees
- Match to customer preference
Payment Address
Crypto Account:
- Your wallet address for receiving
- Displayed on invoice
- QR code generated
- Customer sends payment here
Best Practices:
- Use dedicated payment addresses
- Separate from operational wallet
- Monitor regularly
- Reconcile daily
Payment Verification
Blockchain Confirmation:
- Payments are on public blockchain
- Anyone can verify
- Check blockchain explorer
- Immutable proof of payment
Verification Steps:
- Copy transaction hash from payment
- Open blockchain explorer
- Search for transaction
- Verify:
- Amount matches invoice
- Token is correct
- Recipient address is yours
- Status is confirmed
TradeTrust Verification
What is TradeTrust Verification?
TradeTrust verification proves:
- Document is authentic
- Issued by stated company
- Not tampered with
- Legally valid
- Internationally recognized
Verifying on TradeTrust
Steps to Verify:
-
Download Invoice
- Click Download button
- Save .json or .tt file
- This is TradeTrust format
-
Visit TradeTrust.io
- Go to https://tradetrust.io
- Click "Verify Documents"
-
Upload Invoice
- Drag and drop invoice file
- Or click to browse
- Upload invoice
-
Verification Results
- Green checkmarks: All valid
- Document issued by: Your company
- DNS verified: Your domain
- Blockchain verified: Transaction confirmed
Verification Checks:
✅ Document Integrity
- Has document been tampered with?
- Content matches blockchain
✅ Issuer Identity
- Is issuer DNS verified?
- Domain matches token registry
✅ Document Status
- Is document valid?
- Not revoked or cancelled
Sharing Verification
For Customers:
- Send invoice file
- Provide TradeTrust link
- Customer verifies independently
- Builds trust
For Banks/Financiers:
- Required for trade finance
- Proves invoice authenticity
- Enables financing
- Accelerates approval
Invoice Templates
Creating Templates
For Recurring Invoices:
- Create first invoice completely
- Click Save as Template
- Name the template
- Template saved with:
- Customer information
- Line items
- Payment terms
- Tax rates
- Notes
Using Templates:
- Click + Create E-Invoice
- Select From Template
- Choose saved template
- Invoice pre-filled
- Modify as needed
- Issue invoice
Template Use Cases
Monthly Services:
- Subscription billing
- Recurring consulting
- Maintenance contracts
- Support agreements
Standard Products:
- Common product sales
- Fixed price items
- Regular shipments
- Repeat orders
Reporting and Analytics
Invoice Reports
Available Reports:
Revenue Report:
- Total invoiced amount
- Period comparison
- By customer
- By product/service
Outstanding Report:
- Unpaid invoices
- Aging analysis
- Overdue amounts
- Collection priority
Payment Report:
- Payments received
- By period
- By customer
- By token/currency
Tax Report:
- Tax collected
- By jurisdiction
- Tax liability
- Filing ready
Exporting Data
Export Options:
- CSV: Spreadsheet format
- PDF: Printable reports
- JSON: Data integration
- Excel: Advanced analysis
Export Process:
- Apply desired filters
- Click Export button
- Select format
- Download file
- Use in accounting software
Integration
Accounting Software
Supported Integrations:
- QuickBooks
- Xero
- SAP
- Oracle
- Custom APIs
Integration Benefits:
- Auto-sync invoices
- Real-time updates
- Accounting reconciliation
- Financial reporting
ERP Systems
Enterprise Resource Planning:
- SAP integration
- Oracle ERP
- Microsoft Dynamics
- Custom enterprise systems
Sync Capabilities:
- Invoice data
- Customer information
- Product catalog
- Payment status
API Access
For Developers:
Blockpeer provides APIs to:
- Create invoices programmatically
- Query invoice status
- Receive payment webhooks
- Automate workflows
API Documentation:
- REST API endpoints
- Authentication methods
- Request/response formats
- Code examples
Best Practices
Invoice Creation
Before Issuing:
- Double-check all amounts
- Verify customer details
- Confirm token and DNS
- Review payment terms
- Add clear descriptions
- Include all necessary notes
Naming Conventions:
- Consistent invoice numbering
- Clear item descriptions
- Standardized categories
- Organized documentation
Payment Management
Timely Recording:
- Record payments immediately
- Maintain accurate balances
- Reconcile daily
- Follow up on overdue
Communication:
- Send payment reminders
- Confirm payment receipt
- Provide clear instructions
- Responsive to inquiries
Security
Access Control:
- Limit who can create invoices
- Separate authorization levels
- Audit invoice creation
- Monitor unusual activity
Wallet Security:
- Secure wallet private keys
- Use hardware wallet for high values
- Multi-signature for large invoices
- Regular security audits
Troubleshooting
Q: Invoice issuance transaction failed A: Check wallet has sufficient gas tokens. Increase gas limit. Try again with higher gas price. Verify network connectivity.
Q: Customer can't verify invoice on TradeTrust A: Ensure DNS is properly configured. Check file format is .tt or .json. Try re-downloading invoice. Verify on TradeTrust.io directly.
Q: Payment received but invoice not updated A: Blockchain confirmations may be pending. Check transaction on blockchain explorer. May take 5-10 minutes. Manually record payment if needed.
Q: Can't select DNS in invoice creation A: Complete DNS configuration first. Verify DNS in Config module. Ensure domain record is added. Refresh page.
Q: Invoice shows wrong amount A: Check item quantities and prices. Verify tax calculations. Confirm discount applied correctly. For issued invoices, must cancel and reissue.
Q: Want to edit issued invoice A: Cannot edit issued invoices (blockchain is immutable). Create credit/debit note for corrections. Or cancel and create new invoice.
Q: Transfer invoice failed A: Verify recipient wallet address. Ensure sufficient gas. Check invoice is in "Issued" status. Cannot transfer draft or paid invoices.
Frequently Asked Questions
Q: How much does it cost to issue an invoice? A: Only blockchain gas fees apply. Typically $0.10-$2 per invoice depending on network. No monthly fees or subscription costs.
Q: Can customers pay with regular bank transfer? A: Currently only crypto payments supported. Future versions will support fiat payments. For now, use traditional invoicing for fiat.
Q: Do customers need a wallet to receive invoice? A: No. They can view invoice without wallet. Wallet only needed if they want to verify on TradeTrust or pay in crypto.
Q: Is eInvoice legally valid? A: Yes. Electronic invoices are legally recognized in most jurisdictions. TradeTrust compliance ensures international validity.
Q: Can I use eInvoice for international trade? A: Yes! This is a primary use case. Cross-border crypto payments and TradeTrust verification make international trade easier.
Q: What if customer disputes invoice? A: Blockchain provides immutable proof. Show transaction hash and verification. Can issue credit note if legitimate dispute.
Q: How long are invoices stored? A: Forever. Blockchain storage is permanent. You can access invoices anytime as long as you have wallet access.
Q: Can I bulk import invoices? A: Not currently in UI. Contact support for API access to bulk import historical invoices.
Summary
E-Invoice revolutionizes digital invoicing with:
- ✅ Blockchain Security: Immutable, tamper-proof invoices
- ✅ Crypto Payments: Accept cryptocurrency directly
- ✅ Global Verification: TradeTrust compliance
- ✅ Transferability: Enable trade financing
- ✅ Legal Validity: Internationally recognized
- ✅ Cost Effective: Low transaction fees
- ✅ Instant Settlement: Real-time payment verification
Start Using E-Invoice Today:
- Complete configuration
- Create your first invoice
- Issue to blockchain
- Receive crypto payment
- Verify on TradeTrust
- Transform your business
Next: Learn about ePromissory Note for trade credit instruments