Configuration
Before you can create electronic Bills of Lading, you must complete the configuration process. This involves connecting your wallet, creating a token registry, and setting up DNS records.
1. Connect Wallet
The first step is to connect your blockchain wallet to easyBL.
Why Connect a Wallet?
Your wallet is required to:
- Sign and issue electronic Bills of Lading
- Transfer eBLs securely on the blockchain
- Verify document authenticity
- Maintain cryptographic proof of ownership
Steps to Connect Wallet
- Click on Connect Wallet from the left sidebar
- Select your preferred wallet type:
- MetaMask
- WalletConnect
- Other Web3 wallets
- Follow the wallet connection prompts
- Approve the connection request in your wallet
- Once connected, your wallet address will be displayed

💡 Tip: Make sure you're connected to the correct network (Ethereum, Polygon, or other supported chains).
2. Create Token Registry
After connecting your wallet, you need to create a token registry. The token registry is a smart contract that manages your eBLs on the blockchain.
What is a Token Registry?
A token registry is:
- A blockchain-based smart contract
- The issuer of your electronic Bills of Lading
- The authority that validates your eBLs
- Required for MLETR compliance
Steps to Create Token Registry
- Navigate to Config from the sidebar
- Click on Create Token Registry button
- Review the gas fees
- Click Create and confirm the transaction in your wallet
- Wait for the blockchain confirmation (may take 1-2 minutes)

⚠️ Important: Save your token registry address. You'll need it for DNS configuration.
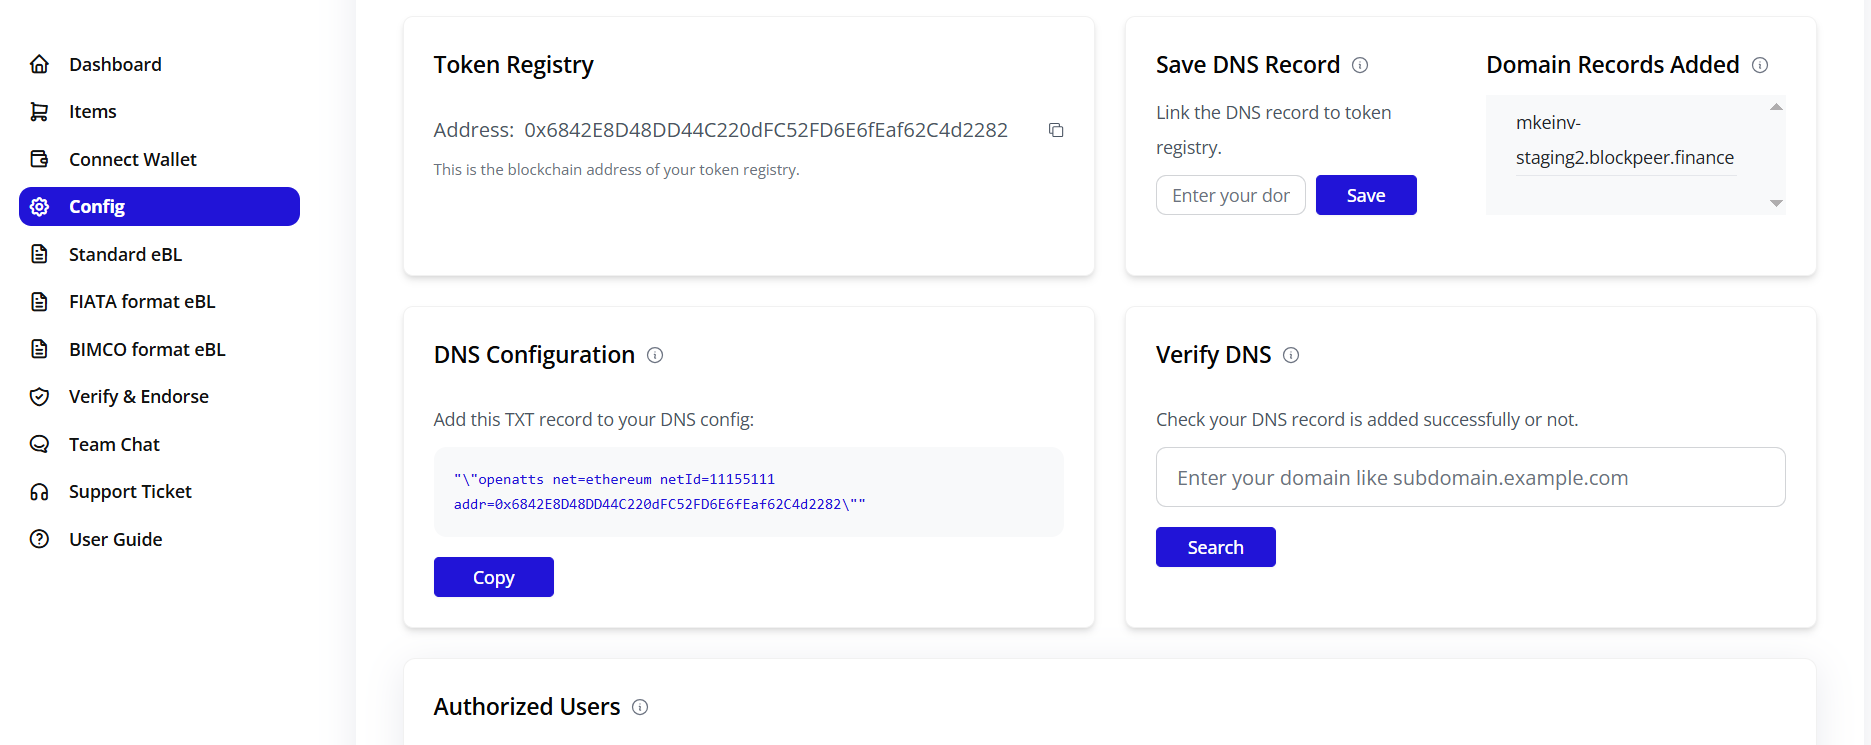
3. Configure DNS Records
After creating your token registry, you'll receive DNS records that must be added to your domain.
Why DNS Configuration?
DNS records:
- Link your domain to your token registry
- Prove ownership of your company domain
- Enable verification of your eBLs by third parties
- Required for TradeTrust interoperability
DNS Record Information
After creating your token registry, you'll see DNS record details like:
Type: TXT Name: _tradetrust-dns.yourdomain.com Value: tradetrust-dns-hash=0x1234567890abcdef...
Steps to Add DNS Records
- Copy the DNS record details provided by easyBL
- Log in to your domain registrar or DNS provider:
- GoDaddy
- Namecheap
- Cloudflare
- AWS Route 53
- etc.
- Navigate to DNS management section
- Add a new TXT record with the provided details:
- Type: TXT
- Name/Host:
_tradetrust-dns(or full subdomain) - Value: The hash value provided
- TTL: 3600 (or default)
- Save the DNS record
- Wait for DNS propagation (can take 15 minutes to 48 hours)

Verify DNS Configuration
- Return to the Config page in easyBL
- Click Verify DNS button
- The system will check if your DNS records are properly configured
- Once verified, you'll see a success message
💡 Tip: Use online DNS lookup tools to check if your DNS records have propagated.
4. Add Domain
After your DNS records are verified, you need to add your domain to easyBL.
Steps to Add Domain
- In the Config page, locate the Add Domain section
- Enter your domain name (e.g.,
yourdomain.com) - Click Add Domain
- The system will verify that:
- DNS records are properly configured
- Domain ownership is confirmed
- Token registry is linked correctly
- Once verified, your domain will be added successfully
5. Configuration Complete
Once you've completed all the above steps, your configuration is complete! You'll see:
- ✅ Wallet connected
- ✅ Token registry created
- ✅ DNS records configured
- ✅ Domain added
You can now start creating electronic Bills of Lading.
✅ Next: Proceed to create your first Standard eBL, FIATA eBL, or BIMCO eBL.