eSignature Management
Overview
The Signet module enables you to create, send, track, and manage electronic signatures that meet international standards (eIDAS, ESIGN, UETA). This comprehensive guide covers the complete eSignature workflow from document creation to completion.
Creating an eSignature Request
Step 1: Choose Signature Method

- From the sidebar, click Sign
- You'll see two options:
Send for Signatures
- Use when: Multiple parties need to sign
- Features: Party management, signing order, notifications
- Workflow: Upload → Configure → Send → Track
Sign Yourself
- Use when: Only you need to sign
- Features: Immediate signing, quick process
- Workflow: Upload → Sign → Download
Step 2: Enter Document Title
After selecting your method, a dialog appears:
Create eSignature Form:
Title* (Required)
- Enter a clear, descriptive title
- Examples: "Service Agreement - ABC Corp", "NDA - John Smith", "Employment Contract - Jane Doe"
- Title appears in notifications and document lists
- Use consistent naming for easy tracking
Click Create to proceed to the document editor
Step 3: Upload Document
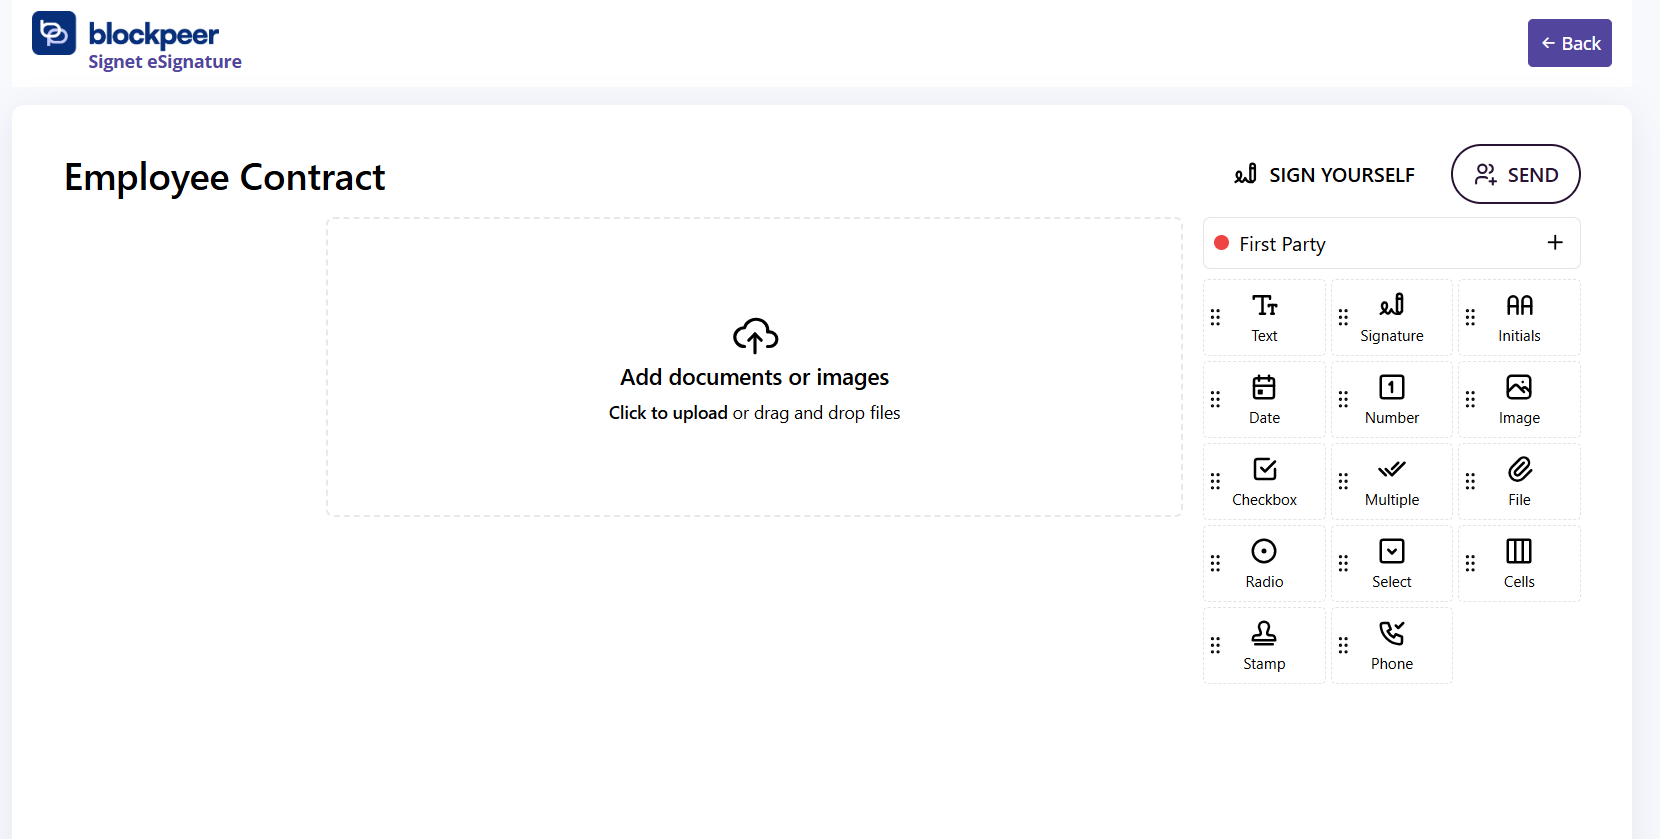
Once created, you'll see the eSignature interface:
Left Panel: Document Upload Area
- Central upload zone with cloud icon
- Text: "Add documents or images"
- Click to upload or drag and drop files
Right Panel: Configuration Options
- Party management section
- Field type selector
- Signature configuration tools
Top Action Buttons:
- SIGN YOURSELF: Complete your own signature (hidden when sending to others)
- SEND: Distribute document to parties for signatures
Supported File Formats:
- PDF (recommended - best compatibility)
- Microsoft Word (.doc, .docx)
- Images (.jpg, .png, .gif)
- Text files (.txt)
- Other document formats
Upload Methods:
-
Click to Upload
- Click the upload area
- Browse your computer
- Select document
- File uploads automatically
-
Drag and Drop
- Locate file on your computer
- Drag file to upload area
- Drop when area highlights
- Upload begins immediately
Upload Tips:
- Ensure document is final version
- Maximum file size: 25MB
- PDF provides best results
- Check document orientation
- Verify all pages included
Step 4: Configure Parties
Adding Signers:
The right panel shows First Party by default (you):
To Add More Parties:
-
Click the + (Plus) icon next to "First Party"
-
Enter party details:
- Full Name: Legal name of signer
- Email Address: Valid email for notifications
- Role/Title: Optional (e.g., "Client", "Manager", "Director")
- Company: Optional organization name
-
Click Add Party
-
Party appears in the list with a colored indicator
Managing Multiple Parties:
Each party gets:
- Unique color identifier (red dot, blue dot, etc.)
- Assigned email address
- Individual signature fields
- Separate completion tracking
Party Status Indicators:
- 🔴 Red: First party (document creator)
- 🔵 Blue: Additional parties
- 🟢 Green: Completed signature
- 🟡 Yellow: Pending signature
Removing Parties:
- Click the X icon next to party name
- Confirm removal
- Associated fields are also removed
Step 5: Add Signature and Form Fields
Available Field Types:
Document Fields:
- Text (Tr): Text input fields for names, titles, addresses
- Signature (✍️): Digital signature capture
- Initials (AA): Initial fields for acknowledgments
- Date (📅): Date fields (auto or manual)
- Number (1⃣): Numeric input
- Image (🖼️): Upload images or logos
Selection Fields:
- Checkbox (☑️): Multiple selection options
- Multiple (✓): Multiple choice selections
- Radio (◯): Single selection option
- Select (▼): Dropdown menu
Special Fields:
- Cells (⊞): Table cells for structured data
- Stamp (🔖): Official stamps or seals
- File (📎): File upload fields
- Phone (☎): Phone number input
Adding Fields to Document:
- Select Field Type from the right panel
- Drag Field onto the document
- Position the field where needed
- Resize by dragging corners
- Assign to Party (field takes party's color)
- Configure Properties:
- Label/placeholder text
- Required vs. optional
- Default values
- Validation rules
Field Placement Best Practices:
Signature Fields:
Signed by: ___________________________
               [SIGNATURE FIELD]

Name: ________________________________
         [TEXT FIELD]

Date: ________________________________
         [DATE FIELD]
For Multi-Page Documents:
- Add signature at the end
- Include initials at bottom of each page
- Place date fields near signatures
- Group related fields together
Field Configuration Options:
For each field, you can set:
- Field Label: Descriptive name
- Tooltip: Help text for signer
- Required: Must be completed to finish
- Default Value: Pre-filled content
- Validation: Format requirements (email, phone, etc.)
- Character Limit: Maximum input length
Step 6: Configure Signing Settings (Send for Signatures Only)
Signing Order:
Parallel Signing (Default)
- All parties receive document simultaneously
- Can sign in any order
- Faster completion
- Best for: Simple agreements, equal parties
Sequential Signing
- Parties sign in specific order
- Next party notified after previous signs
- Enforces signing hierarchy
- Best for: Approval chains, hierarchical agreements
Setting Sequential Order:
- Enable sequential signing
- Arrange parties in desired order
- Drag to reorder if needed
- First party must sign before second, etc.
Additional Settings:
Deadline
- Set expiration date
- Document becomes invalid after deadline
- Signers notified of approaching deadline
- Optional but recommended
Message to Signers
- Add personal message
- Explain document purpose
- Include any instructions
- Provide context
Notification Options
- Immediate email notification
- Reminder schedule
- Completion notifications
- Custom notification text
Security Options
- Require authentication
- Password protection
- Access restrictions
- Download permissions
Step 7: Review and Send/Sign
Before Sending:
✓ Document Review Checklist:
- Document uploaded correctly
- All pages visible and readable
- Content is final version
- No editing needed
✓ Party Verification:
- All parties added
- Email addresses correct
- Names spelled correctly
- Roles assigned properly
✓ Field Placement:
- All signature fields placed
- Fields don't overlap text
- Required fields marked
- Labels are clear
✓ Settings Confirmation:
- Signing order set (if needed)
- Deadline configured
- Message reviewed
- Notifications enabled
To Send for Signatures:
- Click SEND button (top right)
- Final confirmation dialog appears
- Review summary of:
- Number of parties
- Required fields
- Deadline
- Message
- Click Confirm and Send
What Happens After Sending:
- Document status changes to "Pending"
- All parties receive email notification
- Email contains:
- Document title
- Sender information
- Secure signing link
- Instructions
- Deadline (if set)
- Document appears in Pending section
- Tracking begins automatically
To Sign Yourself:
- Complete all your assigned fields
- Add your signature in signature fields
- Fill any required text fields
- Review the document
- Click Complete or Submit
- Document status changes to "Completed"
- Signed PDF is generated
- Available for download
Managing eSignature Documents
Viewing Document List
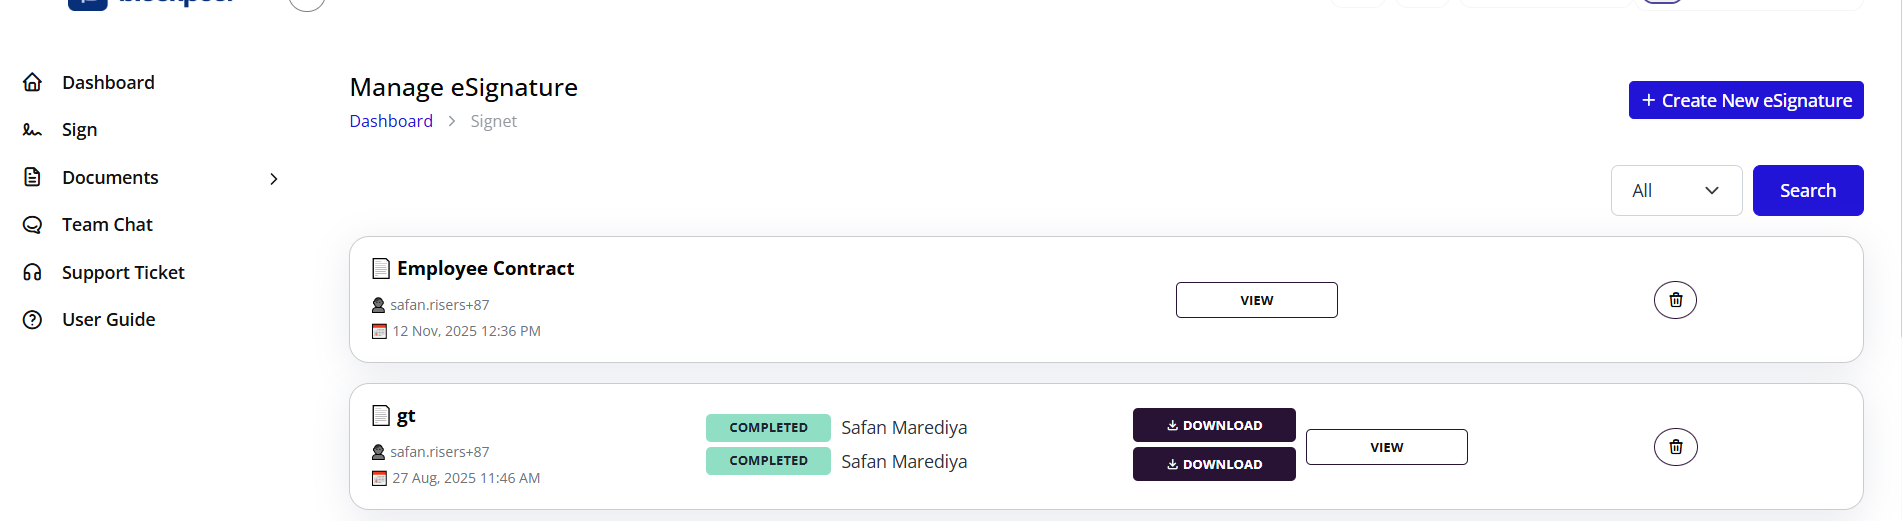
Access your documents from the Documents menu:
Filter Options:
-
All
- Shows every signature request
- Regardless of status
- Complete history
-
Pending
- Awaiting signatures
- Sent but not completed
- Active signature requests
-
Scheduled
- Future-dated signature requests
- Will send automatically
- Can edit before send date
-
Completed
- All signatures collected
- Legally binding
- Ready for download
Document List Information:
Each entry shows:
Document Icon (📄)
- Visual identifier
- Document type indication
Title
- Document name as entered
- Clickable to view details
Creator (👤)
- Who initiated the request
- Username or email
Created Date (📅)
- Timestamp of creation
- Date and time format
Status Badges
- COMPLETED: All signatures done (green)
- PENDING: Awaiting signatures (yellow)
- DRAFT: Being prepared (gray)
Signer Information
- Names of all parties
- Completion status per party
- Visual indicators
Action Buttons:
DOWNLOAD (⬇️)
- Download signed PDF
- Available for completed documents
- Includes audit trail option
- Multiple format options
VIEW
- Open document details
- See signature progress
- Access analytics
- View audit trail
Delete (🗑️)
- Remove document
- Available for drafts and cancelled only
- Cannot delete completed (archived instead)
- Confirmation required
Search and Filter
Search Functionality:
Located in the top-right corner:
Dropdown Filter: "All"
- All documents
- Pending only
- Scheduled only
- Completed only
- Drafts only
Search Button
- Click to execute search
- Searches through:
- Document titles
- Party names
- Creator names
- Document content (if indexed)
Search Tips:
- Use specific keywords
- Enter partial names
- Search by date range
- Filter first, then search for better results
Advanced Filtering:
Combine filters for precise results:
- Status + Date range
- Creator + Status
- Party name + Status
- Title keyword + Date
Viewing Signature Analytics
Document Analytics Dashboard

When you click VIEW on a document, you see detailed analytics:
Left Panel: Document Preview
Shows the actual document with:
- Full PDF preview
- All pages visible
- Signature field positions
- Completed signatures highlighted
- Logo and branding
- Contract details (#CON00002)
- Contract type and value
- Start and end dates
- Document content
Right Panel: Party Analytics
For Each Party:
Second Party Example:
- 🔴 Colored Indicator: Party identifier
- Email: safan.risers@gmail.com
- Timestamp: Aug 27, 2025 01:08 PM
- Status: Completed (green badge)
- Signature Preview: Shows captured signature (SIGNATURE FIELD 2)
- Download Document: Green button to download
First Party Example:
- 🔵 Colored Indicator: Different color for first party
- Email: safan1990@gmail.com
- Timestamp: Aug 27, 2025 01:09 PM
- Status: Completed (green badge)
- Signature Preview: Shows captured signature (SIGNATURE FIELD 1)
Analytics Information:
Viewing Activity:
- When document was opened
- How many times viewed
- Time spent on document
- Device used (desktop/mobile)
Signing Activity:
- When signature was completed
- IP address of signer
- Location data
- Authentication method used
Signature Validation:
- Signature image
- Timestamp
- Signer identification
- Field completion status
Understanding Status Flow
Document Lifecycle:
DRAFT
  ↓
SENT (Pending)
  ↓
VIEWED (by parties)
  ↓
PARTIALLY SIGNED (some signatures complete)
  ↓
COMPLETED (all signatures done)
  ↓
ARCHIVED (for long-term storage)
Party Status:
For each signer:
- Invited: Notification sent, not opened
- Viewed: Opened document, not signed
- In Progress: Started signing, not finished
- Completed: Signature submitted
- Declined: Refused to sign
- Expired: Past deadline without signing
Downloading Documents
Download Options
From Document List:
- Click DOWNLOAD button
- File downloads immediately
- Named with document title and ID
- PDF format
From Analytics View:
- Click Download Document (green button)
- Party-specific download
- Includes that party's signature
- Can download from each party's section
Download Formats:
-
Standard PDF
- Signed document only
- Clean, professional appearance
- Suitable for sharing
-
PDF with Audit Trail
- Document plus complete signing history
- All timestamps and actions
- Legal verification included
- Court-admissible evidence
-
Original + Certificates
- Original document
- Digital signing certificates
- Verification documents
- Complete package
What's Included in Downloaded Document:
- Complete signed document
- All signatures embedded
- Timestamp for each signature
- Digital signature certificates
- Tamper-evident seal
- Unique document ID
- Blockpeer branding (optional)
Storage and Archiving
System Storage:
- All documents stored indefinitely
- Encrypted at rest
- Redundant backups
- Always accessible
Personal Archiving Recommendations:
- Download important documents immediately
- Store in secure location
- Maintain organized folder structure
- Keep audit trail versions
- Back up to multiple locations
Signer Experience
What Signers See
When you send a document, signers receive:
Email Notification:
- Subject: "You have a document to sign from [Your Name]"
- Document title
- Your message (if included)
- Secure signing link
- Deadline (if set)
- Instructions
Signing Portal:
Signers click the link and see:
- Document preview
- Their assigned fields highlighted
- Clear signing instructions
- Progress indicator
- Help/support option
Signing Process for Recipients:
-
Open Email
- Click secure link
- No login required (unless configured)
- Mobile-friendly interface
-
Review Document
- Read entire document
- Scroll through all pages
- Download copy (if allowed)
- Ask questions (if enabled)
-
Complete Required Fields
- Fields highlighted in their color
- Must complete all required fields
- Optional fields can be skipped
- Validation errors shown
-
Add Signature
- Draw signature with mouse/finger
- Type name (converted to signature)
- Upload signature image
- Preview before confirming
-
Submit
- Click "Submit" or "Complete"
- Confirmation message appears
- Receive confirmation email
- Download copy available
Mobile Signing:
Signers can sign on mobile devices:
- Responsive design
- Touch-friendly signature capture
- Easy field navigation
- Same security standards
- Equal legal validity
Notifications and Reminders
Automatic Notifications
For Document Creator:
You receive emails when:
- Document is viewed by a party
- Party completes their signature
- All parties have signed (completion)
- Document is declined
- Document expires without completion
- Error occurs during signing
For Signers:
They receive emails for:
- Initial signing request
- Reminder notifications (customizable)
- Approaching deadline warning
- Their turn (in sequential signing)
- Document completion (when all sign)
Manual Reminders
Sending Reminders:
- Open the pending document
- View party list
- Identify pending signers
- Click Send Reminder
- Customize message (optional)
- Send to specific party or all pending
Reminder Best Practices:
- Wait 2-3 days before first reminder
- Be polite and professional
- Include context and importance
- Mention deadline if applicable
- Limit to 2-3 reminders maximum
Handling Common Scenarios
Signer Doesn't Receive Email
Troubleshooting Steps:
-
Check Spam/Junk Folder
- Most common issue
- Whitelist blockpeer.com domain
- Mark as "Not Spam"
-
Verify Email Address
- Open document
- Check party email spelling
- Correct if wrong
- Resend notification
-
Resend Notification
- Click Resend button
- Generates new email
- Creates new signing link
-
Use Alternative Email
- Remove incorrect party
- Add with correct email
- Configure fields again
Signer Declines to Sign
When a party declines:
- You receive immediate notification
- Document status shows "Declined"
- Reason shown (if provided)
- Other signatures become invalid
Next Steps:
- Contact signer to understand concerns
- Address issues if possible
- Modify document if needed
- Cancel and create new version
- Send revised document
Need to Cancel Signature Request
Cancelling a Pending Document:
- Open the document
- Click Cancel Request button
- Provide reason (optional)
- Confirm cancellation
- All parties notified
- Document moved to cancelled status
When to Cancel:
- Error in document content
- Wrong parties added
- Terms need to change
- Business requirement changed
- Deadline won't be met
After Cancellation:
- Document cannot be reopened
- Create new version instead
- Previous data not lost (archived)
- Audit trail maintained
Deadline Approaching
Monitoring Deadlines:
System automatically:
- Sends warnings 7 days before
- Reminds again 3 days before
- Final reminder 1 day before
- Expires document at deadline
Extending Deadlines:
- Open document
- Click Extend Deadline
- Select new date
- Parties notified of extension
- Document remains active
Document Errors After Sending
If you notice an error:
Option 1: Wait for Completion, Then Revise
- Let current signing complete
- Create corrected version
- Reference original in new document
- Send as amendment or replacement
Option 2: Cancel and Resend
- Cancel immediately
- Create corrected version
- Explain the correction to parties
- Resend with apology for inconvenience
Prevention:
- Always preview before sending
- Use review workflow
- Get approval from legal/manager
- Test with internal signers first
Best Practices
Document Preparation
Before Uploading:
- Remove all editing restrictions
- Ensure PDF is not password-protected
- Check that all pages are included
- Verify content is final
- Remove any hidden comments or markup
Formatting Tips:
- Use standard page sizes (A4, Letter)
- Ensure adequate margins
- Use clear, readable fonts
- Avoid watermarks in signature areas
- Keep file size reasonable (under 25MB)
Party Management
Contact Information:
- Always verify email addresses
- Use professional email addresses when possible
- Include full legal names
- Add titles for clarity
- Double-check spelling
Communication:
- Add meaningful message to signers
- Explain document purpose
- Include context
- Provide contact information for questions
- Set realistic deadlines
Signature Field Strategy
Placement:
- Signature at document end (traditional)
- Date field next to each signature
- Initials at bottom of key pages
- Text fields for typed names
- Clear labels for each field
Required vs. Optional:
- Mark essential fields as required
- Use optional sparingly
- Required fields show asterisk (*)
- Signers can't submit until required fields complete
Field Naming:
- Use descriptive labels
- "Client Signature" not just "Signature"
- "Company Representative" not "Person 2"
- Include date purpose: "Signature Date" vs "Effective Date"
Security Considerations
Document Sensitivity:
- Use authentication for confidential documents
- Enable password protection if needed
- Restrict download permissions
- Limit forwarding capabilities
Compliance:
- Verify document meets legal requirements
- Ensure parties have authority to sign
- Keep complete audit trails
- Archive properly for required retention periods
Workflow Optimization
Templates and Standardization:
- Create reusable signature field layouts
- Save common party configurations
- Use consistent naming conventions
- Standardize messages and instructions
Batch Processing:
- Group similar documents
- Send multiple documents efficiently
- Use consistent deadlines
- Monitor all together
Integration:
- Link to contract management
- Connect with document systems
- Sync with CRM platforms
- Automate notifications
Troubleshooting
Q: Signature fields aren't showing on mobile A: Ensure document uploaded correctly. Test on another device. Signature fields may need resizing for mobile visibility.
Q: Can I see who viewed the document but didn't sign? A: Yes, check the analytics section. It shows viewing activity with timestamps for each party.
Q: Signer says signature field won't accept their signature A: Try different signature method (draw vs. type). Clear browser cache. Try different browser or device.
Q: Download button is missing A: Download is only available for completed documents. Drafts and pending documents can't be downloaded until all signatures are collected.
Q: How do I handle a signer who lost access to their email? A: Cancel the request, add the party with their new email, and resend the document.
Q: Can I edit fields after sending? A: No, fields are locked once sent. You must cancel and create a new signature request with correct fields.
Q: The document preview shows wrong pages A: Re-upload the document. Ensure original file isn't corrupted. Try converting to PDF before uploading.
Q: How long does the signing link remain valid? A: Links remain valid until the document deadline (if set) or indefinitely if no deadline is configured. Links cannot be reused after signing.
Advanced Features
Audit Trail Details
Every document includes comprehensive audit trail:
Recorded Events:
- Document creation
- Parties added
- Fields configured
- Document sent
- Email delivered
- Document viewed
- Fields completed
- Signature captured
- Document completed
- Downloads
For Each Event:
- Exact timestamp
- User identification
- IP address
- Location (if available)
- Device information
- Action performed
Certificate of Completion
Completed documents include digital certificate:
Certificate Contains:
- Unique document ID
- All signer names
- Signature timestamps
- Digital signatures
- Verification hash
- Standards compliance (eIDAS, ESIGN, UETA)
- Issuer information (Blockpeer)
- Validity statement
Sequential Approval Workflows
For complex approval chains:
Example Workflow:
- Department Manager reviews and signs
- Finance Director reviews and signs
- Legal Counsel reviews and signs
- CEO gives final approval and signs
- Client receives and signs
Configuration:
- Set exact order
- Each party waits for previous
- Automatic notifications at each step
- Option to skip if needed
- Delegations possible
Bulk Operations
Coming Soon:
- Send same document to multiple recipients
- Template-based bulk signing
- CSV import for party lists
- Automated document generation
- Batch status tracking
Summary
Blockpeer Signet provides a complete eSignature solution:
✓ Compliant: Meets eIDAS, ESIGN, UETA standards ✓ **